SailPoint Add-On to Replace the Use of RFC_READ_TABLE
SailPoint's ABAP Integration is designed to replace the functionality of SAP's RFC_READ_TABLE to securely access the information in the SAP system required for deeper governance.
This integration needs to be deployed on the SAP system for querying the tables. For the deployment process follow these links in order:
- Prerequisites
- Installation of SAILPOIN Add-On
- Configuring SailPoint's Function Module
- Configuration Table For SAP HR/HCM
- Importing Support Packages for Add-On SAILPOIN
- New Package Download Matrix
- Uninstall SAILPOIN Add-On
Prerequisites
To install the Add-On and support packages using the SAINT transaction code (t-code), follow these steps:
- Log into client 000.
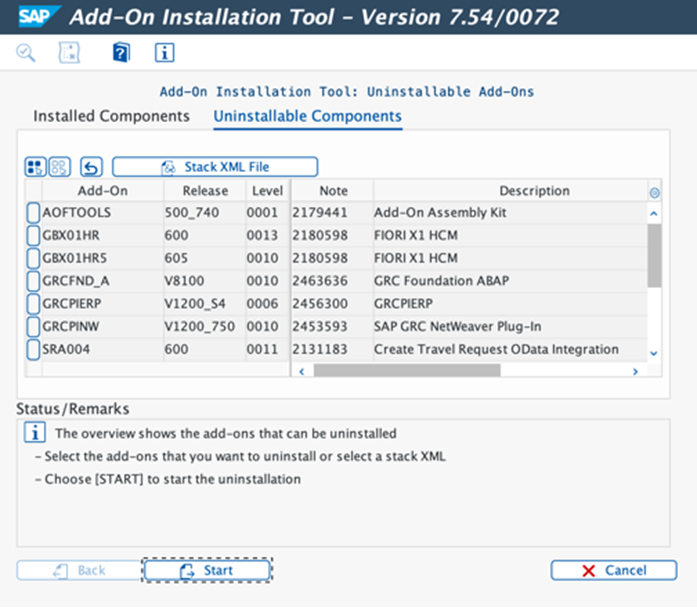
- Ensure that you have installed at least SPAM/SAINT version 0053 to be able to uninstall Add-Ons using the SAINT t-code.
-
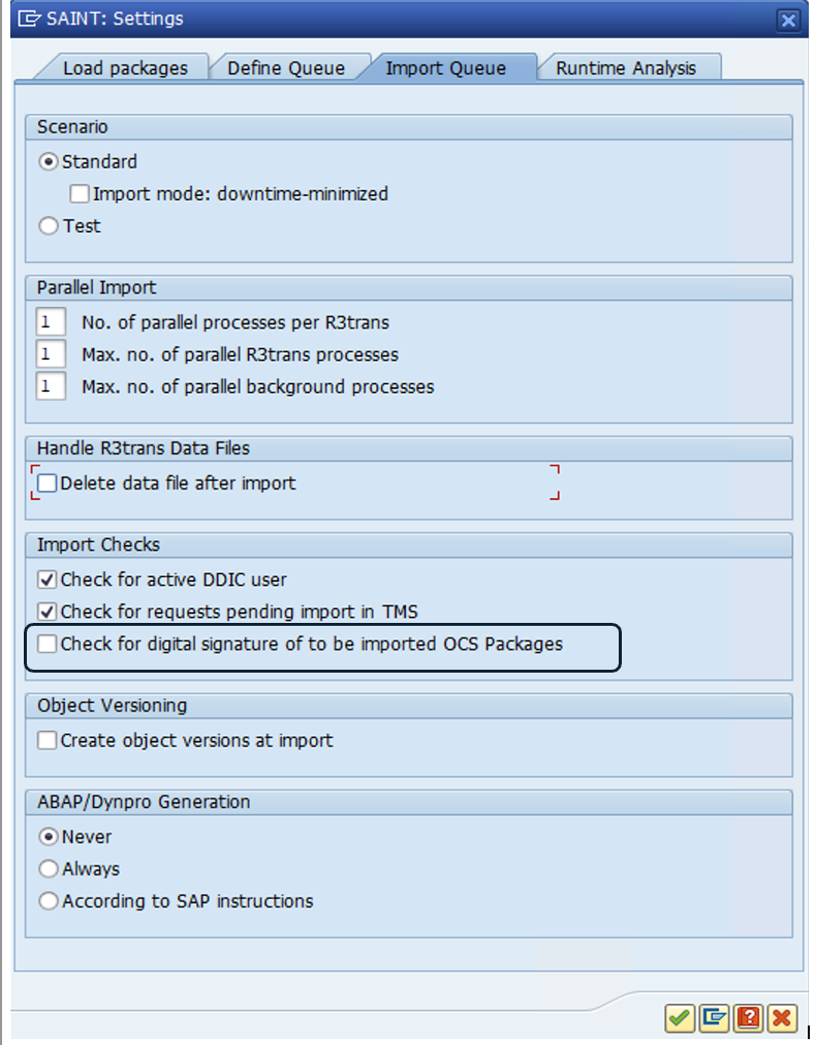
Deselect the digital signature setting in SAINT t-code:
- Go to SAINT t-code.
- Select Extras.
- Choose Setting.
- Deselect the Check for digital signature of to be imported OCS Packages.
-
Proceed with installing the Add-On and support packages using the SAINT t-code.
Screenshot
Installation of SAILPOIN Add-On
Note
If Add-on is already installed, reference Importing Support Packages for Add-On SAILPOIN.
-
Download the PAT file(s) for the Add-On and all the required support packages from the New Package Download Matrix.
Note
The PAT file is a special file used to package the SAP Add-on. If you install the add-on using SPAM/SAINT, the contents of the PAT file will be extracted (disassembled) to your transport directory.
-
Copy the .PAT file on your server location for the Add-On and all the required support packages:
Server Location: (Windows :
<DRIVE>:\usr\sap\trans\EPS\in; Linux/Unix :/usr/sap/trans/EPS/in). -
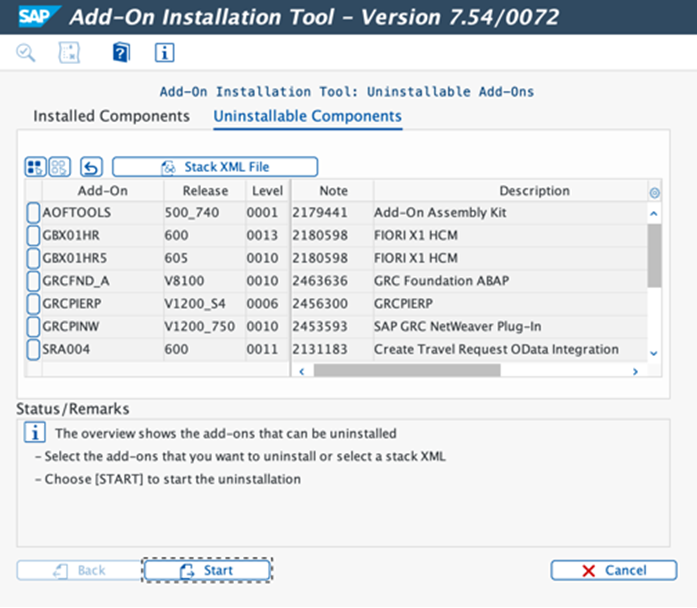
Login to SAP GUI , and then execute the Tcode SAINT.
Screenshot
-
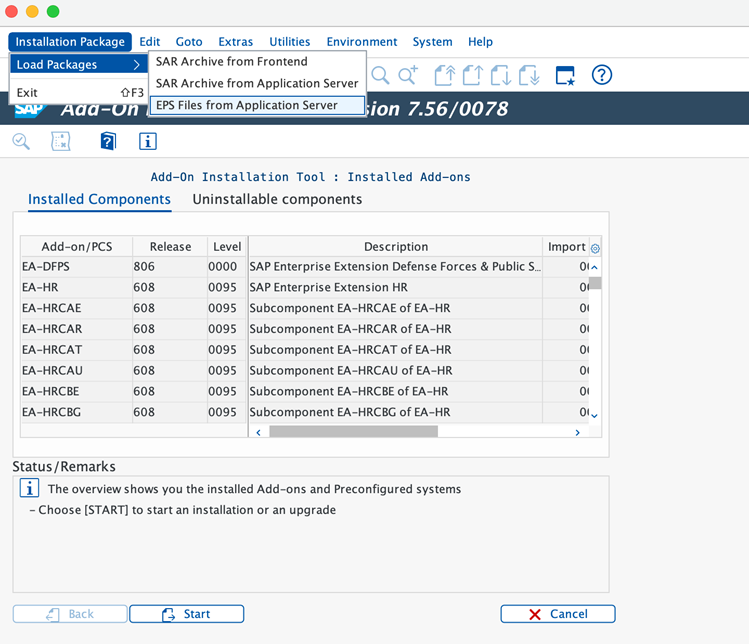
Go to Installation Package > Load Packages > EPS Files From Application Server.
Screenshot
-
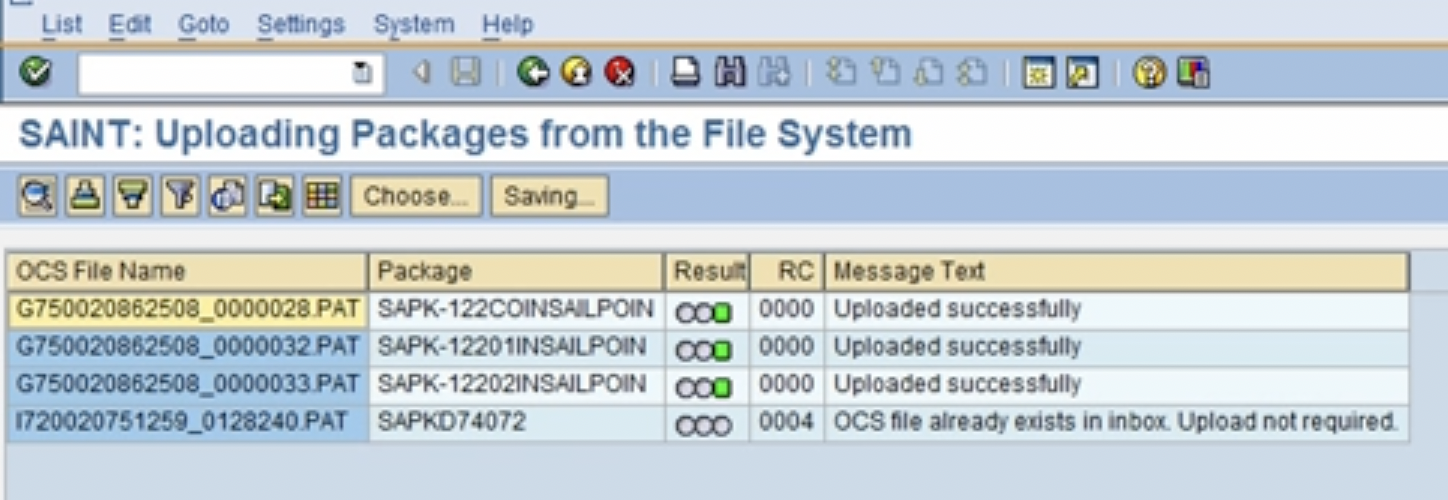
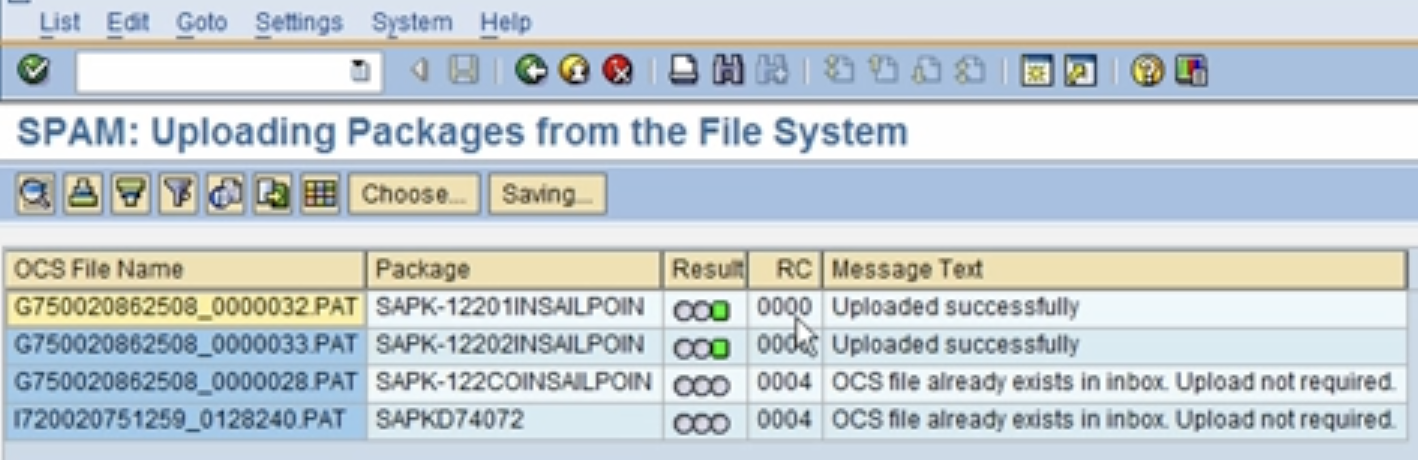
Ensure the following PAT file(s) uploaded successfully:
Screenshot
-
Select Start.
-
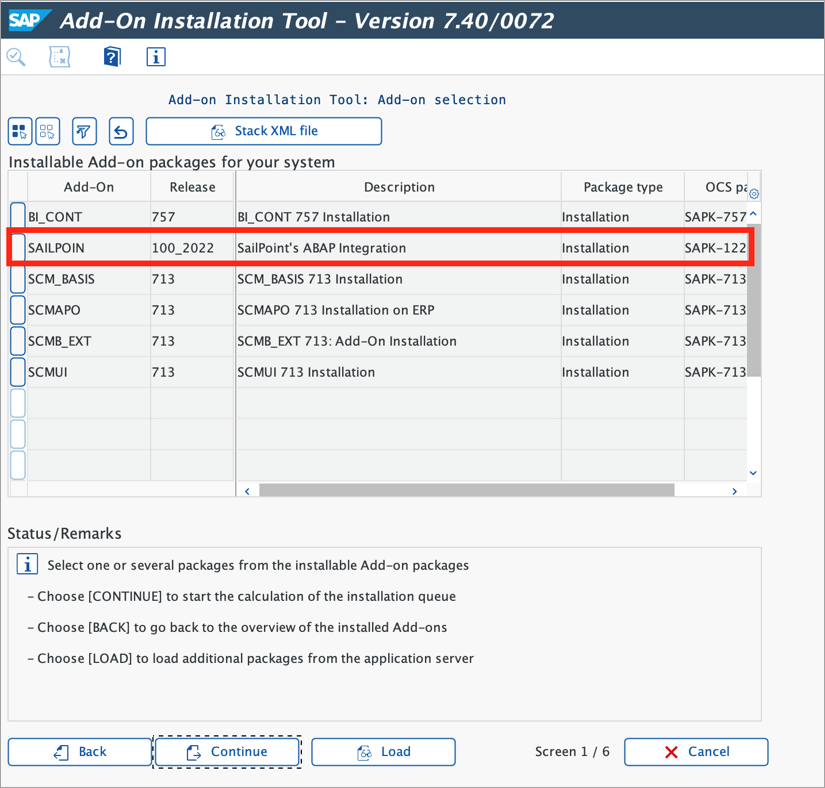
Select SAILPOIN from the Installable Add-on Package packages for your system grid.
Screenshot
-
Select Continue.
-
To install the Add-On and support package(s), perform the following:
-
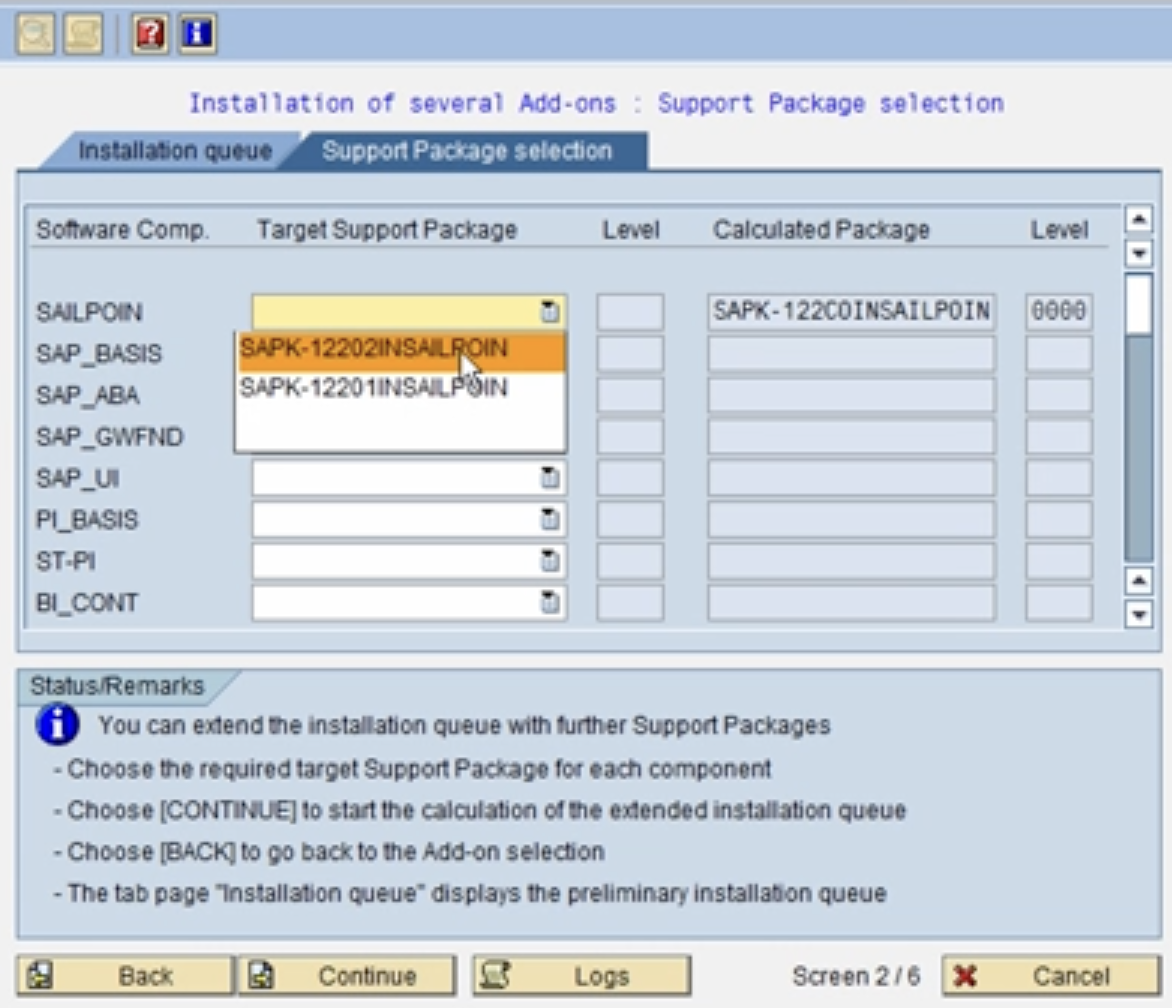
Select the highest version from the available support package(s) under the Target Support Package drop down of the component SAILPOIN.
Screenshot
-
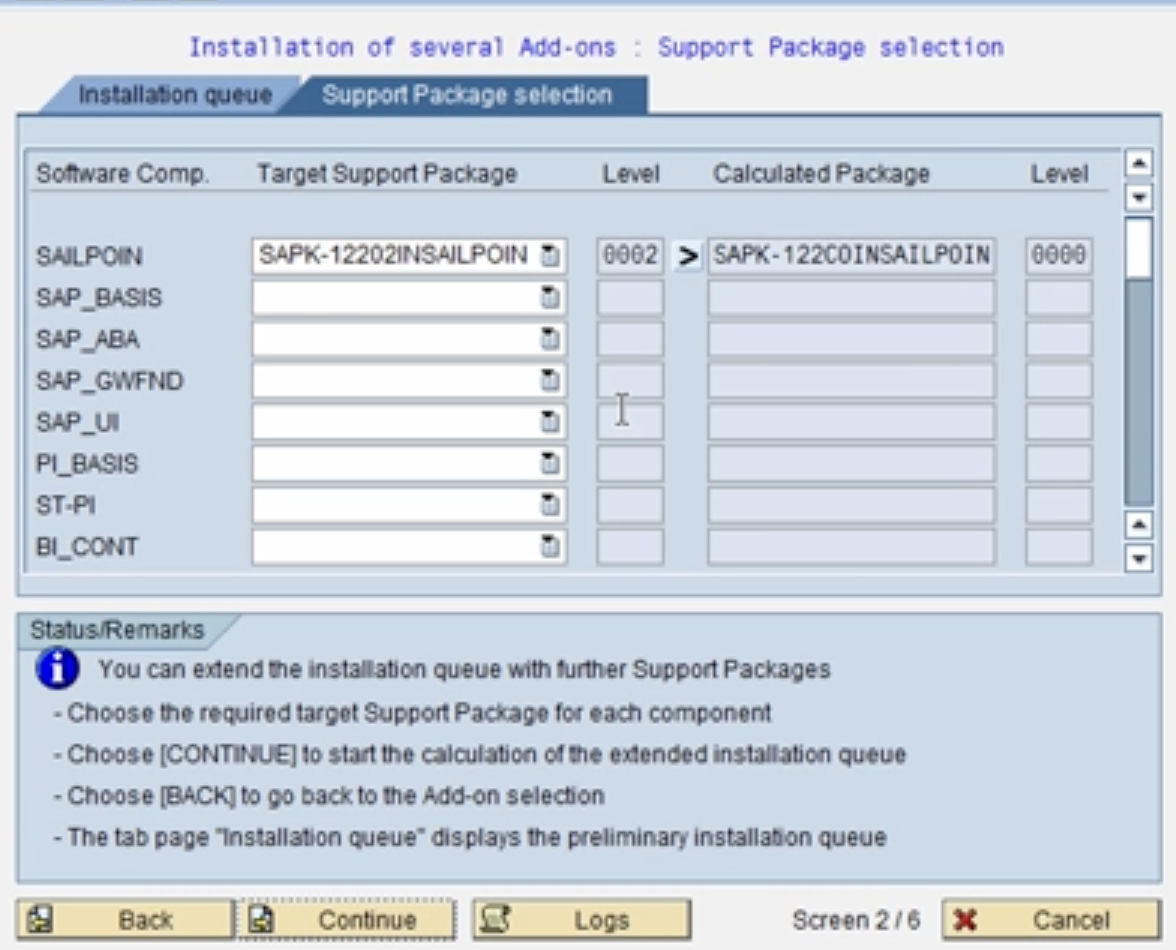
The column Level should indicate the chosen target support package.
Screenshot
-
-
Select Continue.
-
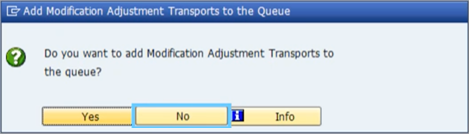
On the Add Modification Adjustment Transports to the Queue dialog, select No.
Screenshot
-
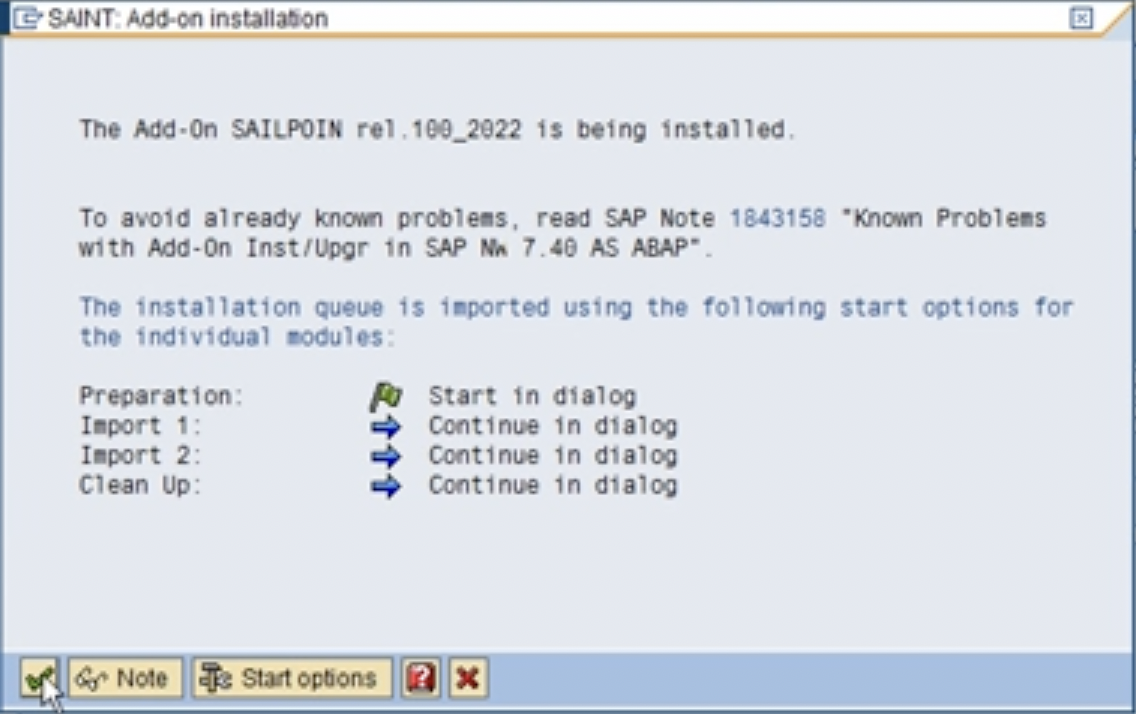
If prompted on the Start Options dialog box, select Continue.
Screenshot
Note
The Add-on and the support package(s) will begin installing, and the progress can be seen at the bottom of the window.
-
Select Finish. If prompted to send Runtime Analysis, select Do not send.
-
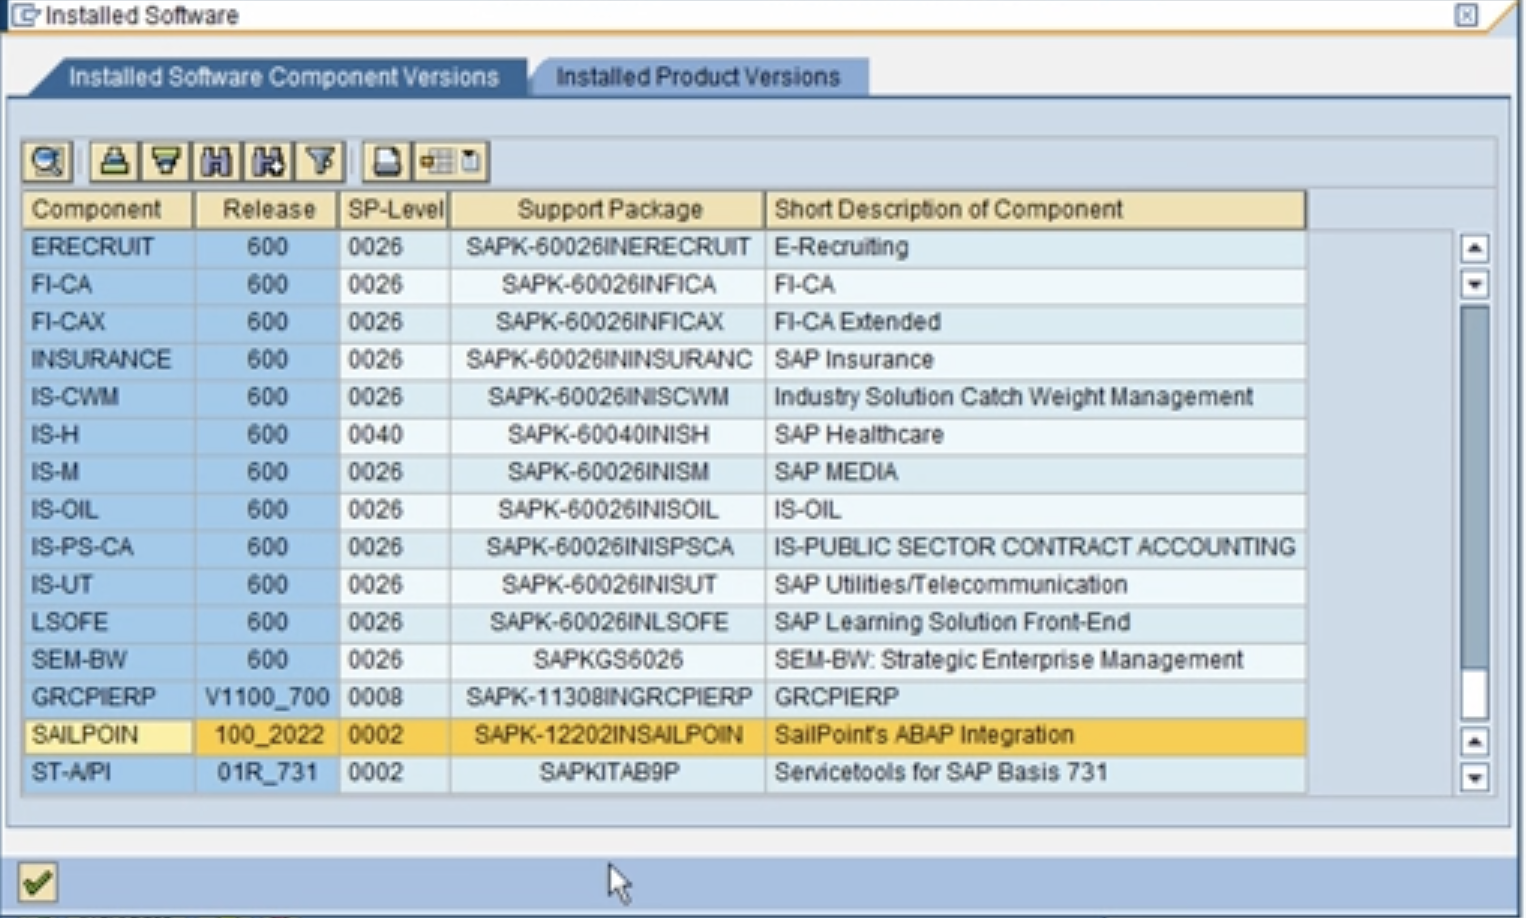
Go to System > Status > Details > Installed Software Component Versions to confirm the following:
-
The Add-On and the support packages have been added in the system component.
Screenshot
-
Configuring SailPoint's Function Module
-
The /SAILPOIN/SAIL_READ_TABLE function module supports SAP BASIS version 751 and later.
This is an SAP-certified function module provided by SailPoint to replace the use of SAP's RFC_READ_TABLE function module, according to SAP recommendations, for reading data from SAP tables required for governance.
/SAILPOIN/SAIL_READ_TABLE provides enhanced security, support for pagination, and performance improvements over the RFC_READ_TABLE. For the deployment process, refer to Install SAILPOIN Add-On.
Important
- SailPoint recommends having SAP BASIS version 751 and above for seamless functionality of the ABAP add-on. However, for lower BASIS versions, /SAILPOIN/SAIL_READ_TABLE_LEG can be tried with limited support from SailPoint.
- RFC_READ_TABLE-based connections are deprecated, and it is recommended to use the SAP-certified add-on instead.
Configuration Table for SAP HR/HCM
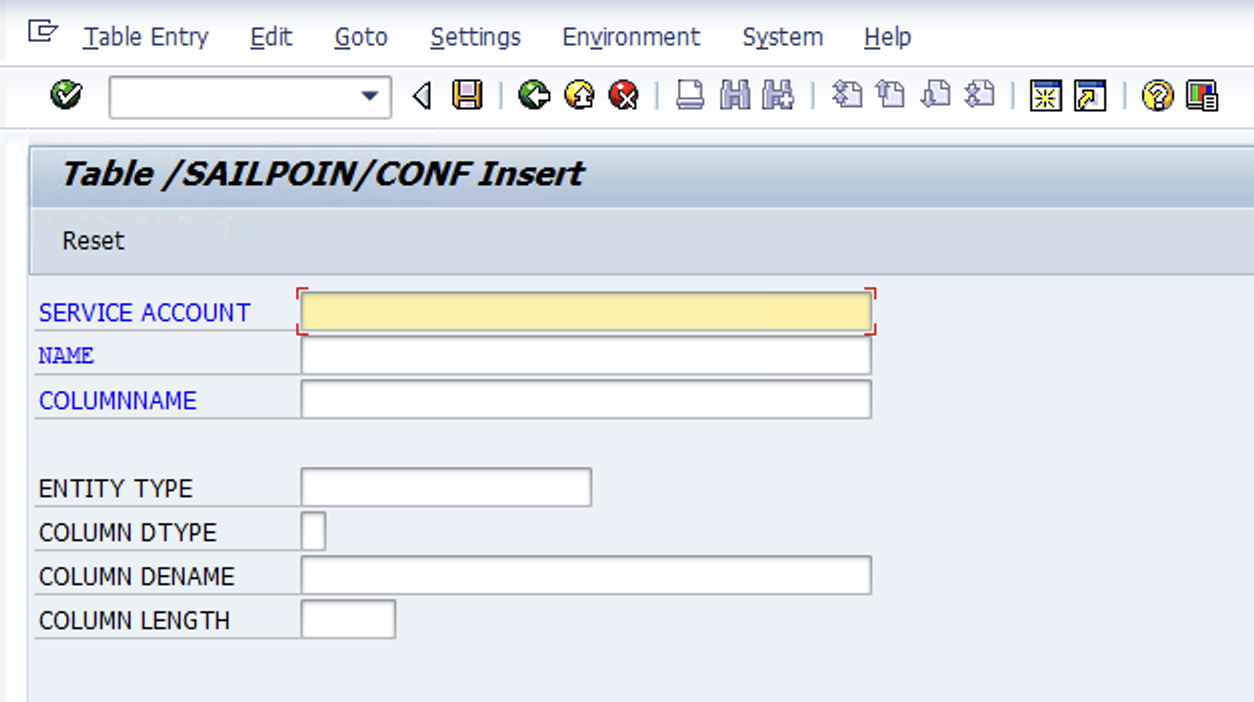
Insert the following data into the '/SAILPOIN/CONF' table:
- SERVICE_ACCOUNT: This is the allowed service account to be used for accessing FM.
- NAME: The name of entity from which data is fetched. For now we can consider it as a table name.
- COLUMN_NAME: The column allowed for fetching data.
- ENTITY_TYPE: The type of entity such as table, join, or any other. This is for a future purpose.
- COLUMN_DTYPE: The data type of the column that is allowed.
-
COLUMN_DENAME: Data element type of the column.
The "Data element type" can be found by using t-code "SE11" when viewing the table details, under the Fields tab.
-
COLUMN_LENGTH: The length of the column that is allowed.
The "Length" can be found by using t-code "SE11" when viewing the table's details, under the Fields tab.
Note
Validate that the values for "COLUMN_DENAME" and "COLUMN_LENGTH" are correct as per your system. These can be validated through the t-code "SE11" while viewing the table details under the Fields tab.
Insert the following data into the '/SAILPOIN/CONF' table through the t-code \"SE16\":
Enter Se16 > Table Name: /SAILPOIN/CONF > Create Entries
Screenshot
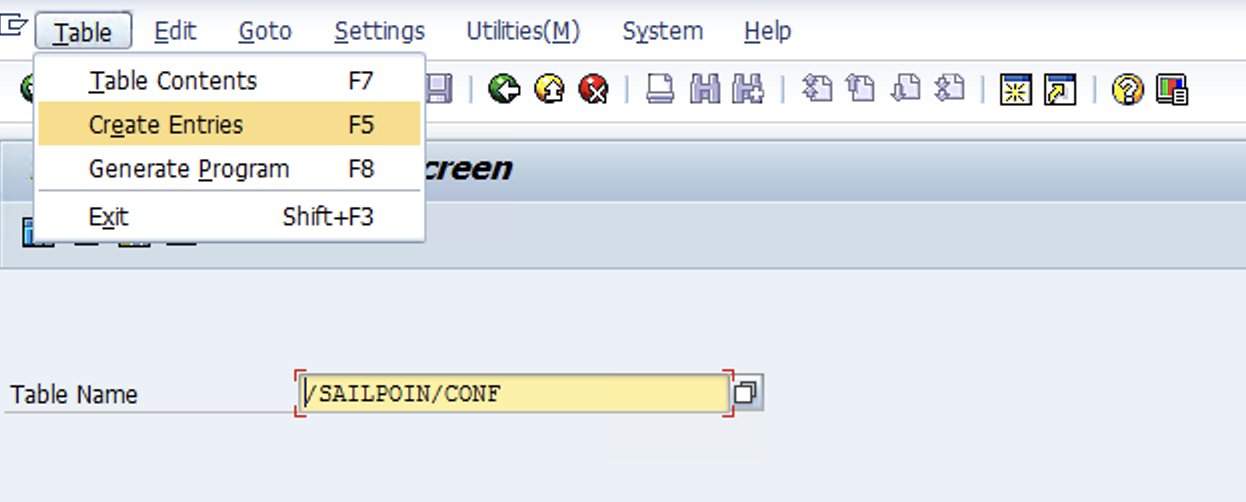
The option to enter the data into the table will appear.
Screenshot
Insert the following data into the '/SAILPOIN/CONF' table using script:
Setup
- Enter t-code SE38 and then create program 'Z_CONFIGURE_SERVICEACCOUNT' in the local object package and type as an executable program.
- Copy and paste the script provided HERE, and activate the program.
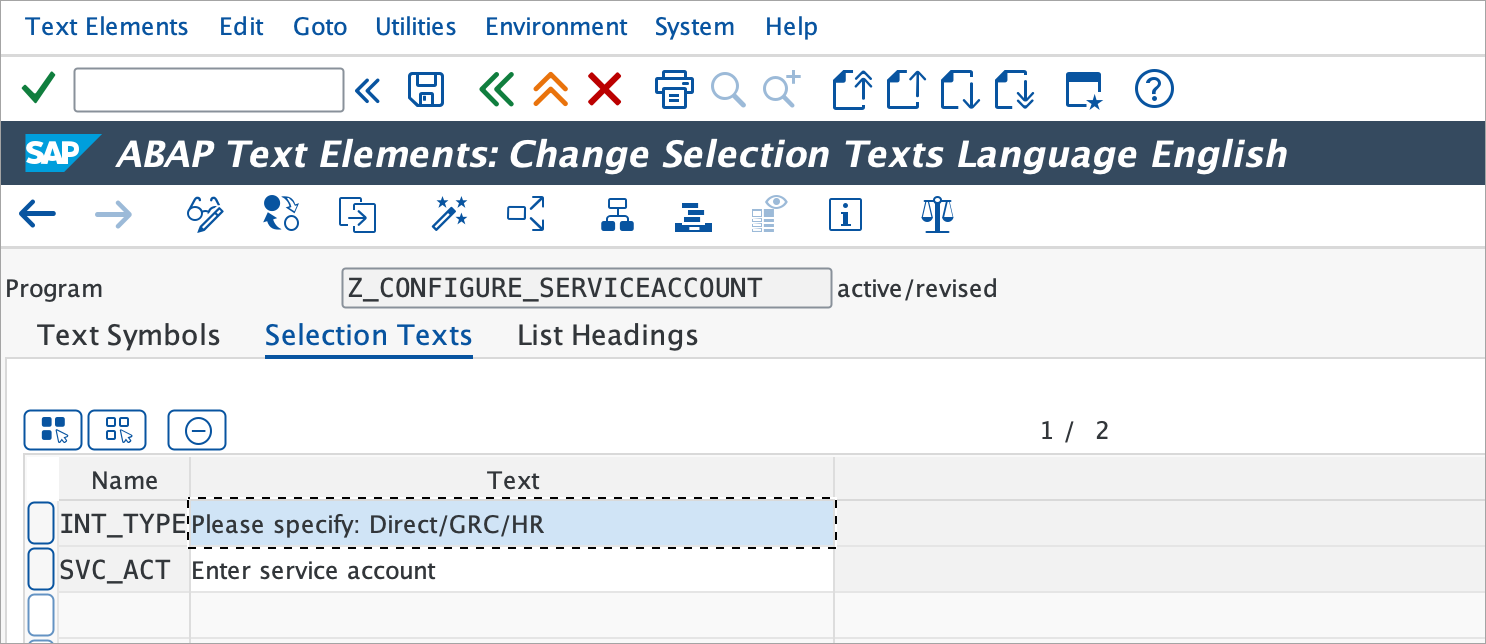
- For better readability of the input parameters edit the selection text from Go to > Text Element > Selection Text and update it as shown in the following image.
Screenshot
- Save and then activate the program.
How it works
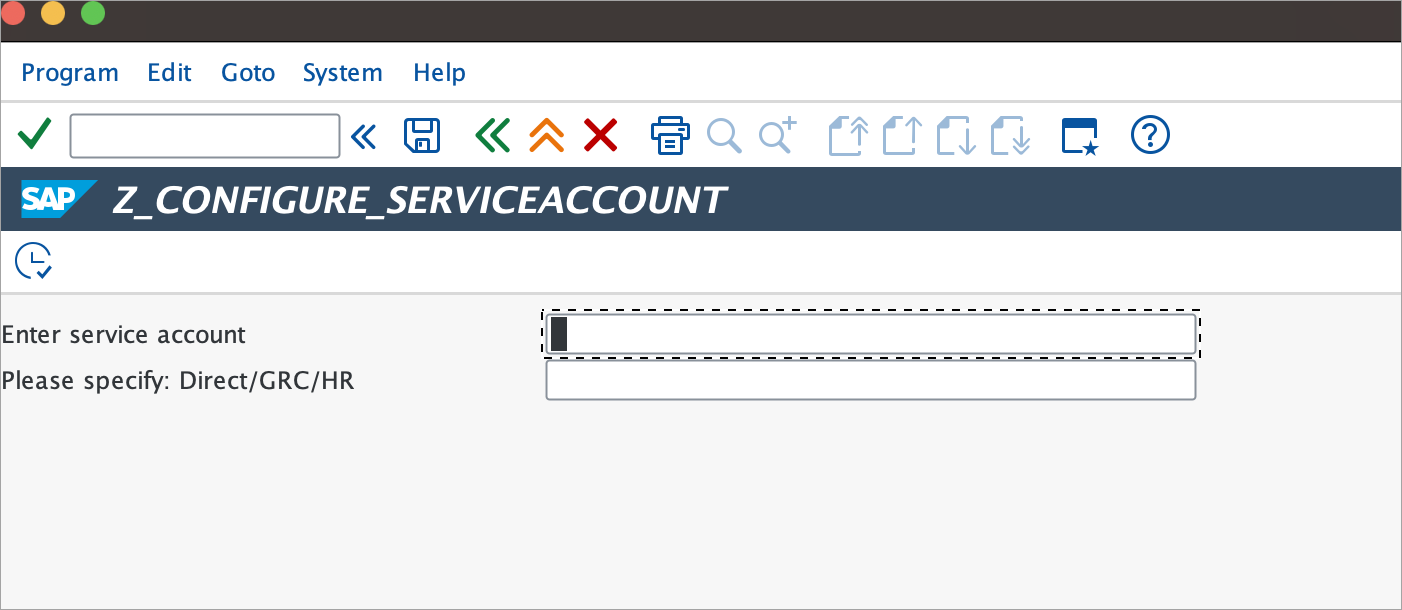
- Enter t-code SE38 and then search for program 'Z_CONFIGURE_SERVICEACCOUNT'. Select execute.
- Enter the service account and integration module to be populated respectively.
Screenshot
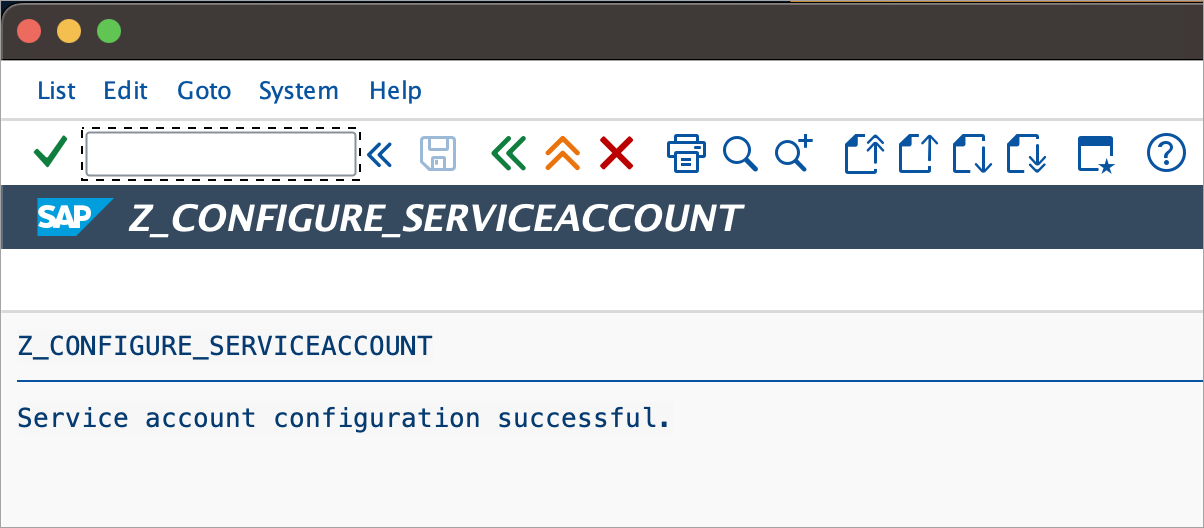
- Once you have entered the details correctly, select execute and you will see a success message.
Screenshot
The table below contains the full set of /SAILPOIN/CONF entries required for SAP HR/HCM:
| SERVICE_ACCOUNT | NAME | COLUMNNAME | ENTITY_TYPE | COLUMN_DTYPE | COLUMN_DNAME | COLUMN_LENGTH |
|---|---|---|---|---|---|---|
<your-service-account-name> |
PA0000 | PERNR | TABLE | N | PERSNO | 8 |
<your-service-account-name> |
PA0000 | STAT2 | TABLE | C | STAT2 | 1 |
<your-service-account-name> |
PA0000 | BEGDA | TABLE | D | BEGDA | 8 |
<your-service-account-name> |
PA0000 | ENDDA | TABLE | D | ENDDA | 8 |
<your-service-account-name> |
PA0000 | AEDTM | TABLE | D | AEDAT | 8 |
<your-service-account-name> |
PA0000 | MASSN | TABLE | C | MASSN | 2 |
<your-service-account-name> |
PA0000 | MASSG | TABLE | C | MASSG | 2 |
<your-service-account-name> |
HRP1001 | OTYPE | TABLE | C | OTYPE | 2 |
<your-service-account-name> |
HRP1001 | PLVAR | TABLE | C | PLVAR | 2 |
<your-service-account-name> |
HRP1001 | SUBTY | TABLE | C | SUBTYP | 4 |
<your-service-account-name> |
HRP1001 | OBJID | TABLE | N | HROBJID | 10 |
<your-service-account-name> |
HRP1001 | SOBID | TABLE | C | SOBID | 45 |
<your-service-account-name> |
HRP1001 | BEGDA | TABLE | D | BEGDATUM | 8 |
<your-service-account-name> |
HRP1001 | ENDDA | TABLE | D | ENDDATUM | 8 |
<your-service-account-name> |
HRP1001 | RELAT | TABLE | C | RELAT | 3 |
<your-service-account-name> |
HRP1001 | ISTAT | TABLE | C | ISTAT_D | 1 |
<your-service-account-name> |
HRP1001 | RSIGN | TABLE | C | RSIGN | 1 |
<your-service-account-name> |
HRP1001 | SCLAS | TABLE | C | SCLAS | 2 |
<your-service-account-name> |
HRP1001 | AEDTM | TABLE | D | AEDTM | 8 |
<your-service-account-name> |
PA0002 | PERNR | TABLE | N | PERSNO | 16 |
<your-service-account-name> |
PA0002 | NACHN | TABLE | C | PAD_NACHN | 40 |
<your-service-account-name> |
PA0002 | BEGDA | TABLE | D | BEGDA | 8 |
<your-service-account-name> |
PA0002 | AEDTM | TABLE | D | AEDAT | 8 |
<your-service-account-name> |
HRP1000 | STEXT | TABLE | C | STEXT | 40 |
<your-service-account-name> |
HRP1000 | OTYPE | TABLE | C | OTYPE | 2 |
<your-service-account-name> |
HRP1000 | PLVAR | TABLE | C | PLVAR | 2 |
<your-service-account-name> |
HRP1000 | OBJID | TABLE | N | HROBJID | 8 |
<your-service-account-name> |
HRP1000 | ENDDA | TABLE | D | ENDDATUM | 8 |
<your-service-account-name> |
HRP1000 | LANGU | TABLE | C | LANGU | 1 |
<your-service-account-name> |
PA0001 | ORGEH | TABLE | N | ORGEH | 8 |
<your-service-account-name> |
PA0001 | VDSK1 | TABLE | C | VDSK1 | 14 |
<your-service-account-name> |
PA0001 | ABKRS | TABLE | C | ABKRS | 2 |
<your-service-account-name> |
PA0001 | SACHA | TABLE | C | SACHA | 3 |
<your-service-account-name> |
PA0001 | SACHP | TABLE | C | SACHP | 3 |
<your-service-account-name> |
PA0001 | WERKS | TABLE | C | PERSA | 4 |
<your-service-account-name> |
PA0001 | PLANS | TABLE | N | PLANS | 8 |
<your-service-account-name> |
PA0001 | GSBER | TABLE | C | GSBER | 4 |
<your-service-account-name> |
PA0001 | BUKRS | TABLE | C | BUKRS | 4 |
<your-service-account-name> |
PA0001 | KOSTL | TABLE | C | KOSTL | 10 |
<your-service-account-name> |
PA0001 | PERSG | TABLE | C | PERSG | 1 |
<your-service-account-name> |
PA0001 | PERSK | TABLE | C | PERSK | 2 |
<your-service-account-name> |
PA0001 | STELL | TABLE | N | STELL | 8 |
<your-service-account-name> |
PA0001 | JUPER | TABLE | C | JUPER | 4 |
<your-service-account-name> |
PA0001 | ENAME | TABLE | C | EMNAM | 40 |
<your-service-account-name> |
PA0001 | BTRTL | TABLE | C | BTRTL | 4 |
<your-service-account-name> |
PA0001 | ANSVH | TABLE | C | ANSVH | 2 |
<your-service-account-name> |
PA0001 | SACHZ | TABLE | C | SACHZ | 3 |
<your-service-account-name> |
PA0001 | SBMOD | TABLE | C | SBMOD | 4 |
<your-service-account-name> |
PA0001 | KOKRS | TABLE | C | KOKRS | 4 |
<your-service-account-name> |
PA0001 | BEGDA | TABLE | D | BEGDA | 8 |
<your-service-account-name> |
PA0001 | ENDDA | TABLE | D | ENDDA | 8 |
<your-service-account-name> |
PA0001 | PERNR | TABLE | N | PERSNO | 8 |
<your-service-account-name> |
PA0001 | AEDTM | TABLE | D | AEDAT | 8 |
<your-service-account-name> |
T529T | MASSN | TABLE | C | MASSN | 2 |
<your-service-account-name> |
T529T | MNTXT | TABLE | C | MNTXT | 30 |
<your-service-account-name> |
T529T | SPRSL | TABLE | C | SPRAS | 1 |
<your-service-account-name> |
T530T | MASSN | TABLE | C | MASSN | 2 |
<your-service-account-name> |
T530T | MGTXT | TABLE | C | MGTXT | 30 |
<your-service-account-name> |
T530T | SPRSL | TABLE | C | SPRAS | 1 |
<your-service-account-name> |
T530T | MASSG | TABLE | C | MASSG | 2 |
<your-service-account-name> |
PA0105 | AEDTM | TABLE | D | AEDAT | 8 |
<your-service-account-name> |
PA0105 | BEGDA | TABLE | D | BEGDA | 8 |
<your-service-account-name> |
PA0105 | PERNR | TABLE | N | PERSNO | 8 |
<your-service-account-name> |
PA0006 | AEDTM | TABLE | D | AEDAT | 8 |
<your-service-account-name> |
PA0006 | BEGDA | TABLE | D | BEGDA | 8 |
<your-service-account-name> |
PA0006 | PERNR | TABLE | N | PERSNO | 8 |
<your-service-account-name> |
PA0709 | AEDTM | TABLE | D | AEDAT | 8 |
<your-service-account-name> |
PA0709 | BEGDA | TABLE | D | BEGDA | 8 |
<your-service-account-name> |
PA0709 | PERNR | TABLE | N | PERSNO | 8 |
<your-service-account-name> |
PA0709 | PERSONID_EXT | TABLE | C | PERSONID_EXT | 20 |
Importing Support Packages for Add-On SAILPOIN
Installation
- Download the PAT file(s) for the support packages from the New Package Download Matrix.
-
Copy the PAT file(s) on your server location:
(Windows :
<DRIVE>:\usr\sap\trans\EPS\in; Linux/Unix :/usr/sap/trans/EPS/in). -
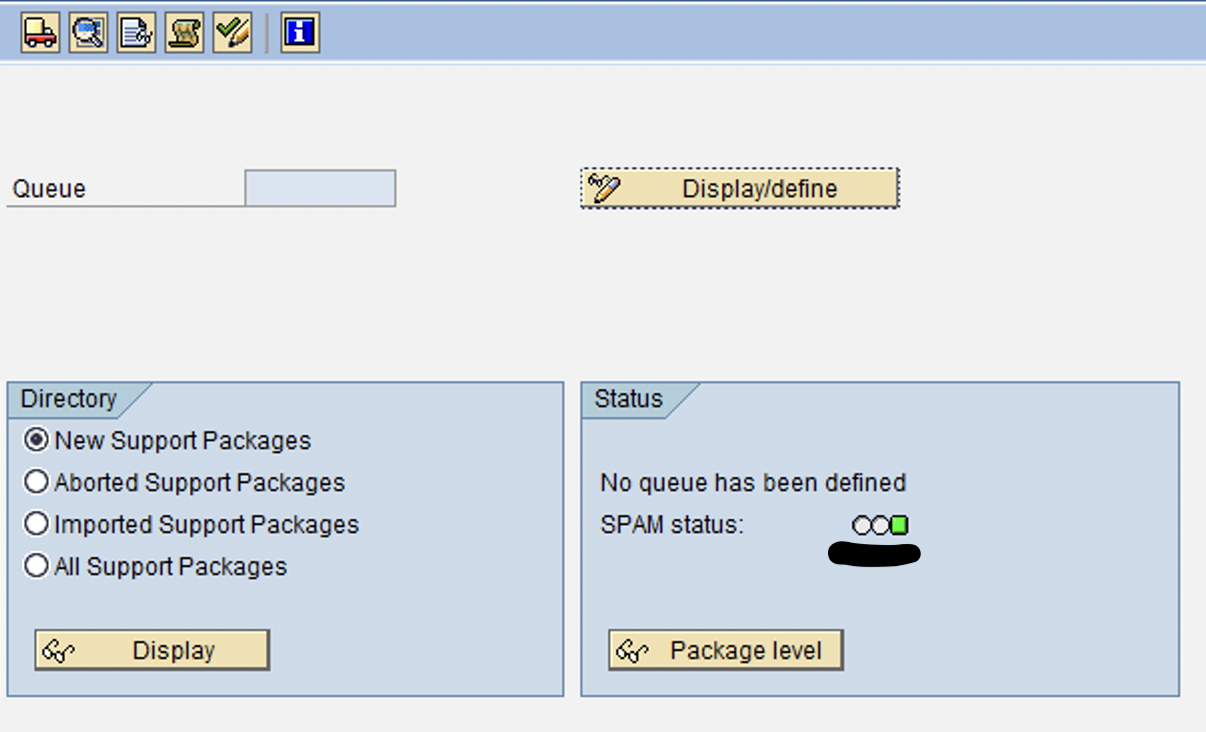
Sign in to SAP GUI and execute the SPAM t-code. The status of the queue for importing support packages should be green as shown.
Screenshot
-
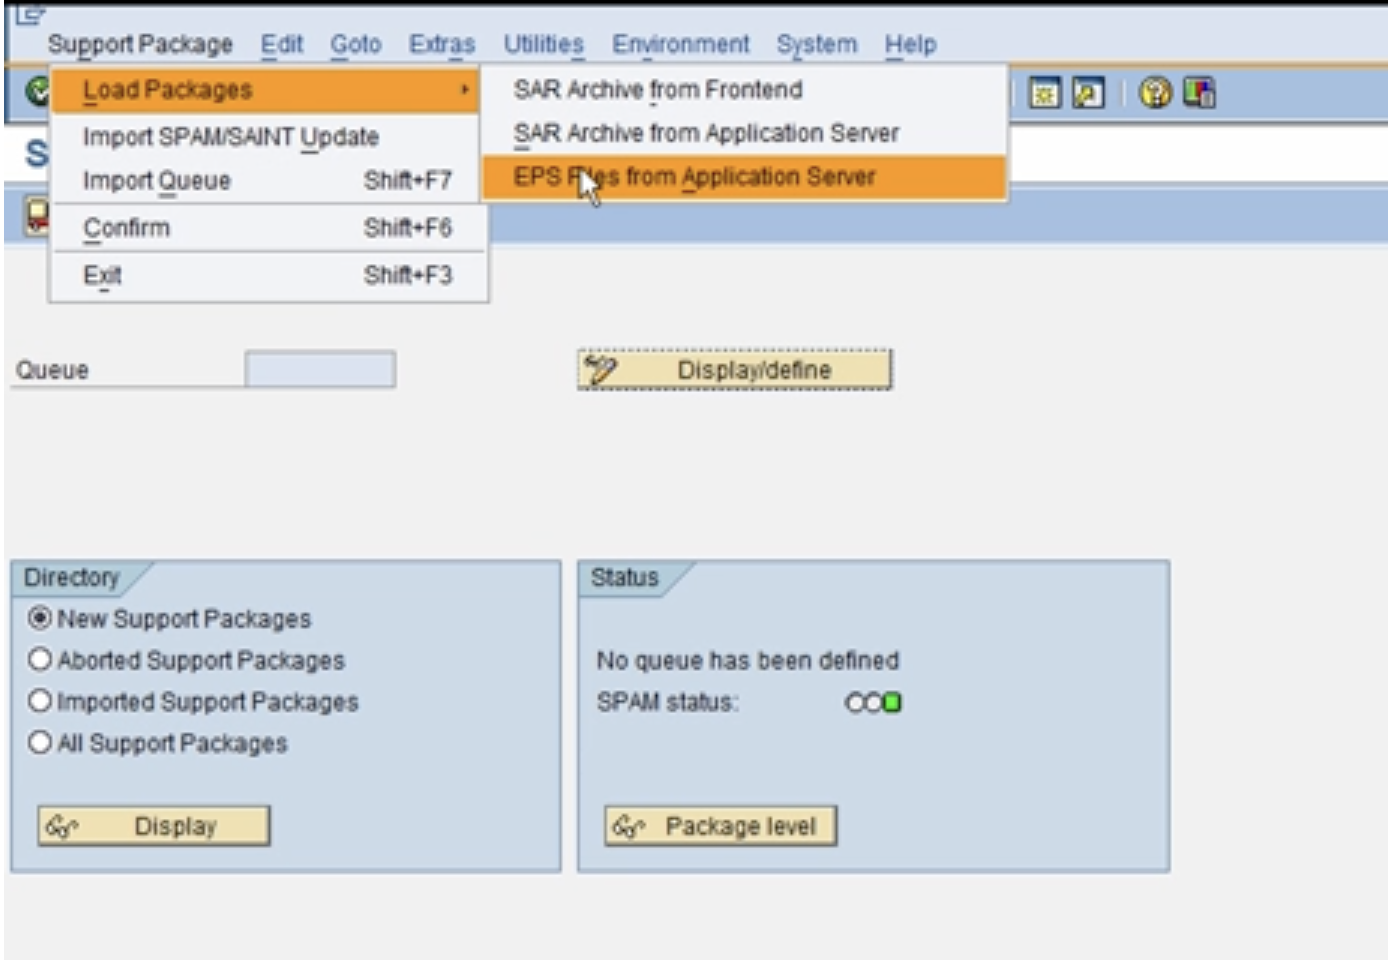
Go to Installation Package > Load Packages > EPS Files From Application Server.
Screenshot
-
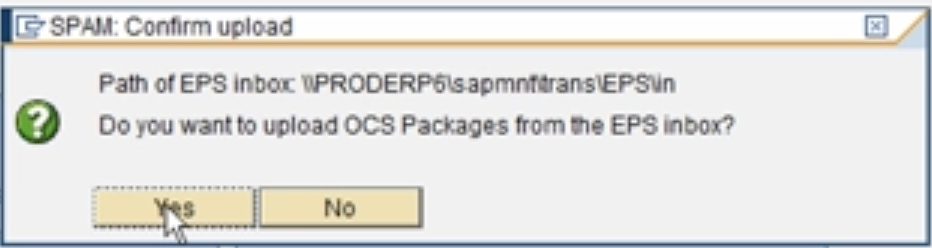
Select Yes when prompted to upload OCS packages from the EPS inbox.
Screenshot
-
Verify that the upload was successful.
Screenshot
-
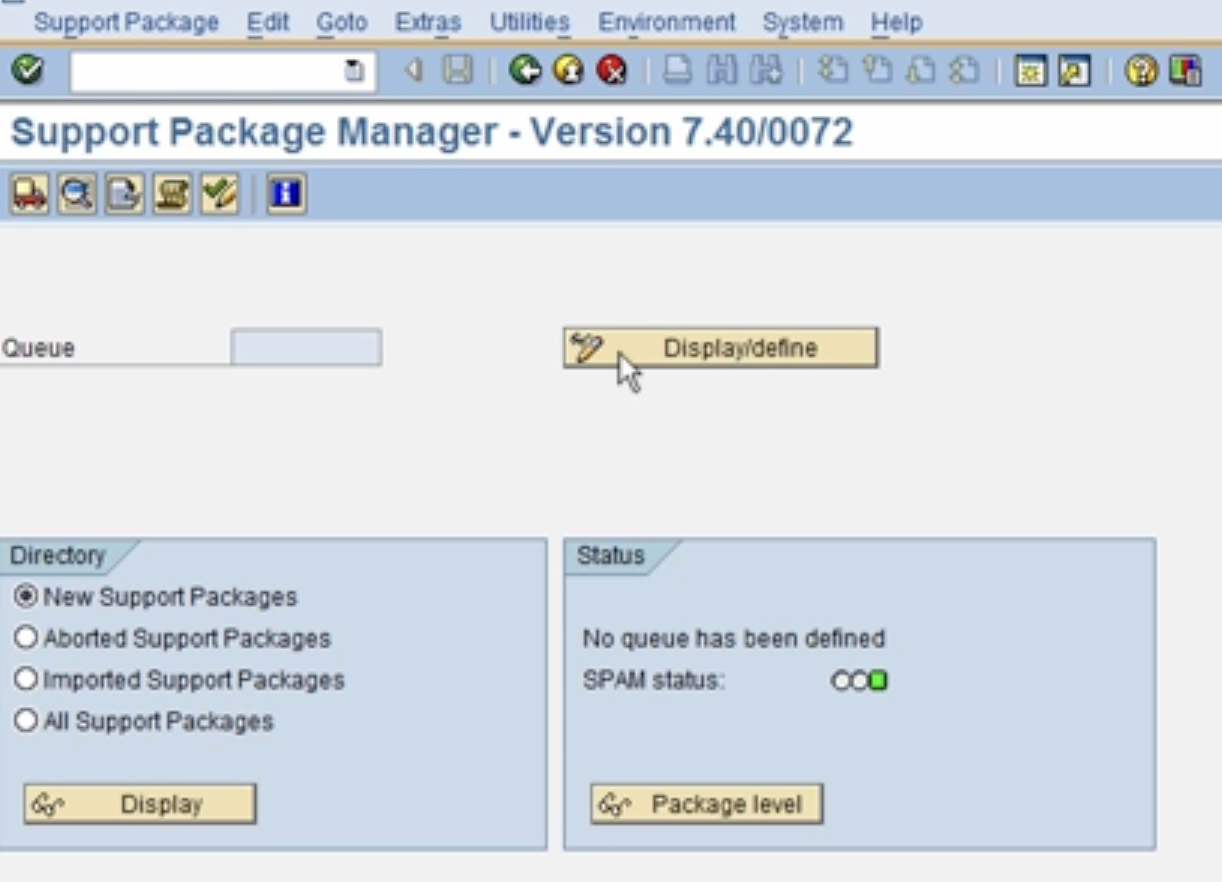
Select Display/Define to choose the software component for which you want to import Support Packages.
Screenshot
-
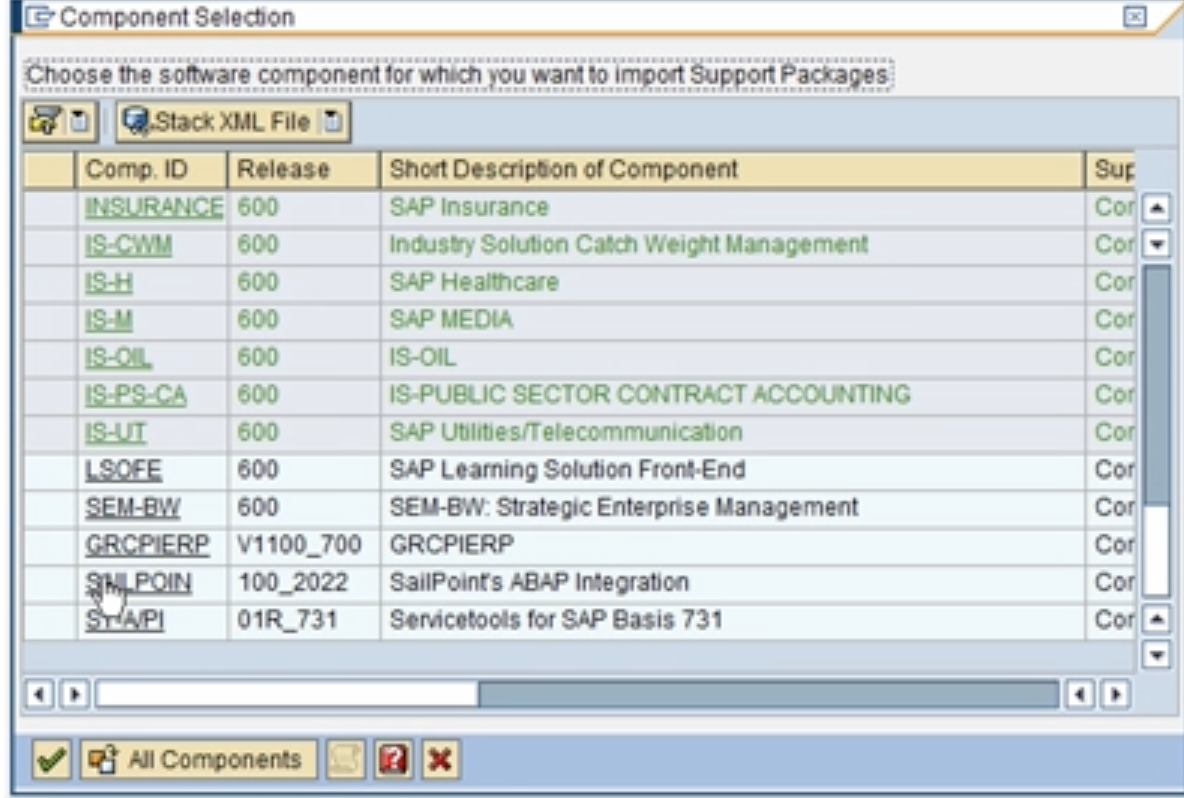
Choose the SAILPOIN component.
Screenshot
-
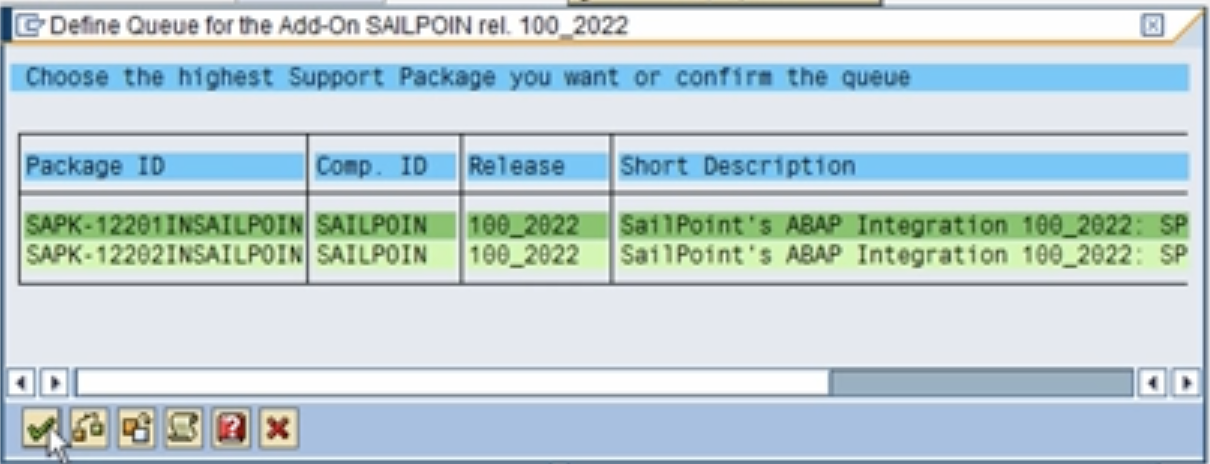
Confirm the queue by selecting Continue.
Note
The queue in the image shows the number of support packages that can be installed based on the PAT files placed on your server location. This example shows importing 2 support packages.
Screenshot
-
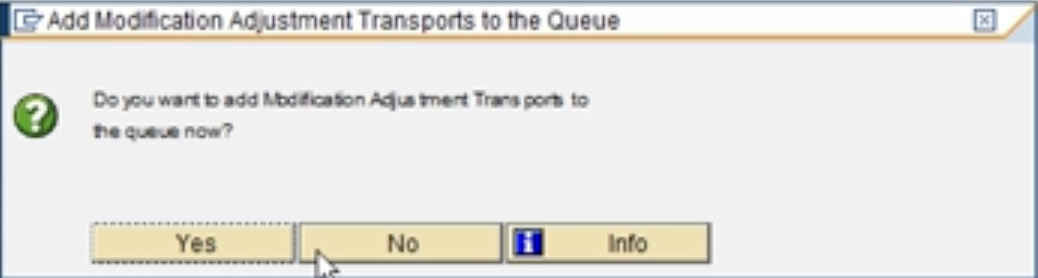
Select No when prompted to add Modification Adjustment Transports to the queue.
Screenshot
-
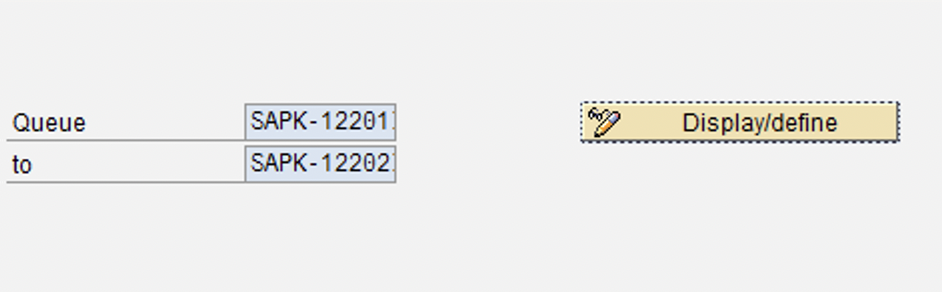
Verify that the queue contains the intended support packages for import that were added/defined in the queue in the previous steps.
Screenshot
-
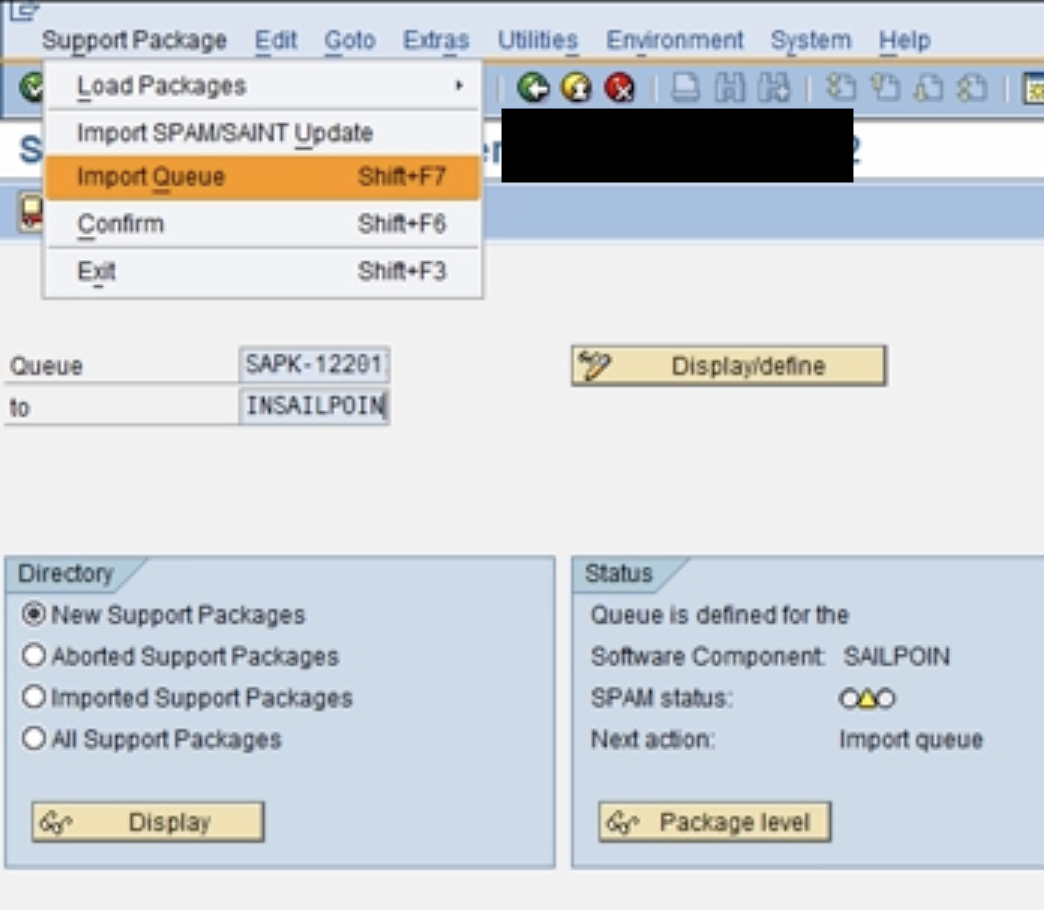
Go to Support Package > Import Queue.
Screenshot
-
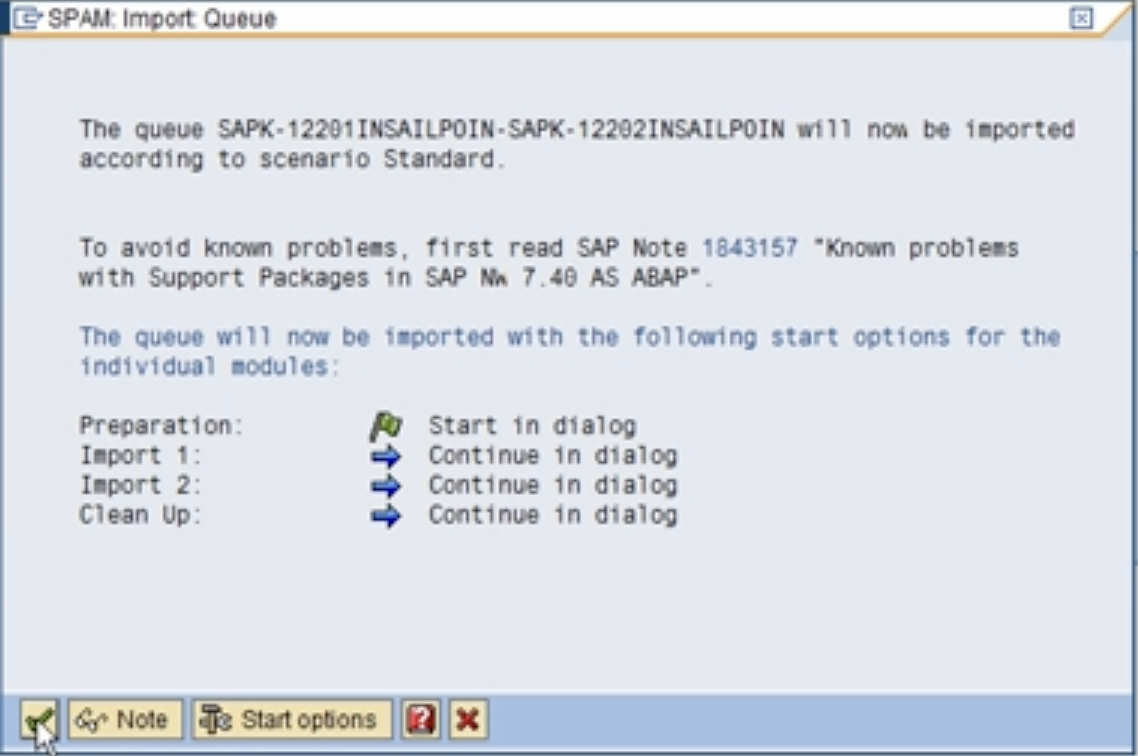
Select Continue to import the queue.
Screenshot
Note
The support package begins installing, and you can view the progress at the bottom of the window.
-
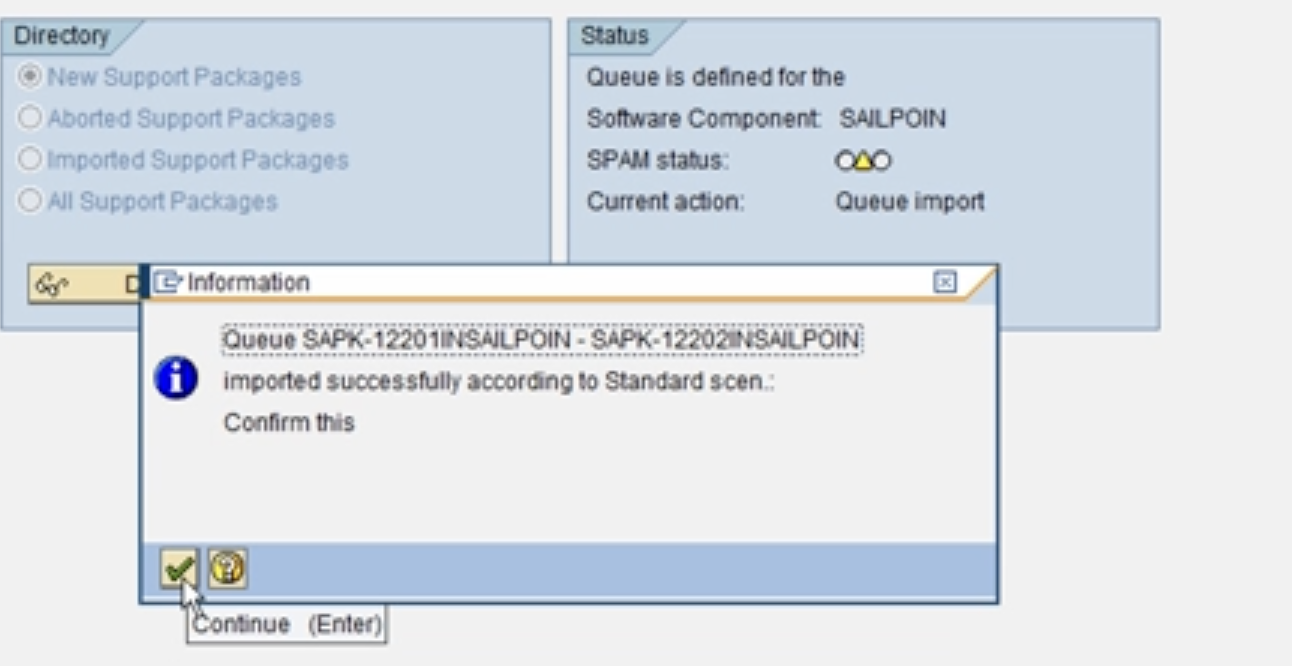
After the support package(s) are successfully imported, the below prompt should display. Select Continue to proceed with the import.
Screenshot
-
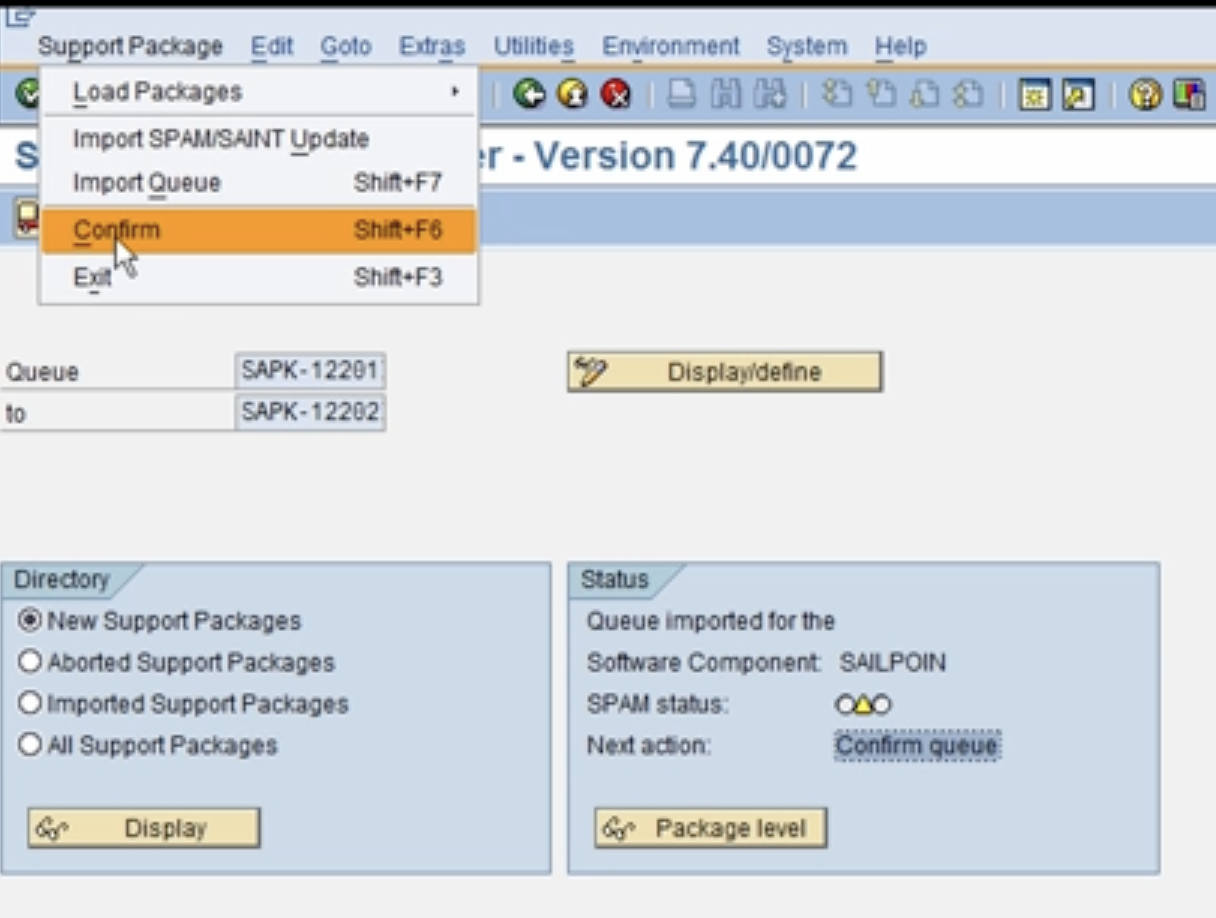
Confirm the queue by going to Support Package > Confirm.
Screenshot
-
When prompted to send Runtime Analysis, select Do not send.
-
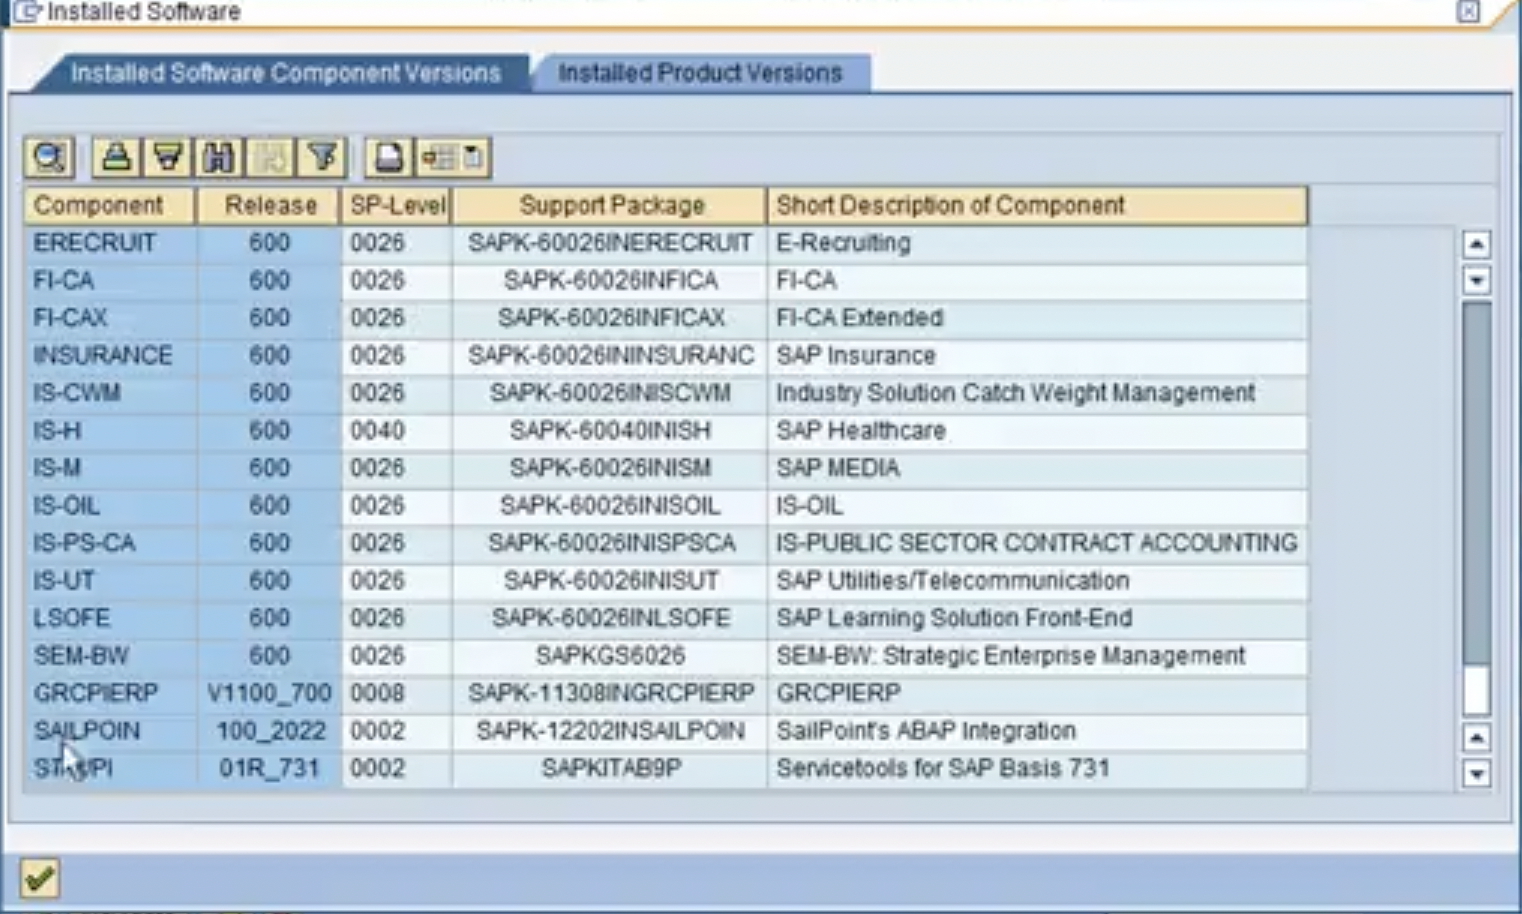
Go to System > Status > Details > Installed Software Component Versions to confirm that the Add-on's support package is now set to the desired support package level. For example,
0002.Screenshot
New Package Download Matrix
Refer the SailPoint SAP ABAP Add-on PAT Files for downloading the new package.
| Release | Installed Software Component Level and Support Package Name | Downloadable Package Type | PAT File Name | Download Link |
|---|---|---|---|---|
| 100_2022 | Base Component | AOI (Add-On Installation Package) | G750020862508_0000028.PAT | https://community.sailpoint.com/knowledge/SailPoint-SAP-ABAP-Add-on-PAT-Files |
| 100_2022 | SP-Level: 0001 Support Package: SAPK-12201INSAILPOIN |
CSP (Component Support Package) | G750020862508_0000032.PAT | https://community.sailpoint.com/knowledge/SailPoint-SAP-ABAP-Add-on-PAT-Files |
| 100_2022 | SP-Level: 0002 Support Package: SAPK-12202INSAILPOIN |
CSP (Component Support Package) | G750020862508_0000033.PAT | https://community.sailpoint.com/knowledge/SailPoint-SAP-ABAP-Add-on-PAT-Files |
To overcome dependency errors during Add-on installation, use these Attribute Change Package (ACP) files:
| Installed Software Component Level and Support Package Name | PAT File Name |
|---|---|
| DW4CORE, S4CORE, SAP_GWFND | G750020862508_0000076.PAT |
| S4FND, MDG_FND, SAP_GWFND | G750020862508_0000077.PAT |
Uninstall SAILPOIN Add-On
- In the SAP GUI, execute the Tcode SAINT.
-
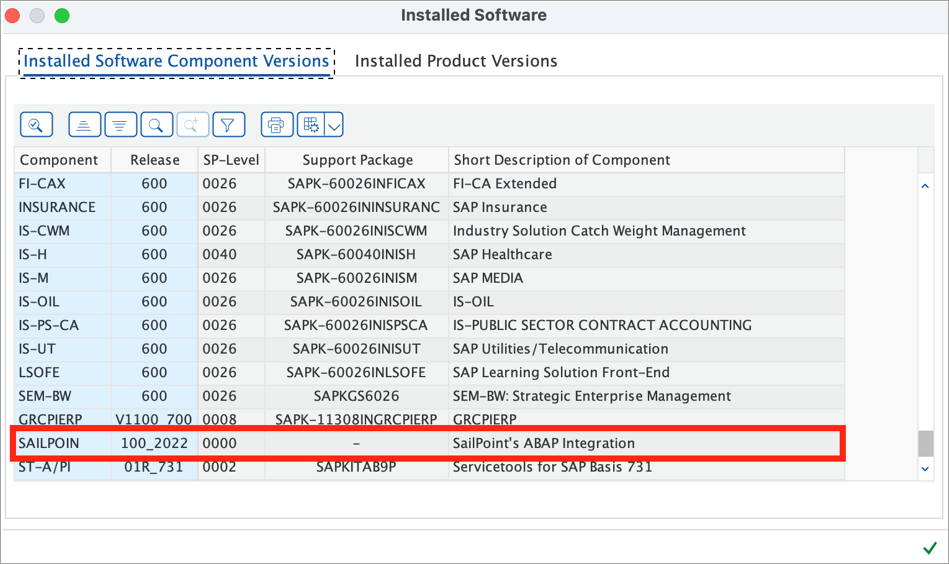
Ensure that the Add-on SAILPOIN was successfully installed by confirming that it is visible in the Installed Components list.
Screenshot
-
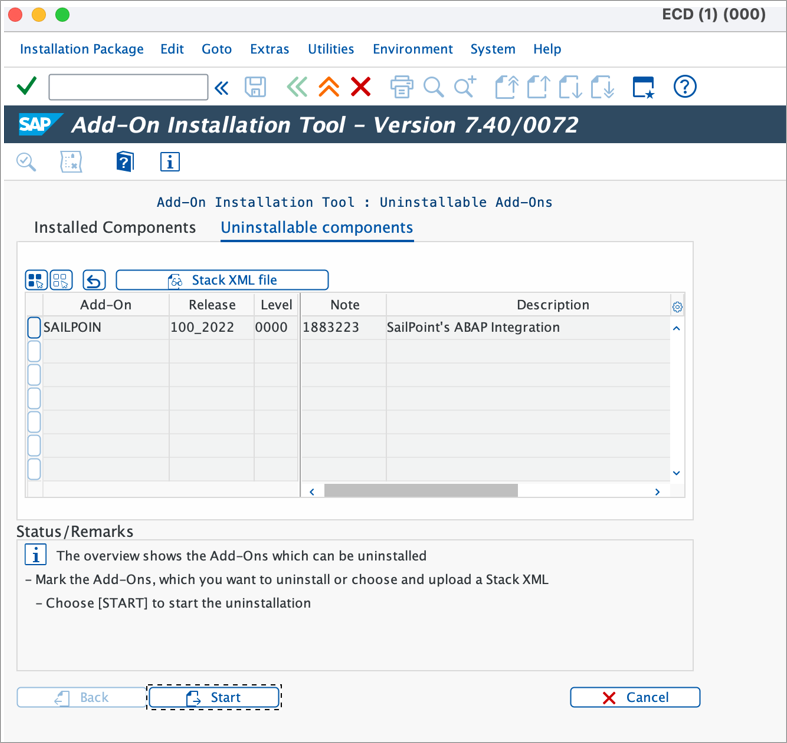
Select Uninstallable Components. The Add-on SAILPOIN should be visible.
Screenshot
-
Select SAILPOIN from the grid, and then select Start.
-
Select Continue when prompted on the Start Options dialog box.
Screenshot
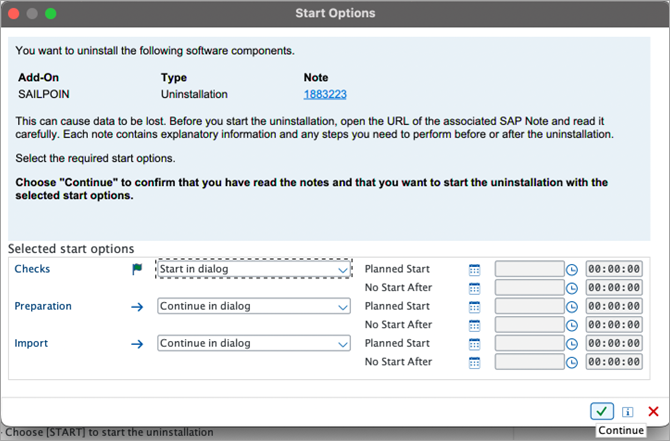
Note
If there are any specific preferences for any of the start options, they can be selected as per your requirement.
-
Select Finish.
-
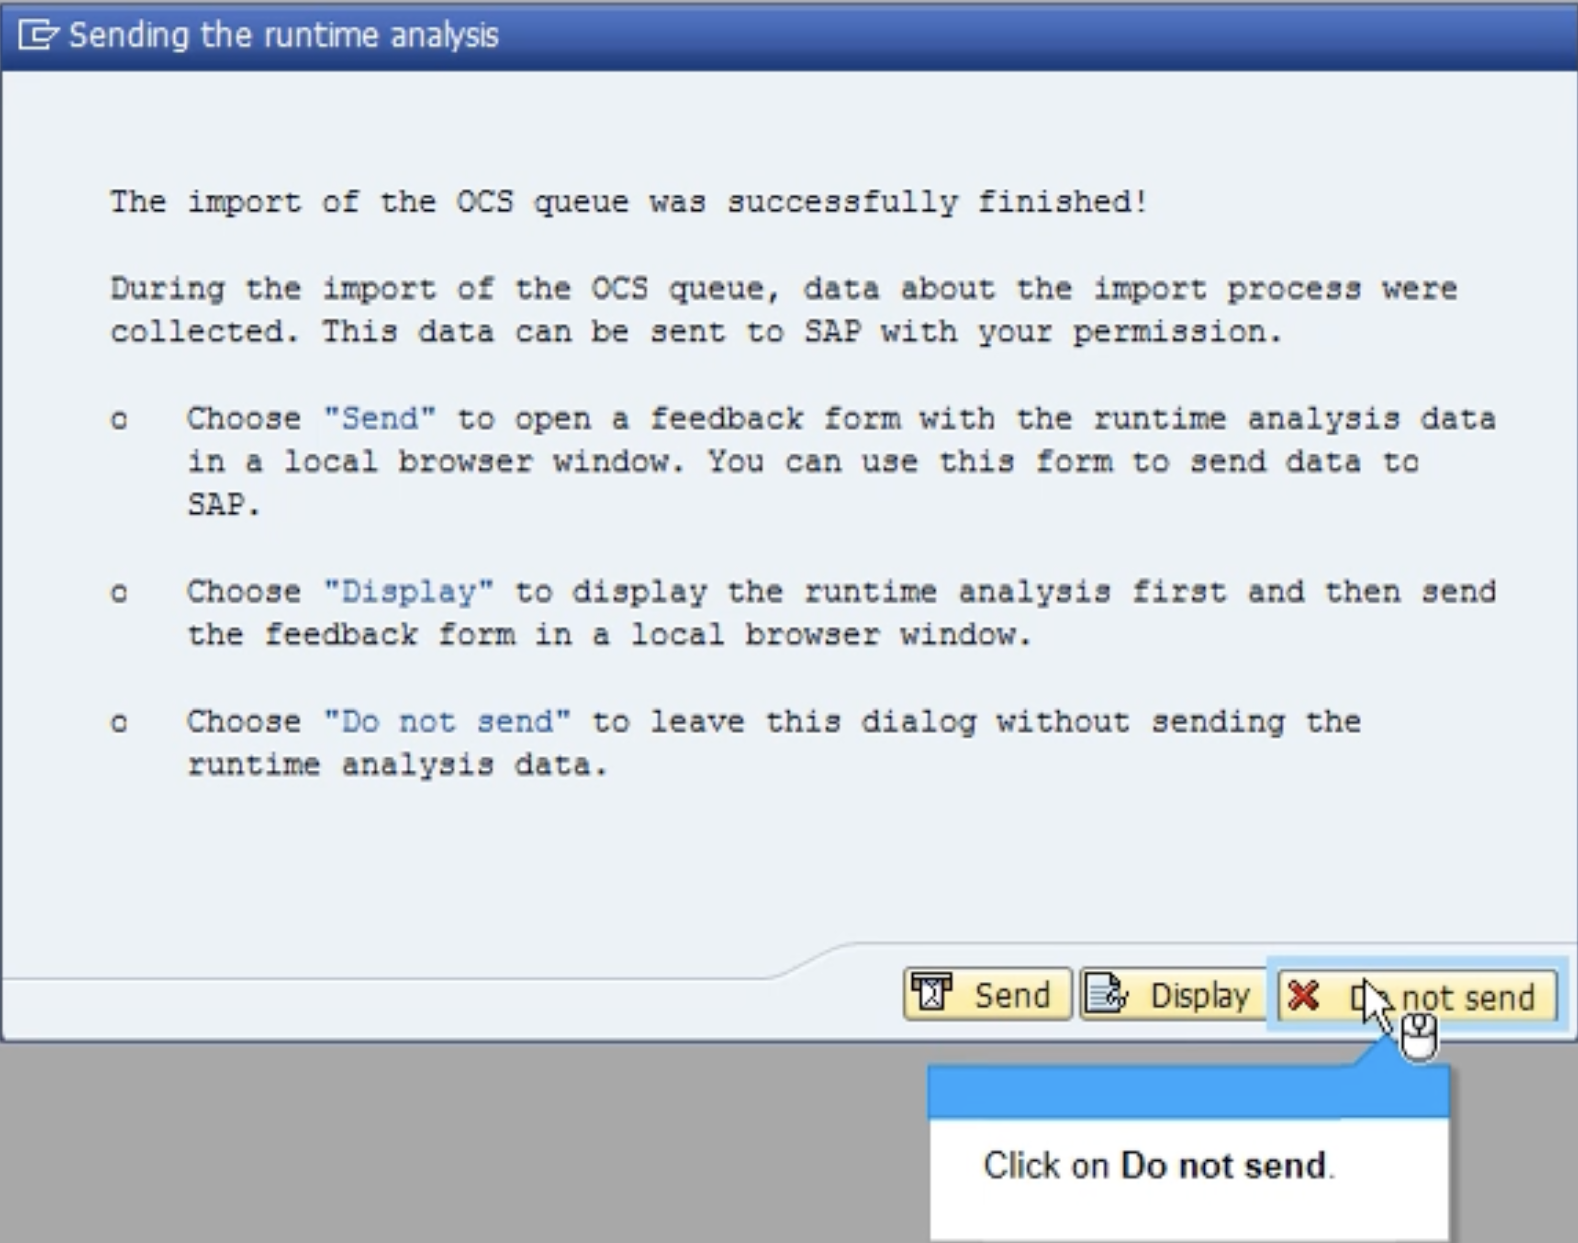
When prompted to send Runtime Analysis, select Do not send.
Screenshot
-
Perform the following to confirm that the Add-on SAILPOIN was uninstalled:
- Select Installable Components and scroll through the list to ensure SAILPOIN is not found.
- Select Uninstallable Components and scroll through the list to ensure SAILPOIN is not found.
- Go to System > Status. Under SAP System data go to Product Version > Details > Installed Software Component Versions and ensure the Add-on SAILPOIN is not found.
Documentation Feedback
Feedback is provided as an informational resource only and does not form part of SailPoint’s official product documentation. SailPoint does not warrant or make any guarantees about the feedback (including without limitation as to its accuracy, relevance, or reliability). All feedback is subject to the terms set forth at https://developer.sailpoint.com/discuss/tos.