Automation Anywhere Provisioning Settings
This section contains the information used to create, update, enable, disable, and delete accounts by triggering RPA bots.
Important
Upload the bot to the Control Room before configuring its file ID. The connector cannot deploy a bot that exists on a local machine.
Bot Execution Configuration
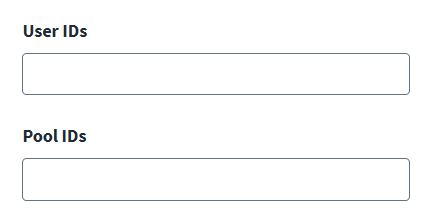
Configure User IDs and Pool IDs.
Screenshot
-
In the User IDs field, enter one or more Automation Anywhere user IDs that the bot will run as. For more information, refer to Run As User ID.
Find these IDs in your Automation Anywhere Control Room under Administration > Users.
-
In the Pool IDs field, enter one or more device pool IDs to run the bot on specific devices. For more information, refer to Device Pool ID (Optional).
Note
To use the default device, leave the field empty.
-
Select Save.
Operation Configuration
Configure which Automation Anywhere bots to trigger for each provisioning operation. You can find file IDs in the Automation Anywhere Control Room under Automation > Bots. For more information, refer to Bot File IDs.
Screenshot
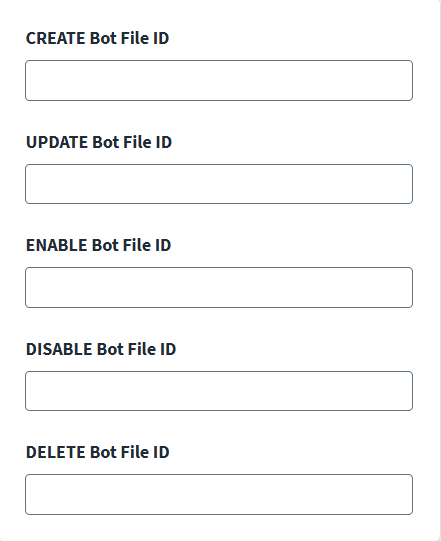
- In the CREATE Bot File ID field, enter the bot file ID to trigger when creating new accounts.
- In the UPDATE Bot File ID field, enter the bot file ID to trigger when updating accounts.
- In the ENABLE Bot File ID field, enter the bot file ID to trigger when enabling accounts.
- In the DISABLE Bot File ID field, enter the bot file ID to trigger when disabling accounts.
- In the DELETE Bot File ID field, enter the bot file ID to trigger when deleting accounts.
- Select Save.
Advanced Polling Settings
Configure settings to adjust polling when connecting to the source. This may help resolve timeout errors that occur during provisioning operations.
Screenshot
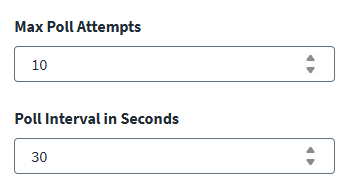
- In the Max Poll Attempts field, enter the maximum number of times the connector should check the job status. If the job doesn't complete after the configured number of checks, it times out.
- In the Poll Interval in Seconds field, enter the wait time between job status checks. Increase this value if your workflows take longer to complete.
- Select Save.
Operation-Specific Guidelines
This section provides detailed guidance for provisioning operations in the Automation Anywhere RPA platform.
Best Practices
- Return a clear result: Always set
Statusand, on failure, set amessageso Support can troubleshoot. The response should have the required attributes. - Always return
botOutVariables: The connector requiresbotOutVariableswithStatus. SetStatus: trueon success andStatus: falseon failure. - Return the created identity: Always include the identity attribute in
Attributeswith the final value. - Idempotency: If the same operation is retried, consider designing the target system or workflow so it does not create duplicates (e.g. "create if not exists" or use a stable identifier).
- Errors: On failure, set
Status: falseand put a short, user-friendly reason inmessage; avoid exposing sensitive details. - Logging: Log input and outcome (success or failure) in Automation Anywhere for auditing and support; avoid logging secrets in plain text.
-
Atomic Operations - If the create operation partially fails, for example if the account is created but role assignment fails:
- Option A: Rollback the partially created account then set
Status = false. - Option B: Complete what's possible, then set
Status = true. Note the issue in a message.
Note
SailPoint recommends that you roll back for consistency.
- Option A: Rollback the partially created account then set
-
Apply set / add / remove correctly: In the target system, implement
Setas "replace value",Addas "append to list",Removeas "remove these values from list" so the behavior matches the connector's intent. - Return current state: Prefer returning the updated account's attributes in
Attributes(at least identity + any attributes your workflow changes) so the connector can merge and show up-to-date data.
CREATE Operations
When the connector receives a Create Account request, it deploys a dedicated Automation Anywhere bot. The bot receives input, performs the account creation in the target system, and returns the result to the connector.
Configure the CREATE bot file ID in the connector configuration. The bot must be the one associated with that file ID in the Automation Anywhere Control Room.
Bot Input Variables
The connector sends input variables to the bot using the Automation Anywhere /v3/automations/deploy endpoint. Each variable is formatted as an Automation Anywhere typed variable.
Variable Format:
The input contains one typed variable per attribute from the provisioning request. Names and sets of attributes depend on the account schema and what the request contains. For example, Email, displayName, Roles, etc.
The connector does not send the following:
- Null or empty string values
- Reserved names used only for output. Names such as
Status,message, orAttributes.
The bot can expect the following Automation Anywhere variable types as input:
| Type | Description |
|---|---|
| string | String values |
| string | Arrays of strings (serialized as comma-separated or JSON string) |
| number | Numeric values |
| boolean | Boolean values |
The bot receives the same attribute names as in the schema (e.g. Email, accountId). The identity attribute's name is defined in the connector's account schema.
Bot Input Example
{
  "Email":       { "type": "STRING", "string": "john.doe@example.com" },
  "displayName": { "type": "STRING", "string": "John Doe" },
  "Roles":       { "type": "STRING", "string": "[\"Admin\"]" }
}
Bot Responsibilities
- Validate Input - Check all required fields are present.
-
Check for Duplicates
- Search the target system for an existing account with same email or username.
- If one exists, set
Status = falseand return an error message. For example: "Account with email john.doe@company.com already exists"
-
Create Account
- Go to the user creation interface.
- Fill in all the provided attributes.
- Submit form / call API.
- Wait for confirmation.
-
Assign Initial Entitlements (if specified)
- Add the user to their specified roles/groups.
- Assign default permissions.
-
Verify Creation
- Search for newly created accounts.
- Confirm that they exist and they are active.
- If verification fails, set
Status = false.
-
Capture Account Details
- Scrape all account attributes from the confirmation page or the API response.
- Critical: Capture system-generated fields (account ID, timestamps).
- Critical: Ensure the identity attribute is captured.
-
Return Output
- Set
Status = trueif successful. - Include a success message.
- Include complete account data in the Attributes field.
- Set
Bot Output Variables
The connector reads the bot's output variables after the bot completes. The bot must return the following output variables in Automation Anywhere's typed variable format.
| Variable | Type | Required | Description |
|---|---|---|---|
| Status | boolean | Yes |
If |
| message | string | Recommended | Short reason or detail, especially when Status is false. |
| Attributes | string | Yes | A JSON string that, when parsed, is an object of account attributes. It must include the identity attribute with the created account's ID. Note: The identity attribute must be present in the parsed |
Bot Output Example (inline)
{
  "botOutVariables": {
    "values": {
      "Status":     { "type": "BOOLEAN", "boolean": true },
      "message":    { "type": "STRING",  "string": "Account created" },
      "Attributes": { "type": "STRING",  "string": "{\"Email\":\"john.doe@example.com\",\"displayName\":\"John Doe\",\"Roles\":[\"Admin\"]}" }
    }
  }
}
Bot Output - Success Example
{
  "botOutVariables": {
    "values": {
      "Status":     { "type": "BOOLEAN", "boolean": true },
      "message":    { "type": "STRING",  "string": "Account john.doe@company.com created successfully in SalesApp" },
      "Attributes": { "type": "STRING",  "string": "{\"email\":\"john.doe@company.com\",\"username\":\"jdoe\",\"firstName\":\"John\",\"lastName\":\"Doe\",\"department\":\"Engineering\",\"jobTitle\":\"Senior Developer\",\"manager\":\"jane.smith@company.com\",\"status\":\"Active\",\"roles\":[\"Developer\",\"User\"],\"accountId\":\"SA-12345\",\"createdDate\":\"2025-01-10T14:30:00Z\",\"lastModifiedDate\":\"2025-01-10T14:30:00Z\"}" }
    }
  }
}
Bot Output - Failure Example (Duplicate)
{
  "botOutVariables": {
    "values": {
      "Status":     { "type": "BOOLEAN", "boolean": false },
      "message":    { "type": "STRING",  "string": "Cannot create account: Email john.doe@company.com already exists in SalesApp (Account ID: SA-11111)" },
      "Attributes": { "type": "STRING",  "string": "{}" }
    }
  }
}
Bot Output - Failure Example (System Error)
{
  "botOutVariables": {
    "values": {
      "Status":     { "type": "BOOLEAN", "boolean": false },
      "message":    { "type": "STRING",  "string": "Failed to create account: Target system returned error 'Invalid department code: ENG01'. Please verify department value." },
      "Attributes": { "type": "STRING",  "string": "{}" }
    }
  }
}
UPDATE Operations
When an update account request runs, the connector deploys an Automation Anywhere bot. The bot receives the account identity and the change details (set / add / remove), applies the changes to the target system, and returns a result.
Configure the UPDATE bot file ID in the connector configuration. The bot must be the one associated with that file ID in the Automation Anywhere Control Room.
Bot Input Variables
The connector sends typed input variables when deploying the bot via the Automation Anywhere Control Room /v3/automations/deploy endpoint. Each variable is sent in Automation Anywhere's typed variable format.
Variable Format:
The input uses a structured format instead of a flat list of attributes. The update operation groups changes into three categories: attributesToSet, attributesToAdd, and attributesToRemove. These categories are serialized as JSON strings and sent as STRING-typed variables.
Top-level variables:
| Variable | Type | Description |
|---|---|---|
| identity attribute | string | The account to modify. The name comes from the connector schema (e.g. Email). |
| attributesToSet | string | JSON string of key-value pairs: attributes to set (replace). Values can be string, number, boolean, or array of strings. |
| attributesToAdd | string | JSON string of key-value pairs: multi-valued attributes - add these values to the existing list. Values are typically arrays of strings. |
| attributesToRemove | string | JSON string of key-value pairs: multi-valued attributes - remove these values. Values are typically arrays of strings. |
| operation | string | Always UPDATE for this bot. |
| timestamp | string | Request timestamp (e.g. for logging). |
Note
Only attributes that exist in the connector's account schema are included. Identity is sent once at the top level; it is not repeated inside the three buckets. Any of the three objects may be empty {} if there are no set/add/remove changes for that category.
Bot Input Example
{
  "Email":              { "type": "STRING", "string": "user@example.com" },
  "attributesToSet":    { "type": "STRING", "string": "{\"displayName\":\"New Name\"}" },
  "attributesToAdd":    { "type": "STRING", "string": "{}" },
  "attributesToRemove": { "type": "STRING", "string": "{\"Roles\":[\"OldRole\"]}" },
  "operation":          { "type": "STRING", "string": "UPDATE" },
  "timestamp":          { "type": "STRING", "string": "Wed Feb 04 12:00:00 GMT 2026" }
}
Bot Responsibilities
-
Locate Account
- Use the identity attribute value to find account in target system.
- If an account is not found, set
Status = falseimmediately. Example error:Cannot update: Account john.doe@company.com not found
-
Determine What Changed
- Parse the three input JSON strings.
- Identify additions, such as new roles using
attributesToAdd. - Identify removals, such as removed roles using
attributesToRemove. - Identify modifications, such as department change using
attributesToSet.
-
Apply Changes
- Update only the specified attributes.
- Do not modify attributes not mentioned in input.
- Navigate to edit interface.
- Make changes.
- Save the changes.
-
Verify Changes
- Re-read account data from target system.
- Confirm changes applied correctly.
- If verification fails, consider rolling back the changes.
-
Capture Updated State
- Scrape all current account attributes.
- Critical: Include identity attribute.
- Include both changed and unchanged attributes (full account state).
-
Return Output
- Set Status = true if all changes applied.
- Describe what was changed in a message.
- Include complete account data in the
Attributesfield.
Bot Output Variables
The connector reads output variables when the bot finishes execution. The bot must return the following variables in the Automation Anywhere's typed variable format:
| Variable | Type | Required | Description |
|---|---|---|---|
| Status | boolean | Yes |
If |
| message | string | Recommended | Short reason or detail, especially when Status is false. |
| Attributes | string | Yes | A JSON string that parses to an object of account attributes. Must include the identity attribute with the updated account's ID. Other attributes returned here are merged with existing account data so the identity system shows the latest state. Note: The identity attribute must be present in the parsed |
Bot Output - Success Example
{
  "botOutVariables": {
    "values": {
      "Status":     { "type": "BOOLEAN", "boolean": true },
      "message":    { "type": "STRING",  "string": "Account updated: Changed department from Engineering to Sales, changed job title to Sales Engineer, added Sales role" },
      "Attributes": { "type": "STRING",  "string": "{\"email\":\"john.doe@company.com\",\"username\":\"jdoe\",\"firstName\":\"John\",\"lastName\":\"Doe\",\"department\":\"Sales\",\"jobTitle\":\"Sales Engineer\",\"manager\":\"bob.jones@company.com\",\"status\":\"Active\",\"roles\":[\"Developer\",\"User\",\"Sales\"],\"lastModifiedDate\":\"2025-01-10T16:15:00Z\"}" }
    }
  }
}
Bot Output - Failure Example (Account Not Found)
{
  "botOutVariables": {
    "values": {
      "Status":     { "type": "BOOLEAN", "boolean": false },
      "message":    { "type": "STRING",  "string": "Cannot update account: User john.doe@company.com not found in SalesApp. Account may have been deleted." },
      "Attributes": { "type": "STRING",  "string": "{}" }
    }
  }
}
DELETE, ENABLE, and DISABLE Operations
The connector starts an Automation Anywhere bot when a DELETE, ENABLE, or DISABLE account request is run. The bot receives the account identity, then it deletes, activates, or deactivates the account in the target system, and returns a result.
Configure the DELETE, ENABLE, or DISABLE bot file ID in the connector configuration. The bot must be the one associated with that file ID in the Automation Anywhere Control Room.
Important
To use ENABLE or DISABLE account operations, ensure that an attribute named accountStatus is included in the data and that it is mapped to set the Account Status (enabled or disabled) in SailPoint. The attribute accountStatus is a boolean attribute where TRUE means the account is enabled.
Bot Input Variables
The connector sends typed input variables when deploying the bot via the Automation Anywhere Control Room /v3/automations/deploy endpoint. Each variable is sent in Automation Anywhere's typed variable format.
Variable Format:
Top-level fields:
| Variable | Type | Description |
|---|---|---|
| identity attribute | string | The account to modify. The name comes from the connector schema (e.g. Email). This is the only identity field sent. |
| operation | string | DELETE, ENABLE, or DISABLE |
| timestamp | string | Request timestamp (e.g. for logging). |
Bot Input Example
DELETE
{
  "Email":    { "type": "STRING", "string": "user@example.com" },
  "operation":{ "type": "STRING", "string": "DELETE" },
  "timestamp":{ "type": "STRING", "string": "Wed Feb 04 12:00:00 GMT 2026" }
}
ENABLE
{
  "Email":    { "type": "STRING", "string": "user@example.com" },
  "operation":{ "type": "STRING", "string": "ENABLE" },
  "timestamp":{ "type": "STRING", "string": "Wed Feb 04 12:00:00 GMT 2026" }
}
DISABLE
{
  "Email":    { "type": "STRING", "string": "user@example.com" },
  "operation":{ "type": "STRING", "string": "DISABLE" },
  "timestamp":{ "type": "STRING", "string": "Wed Feb 04 12:00:00 GMT 2026" }
}
Bot Output Variables
Bot output variables are required. The connector requires the bot to complete successfully and to return valid output variables.
If botOutVariables is missing, empty, or the Status variable is absent, the connector fails the request.
The bot must return the following output variables in Automation Anywhere's typed variable format:
| Variable | Type | Required | Description |
|---|---|---|---|
| Status | BOOLEAN | Yes | Must be true for success. If false, the connector fails the request and uses message as the error reason. |
| message | STRING | Recommended | Short reason for success or failure. Especially important when Status is false. |
Note
Attributes are not required. The connector does not read or validate an Attributes variable for DELETE, ENABLE, or DISABLE operations.
Bot Output Examples
DELETE
Success
{
  "botOutVariables": {
    "values": {
      "Status":  { "type": "BOOLEAN", "boolean": true },
      "message": { "type": "STRING",  "string": "Account deleted" }
    }
  }
}
Failure
{
  "botOutVariables": {
    "values": {
      "Status":  { "type": "BOOLEAN", "boolean": false },
      "message": { "type": "STRING",  "string": "Account not found or already removed" }
    }
  }
}
ENABLE
Success
{
  "botOutVariables": {
    "values": {
      "Status":  { "type": "BOOLEAN", "boolean": true },
      "message": { "type": "STRING",  "string": "Account enabled" }
    }
  }
}
Failure
{
  "botOutVariables": {
    "values": {
      "Status":  { "type": "BOOLEAN", "boolean": false },
      "message": { "type": "STRING",  "string": "Account not found or already enabled" }
    }
  }
}
DISABLE
Success
{
  "botOutVariables": {
    "values": {
      "Status":  { "type": "BOOLEAN", "boolean": true },
      "message": { "type": "STRING",  "string": "Account disabled" }
    }
  }
}
Failure
{
  "botOutVariables": {
    "values": {
      "Status":  { "type": "BOOLEAN", "boolean": false },
      "message": { "type": "STRING",  "string": "Account not found or already disabled" }
    }
  }
}
Documentation Feedback
Feedback is provided as an informational resource only and does not form part of SailPoint’s official product documentation. SailPoint does not warrant or make any guarantees about the feedback (including without limitation as to its accuracy, relevance, or reliability). All feedback is subject to the terms set forth at https://developer.sailpoint.com/discuss/tos.