Connecting SailPoint and Microsoft SQL Server
To connect SailPoint with Microsoft SQL Server, perform the following tasks:
Adding the Source in SailPoint
To connect to SailPoint, perform the following steps. Once the connection is made, you can configure it to meet your company's needs.
Important
By default, the provisioning feature is disabled, and the connector only supports read-only operations. To support provisioning operations, you must manually enable the feature in the source configuration.
To configure a new source:
- Sign in to SailPoint.
- Go to Admin > Connections > Sources.
- Select Create New.
- Search for the connector by entering the name in the search box, and then select Configure.
- In the Source Name field, enter a unique and descriptive name for your source. Source names cannot exceed 128 characters.
- In the Description field, provide additional details about the source to help distinguish it from similar sources. This field allows a maximum of 2,000 characters.
- In the Source Owner field, begin typing the name of an owner. Matches appear after you type two or more letters. For more information, refer to Assigning a Source Owner.
-
Under Connection Type, select Direct Connection or Flat File.
- Direct Connection - A direct connection fetches data from the Virtual Appliance Cluster you choose as the application connector for the source. A direct connection configuration allows for real-time updates. For more information about configuring and deploying virtual appliances, refer to the Virtual Appliance Reference Guide.
- Flat File - Select the flat file if no connector is available, or if another system restricts the connection. This option allows only reading and aggregating data as a generic/delimited application. Provisioning activity is unsupported, and additional configuration pages like connection settings and aggregation settings are unavailable.
-
If you selected Direct Connection, in Virtual Appliance Cluster, select the virtual appliance cluster that will be used as the application connector for the source.
- (Optional) Select a governance group to grant its members source or role sub-admin level oversight of the source and its access. For more information, refer to Creating and Managing Governance Groups.
- If this source represents a primary system containing your organization's personnel records, select the Authoritative Source checkbox. For more information, refer to Creating Identity Profiles.
- Select Continue. The source is created, and you are navigated to the Source Setup > Base Configuration page. Continue to configure your connected source there.
Base Configuration
Provide the base configuration parameters. Information you entered in the Create New Source dialog is automatically entered into the fields in the Base Configuration page. You can edit this information if necessary.
- Enter a unique name and description for the source.
-
In the Source Owner dropdown list, select the identity that owns this source.
- To find a source owner, begin entering their name.
-
In the Virtual Appliance Cluster dropdown list, select the virtual appliance to use when communicating with your organization's systems. For more information, refer to SailPoint Virtual Appliances.
-
(Optional) If enabled for your organization, select the Use a Credential Provider checkbox to manage the source's authentication using a credential provider.
Note
To add a credential provider, go to Admin > Connections > Credential Providers. For more information about credential providers, refer to Credential Providers.
-
Configure the authentication to allow SailPoint to connect to the source. Refer to Connection Settings for more information.
-
(Optional) In the Governance Group for Source Management dropdown list, select a governance group to associate with this source. For more information about governance groups, refer to Associating Governance Groups with a Source.
-
(Optional) Choose whether to enable or disable provisioning for the source. Provisioning is disabled by default.
-
Enable Provisioning - Set the toggle to Enabled to allow the source to create, update, and deactivate accounts in the connected source system.
-
Disable Provisioning - Set the toggle to Disabled to disable provisioning for the source. Disabling provisioning will prevent the creation, updating, or deactivating of accounts on this source.
-
-
Drag and drop the required files into the Upload Files box, or upload them from your computer.
Warning
Ensure that the file you upload is not vulnerable or malicious.
Upload the Microsoft SQL Server jar file used for the source connection. The current file and upload history are listed below the box.
-
(Optional) Upload the SQLJDBCDriver.config and krb5.config files used to connect to the source via Windows authentication. The current file and upload history are listed below the box.
Warning
Ensure that the file you upload is not vulnerable or malicious.
Important
This step is necessary if you select Windows Authentication as your Authentication Type. For more information, refer to Connection Settings.
Once you upload the file to the selected location, you might need to restart the Cloud Connection Gateway (CCG) service on the Virtual Appliance. This is to ensure the previously cached configuration file - if one exists - is removed and a fresh configuration file is used. For more information, refer to the Virtual Appliance Troubleshooting Guide.
Note
- For more information on Windows authentication and its requirements, refer to Windows Authentication and Kerberos.
- For alternative methods to uploading the configuration files, refer to Upload Configuration Files.
-
Select Save.
Connection Settings
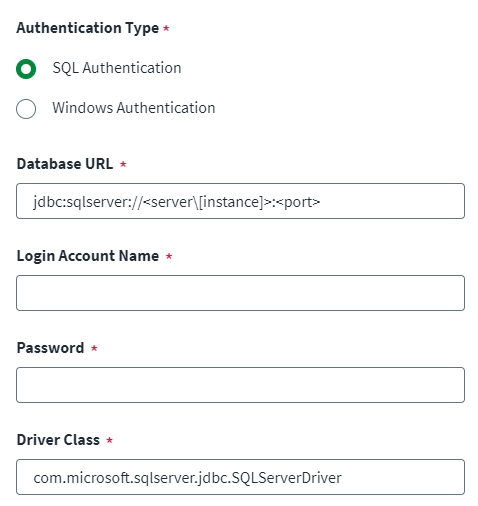
Configure authentication settings used to connect to the SQL server source.
Screenshot
To configure a secured, direct connection:
- Select an Authentication Type.
-
Based on your selected Authentication Type, enter a Database URL.
-
For SQL Authentication:
<jdbc:sqlserver://><[serverName][\instanceName][:portNumber]]Consider the following for this URL:
jdbc:sqlserver- (Required) This is known as the sub-protocol and is constant.-
serverName- The address of the server or listener for clustered environments to which SailPoint should connect.This could be a DNS, IP address, localhost, or
127.0.0.1for the local computer. -
instanceName- The instance used to connect toserverName portNumber- The port used to connect toserverName
-
For Windows Authentication:
To properly support Windows authentication, the Virtual Appliance must be able to resolve the SQL server host, the key distribution center (KDC), and the default Kerberos realm. For more information about configuring Windows authentication, refer to Windows Authentication and Kerberos.
Important
To use Windows authentication, you must upload SQLJDBCDriver.config and krb5.config files. For more information, refer to Base Configuration or Upload Configuration Files.
Connections using Windows authentication are supported for JDBC drivers only.
jdbc:sqlserver://><[serverName[\instanceName][:portNumber]];integratedSecurity=true;authenticationScheme=JavaKerberos;trustServerCertificate=true;Consider the following for this URL:
jdbc:sqlserver- (Required) This is known as the sub-protocol and is constant.-
serverName- The fully qualified domain name of the SQL server host machine.This is typically in the following format:
<hostname>.<domain_name>For example, if the SQL server host is
MYSQLSERVERand the domain isEXAMPLE.COM, your entry would be as follows:MYSQLSERVER.EXAMPLE.COM -
instanceName- The instance used to connect toserverName portNumber- The port used to connect toserverName
-
-
Enter the service account username into the Login Account Name field. The service account is the account that makes the connection to the Microsoft SQL server database.
If you are using Windows authentication, the service account should be in the following format, with
<name>as the username and<realm>as the domain name:<name>@<realm>For example, if
useris the service account username, andEXAMPLE.COMis its domain, then the entry is as follows:user@EXAMPLE.COM -
Enter the Password used to authenticate the service account.
If you are using Windows authentication, the password you enter is the password that authenticates the Active Directory user.
-
Enter the fully qualified name of the Driver Class supported by JDBC. For example, you can use the following:
com.microsoft.sqlserver.jdbc.SQLServerDriver
Database Connection Settings
Screenshot
Note
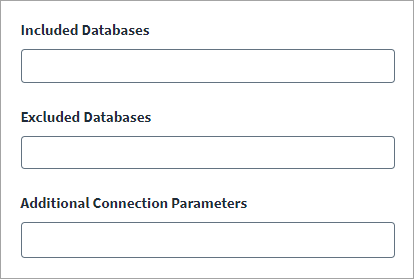
If you leave both the Included Databases and Excluded Databases fields blank, SailPoint aggregates all server accounts and users from all available databases, except orphan database users (databases users who are not linked with any server account) and databases users with only public roles.
- In the Included Databases field, enter a comma-separated list of database names to be included in the aggregation operation. The Microsoft SWL server source supports database names with special characters during account aggregation.
-
In the Excluded Databases field, enter a comma-separated list of database names to be excluded in the aggregation operation. The Microsoft SWL server source supports database names with special characters during account aggregation.
Important
If the Include Databases field is configured, SailPoint ignores the Excluded Databases parameter.
-
In the Additional Connection Parameters field, you can set up the additional parameters as per your requirements, in the form of a key-value pair. Press Enter to add each multiple key-value pair to a list that displays below the field.
- Select Save.
Additional Settings
Configure additional connector options.
Page Size
Configure the maximum number of records to aggregate in a single page when iterating over large datasets.
Screenshot
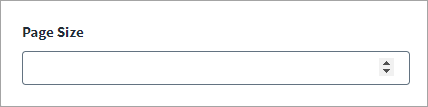
- Enter the Page Size that is the number of rows in a result set. By default, the page size value is 1000.
- Select Save.
Review and Test
Perform a test to confirm the connection to SailPoint.
- Go to Review and Test.
-
Confirm that the entries in each field are correct.
If you note any mistakes, return to the section and make corrections.
-
Select Test Connection.
SailPoint Application Onboarding
SailPoint application onboarding enables you to easily onboard new applications and create sources following the successful onboarding of a discovery source. To use this feature, continue to Discovered Applications in the SailPoint user interface.
For more information, refer to Application Onboarding in the SailPoint SaaS documentation.
Documentation Feedback
Feedback is provided as an informational resource only and does not form part of SailPoint’s official product documentation. SailPoint does not warrant or make any guarantees about the feedback (including without limitation as to its accuracy, relevance, or reliability). All feedback is subject to the terms set forth at https://developer.sailpoint.com/discuss/tos.