Configuring Top Secret for Integration
This section contains reference information and configuration tasks you'll need to complete to configure the SailPoint Top Secret connector after establishing the connection.
Installing and Configuring Connector Gateway
Download the .zip files for the latest Connector Gateway release.
The Connector Gateway can be installed on a UNIX/Windows computer with network connectivity to both SailPoint and the Top Secret Connector.
Create an installation directory on the computer where the Connector Gateway will run and extract the contents of the ConnectorGateway-releaseVersion.zip file included with the release of SailPoint, where releaseVersion is the version of the Connector Gateway.
Before You Begin
- Java Development Kit is required to install Connector Gateway, Oracle Jdk 11 and 17 and OpenLogic Jdk 11 and 17 are recommended.
- After upgrading to the latest version of Connector Gateway, the interceptions are no longer stored in file or read from a file. Pending interceptions which were stored in a file by a previous version of the Connector Gateway, or pending interceptions not sent to the Provisioning Engine will be invalid.
- The Connector Gateway and the Top Secret Connector can be started / stopped in any order.
- If there is a firewall between the Connector Gateway and the Top Secret Connector, then the port and port +1 on which Top Secret Connector is listening must be opened.
Installation steps for the Connector Gateway must be followed only if you want to configure the Connector Gateway as a service.
Note
You are only entitled to download components for which you have an active license with SailPoint. The availability of a component for download does not grant you a license to use it. Downloading a component which you do not have an active license for does not entitle you to use it. Please contact your Account Representative or CSM for more information.
Supported Operating Systems
The Connector Gateway provides support for the following operating systems:
- SUSE Linux Enterprise Server version 15
- Windows Server version 2022 and 2025
Note
For Linux Support, the distributions and versions of Linux highlighted above are verified, but any currently available and supported distributions and versions of Linux will be supported by SailPoint. Implementers and customers must verify that the distribution and version of Linux of choice is compatible with the version of JDK being used.
Hardware Sizing Considerations
Use the information below to determine the hardware resource allocations required by your Mainframe deployment. For a more detailed explanation, refer to the IdentityIQ Hardware Sizing Guide.
Connector Gateway Resource Allocation
You need to provide a separate host to run the Connector Gateway for the Top Secret connector. Dedicating a virtual machine (VM) as a host for all of the Connector Gateway instances provides a simple approach and a redundancy/backup strategy for this part of the infrastructure.
Regardless of your overall IdentityIQ footprint, SailPoint suggests using the same resources as a medium UI server compute resource target for a single Connector Gateway instance. For example, if a medium footprint calls for 4 CPUs, 8 GB of memory, and 50 GB of storage for a UI server. For more information about Connector Gateway, refer to Connector Gateway (CG) and Mainframe Connectors - FAQ and Troubleshooting.
Note
Connector Gateway can be installed on systems with other ancillary SailPoint products (like IQService). However, be sure that the system has dedicated resources (TCP ports, for example) to support all products to appropriately.
Installing Connector Gateway
Install the Connector Gateway on a Windows or UNIX system.
For Microsoft Windows
- Download the Connector Gateway from the Mainframe Connectors Downloads page.
-
Unzip the
ConnectorGateway-<releaseVersion>.zipfile in the temporary directory.The following files are extracted:
init.xmlinstall.batupdate.batlog4j.propertiesConnectorGateway.jarConnectorGateway64.exelog4j-core-2.26.0.jarlog4j-api-2.26.0.jarlog
-
Set
JAVA_HOMEenvironment variable to the root directory of your JDK installation. -
Run the following batch file to install Connector Gateway on 64-bit systems:
install.bat
Verify that the
SailPointConnectorGateway_<service name>service has been installed, where<service name>is the name of the service to which the Connector Gateway is connected during the installation of the connector.For example, you can use
20as a value for server entries. -
Edit the init.xml file and set the host and port details for the Mainframe Connector and the listening port for the Connector Gateway in the
Servertag. For more information on parameters in the init.xml file, refer to Example init.xml File.Note
Restart the Connector Gateway after
init.xmlfile is modified.The parameters in the init.xml file can also be set using the command line as follows:
java -jar ConnectorGateway.jar -smHostname <MF Host> -smPort <MF Agent Port> -serverPort <Connector Gateway Port> -characterSet <Character Set>Note
All the parameters in the init.xml file can be set using the above command. You can set one or more parameters at a time.
To update Service Name edit the install.bat file and rename
SERVICE_NAME_SUFFIXvariable. -
Start the
SailPointConnectorGateway_<service name>service. -
To provide heap memory settings for the Java Virtual Machine (JVM) pass the values like below:
install.bat JvmMsValue JvmMxValue i.e. install.bat 32 512update.bat JvmMsValue JvmMxValue i.e. update.bat 32 512Note
- JvmMx Stands for Maximum heap size which Sets the maximum amount of memory the JVM can allocate for the heap. default is 512MB
- JvmMs Stands for: Minimum heap size which Sets the initial memory allocation for the heap when the JVM starts. default is 32 MB
-
Whenever JDK version is upgraded from one version to another, Run
update.batfile as follow:(64-bit) update.bat 64
For UNIX
- Download the Connector Gateway from the Mainframe Connectors Downloads page.
-
Unzip the
ConnectorGateway-releaseVersion.zipfile in the temporary directory.The following files are extracted:
init.xmlinstall.batupdate.batlog4j.propertiesConnectorGateway.jarConnectorGateway64.exelog4j-core-2.26.0.jarlog4j-api-2.26.0.jarlog
-
Add the
bindirectory of the Java Development Kit to the systemPATHvariable. -
Edit the init.xml file and set the host and port details for the Mainframe Connector and the listening port for the Connector Gateway in the
Servertag.For more information on parameters in init.xml file, refer to Example init.xml File.
-
Run the following to start the Connector Gateway:
java -jar ConnectorGateway.jar
Upgrading Connector Gateway
To upgrade the Connector Gateway, download and install the upgrade .zip file from the SailPoint Compass Community.
Important
For Connector Gateway versions preceding version ConnectorGateway-Jun-2025, you must recycle the default encryption key if one is currently in use. For more information, refer to Recycling Encryption Keys.
- Download the Connector Gateway from the Mainframe Connectors Downloads page.
-
Unzip the
ConnectorGateway-releaseVersion.zipfile in the temporary directory.The following files are extracted:
init.xmlinstall.batupdate.batlog4j.propertiesConnectorGateway.jarConnectorGateway64.exelog4j-core-2.24.3.jarlog4j-api-2.24.3.jarlog
-
Begin the upgrade process.
(For Microsoft Windows) Stop the Connector Gateway service or Command Line Interface (CLI).
(For UNIX) Stop the SailPoint Connector Gateway process.
-
Retain the backup of the old Connector Gateway configuration.
- Replace the existing setup files with the new files extracted from the latest download version.
-
To update the init.xml file from the latest download, refer to the values provided in the init.xml file from the backup configuration you took earlier.
For more information on parameters in the init.xml file, refer to Example init.xml File.
-
(For Microsoft Windows) Start the Connector Gateway service or Command Line Interface (CLI).
(For UNIX) Start the SailPoint Connector Gateway process.
Example init.xml File
The following is an example of a typical init.xml file:
<ConnectorGateway>
  <SM>
    <!-- Agent Hostname or IP Address-->
    <hostname>xx.xx.xx.xx</hostname>
    <!-- Agent port number-->
    <port>2980</port>
    <!-- Default value is IBM1047 -->
    <characterSet></characterSet>
    <!-- Flag indicating whether the TLS communication is enabled between CG and Mainframe Agent -->
    <enableCGtoAgentTLS>true</enableCGtoAgentTLS>
    <trustStore>C:\Java\jre1.8.0_144\lib\security\cacerts</trustStore>
  </SM>
  <Server>
    <!-- Connector Gateway port number-->
    <port>2980</port>
    <enableCGtoPE2TLS>true</enableCGtoPE2TLS>
    <keyStore>C:\Users\UserName\Desktop\Certs\keystore.jks</keyStore>
    <keyStorePass>ij2Hn20pTsyGbV9vum4/3w==</keyStorePass>
    <keyPass>ij2Hn20pTsyGbV9vum4/3w==</keyPass>
  </Server>
</ConnectorGateway>
The parameters of the init.xml file are as follows:
SM Entries
| Parameter | Description |
|---|---|
hostname |
Hostname of the connector. |
port |
(Agent port number) Port number of the connector. This connection requires a read/write port, so be sure that the defined port+1 is reserved for this connection. For example, if the port number in the init.xml file is 2470, ports 2470 and 2471 must be reserved for the connection to the connector. |
characterSet |
The Provisioning Engine encodes all messages from ASCII to EBCDIC using the IBMCharacterSet defined in the application. The Connector Gateway only needs to decode the header message before sending it to the connector. The characterSet value in the Connector Gateway and IBMCharacterSet in the application must match.Default - IBM1047 |
agentCertSubject |
To enable TLS communication between the Connector Gateway and the connector, the Connector Gateway must validate the CN of the certificate subject against this value. Set it using java -jar ConnectorGateway.jar -agentCertSubject <VALUE> - do not set it directly in the init.xml file. The Connector Gateway encrypts the value and stores it in init.xml under the <SM> tag as <agentCertSubject>ENCRYPTED_VALUE</agentCertSubject>. If not specified, the Connector Gateway validates the CN against the FQDN of the machine hosting the connector. |
disableHostnameVerification |
Disables hostname verification. Set <disableHostnameVerification>true</disableHostnameVerification> in init.xml to stop the Connector Gateway from validating the subject name referenced by agentCertSubject.Default - false |
clientProtocols |
Configures a specific supported TLS version for the Connector Gateway environment, for example <clientProtocols>TLSv1.2</clientProtocols>, which sets the jdk.tls.client.protocols system property. The default value is decided based on the JRE version available on the Connector Gateway and Mainframe environments. |
enableFIPS |
Enables FIPS for the Connector Gateway. Set <enableFIPS>true</enableFIPS> in init.xml to enable. For more information, refer to Enabling FIPS for Connector Gateway.Default - false |
trustStorePassword |
Truststore password used by the Connector Gateway, for example <trustStorePassword>Encrypted_Value</trustStorePassword>. Applies only when enableFIPS is enabled - the Connector Gateway ignores this value if enableFIPS is disabled. |
Server Entries
| Parameter | Description |
|---|---|
port |
(Connector Gateway port number) Port number of the Connector Gateway. This connection requires a read/write socket on the defined port, so be sure that the port is reserved for this connection. For example, if the listening port under the server entries is 2980, port 2980 must be reserved for the connection to the Connector Gateway. |
send_keep_alive_to_all |
(Optional) By default, the Connector Gateway sends a keep-alive message only over the ACF2 connector and the interception connection channel. To send the keep-alive message to all active SailPoint / connector connections, add <send_keep_alive_to_all>true</send_keep_alive_to_all> to init.xml.Default - false |
disableSSLLogs |
When TLS and TRACE level logging are enabled at the Connector Gateway, it prints Java's SSL logs - to the console when running from the command line, or to stdout.log in the log directory when running as a Windows service. Add <disableSSLLogs>true</disableSSLLogs> under the <Server> tag to disable SSL logs.Default - false |
encryptionKeyFile |
Path to a site-specific Encryption Key file used to encrypt sensitive data in init.xml, for example <encryptionKeyFile>C:\FileName</encryptionKeyFile>. The key must be 16, 24, or 32 bytes long and stored in a file accessible to the Connector Gateway with read permissions. |
maxActiveTransactions |
Maximum number of transactions the Connector Gateway handles simultaneously. Add under the <Server> tag, for example <maxActiveTransactions>20</maxActiveTransactions>.Default - 10 |
Recycling Encryption Keys
Encryption Keys externalized in a file can be recycled using the -recycleencryptionkey <newKeyFilePath> command.
You can define a site-specific Encryption Key to encrypt the data. Set the new Encryption Key in a file and then provide Connector Gateway with Read access to the file. The Encryption Key length must be 16, 24, or 32 bytes. For more information on the Encryption Key, refer to Configure TLS/mTLS Between SailPoint Mainframe Connector and the Connector Gateway (CG).
The -recycleEncryptionKey command updates the values for the following attributes in the init.xml file if they are already defined. For more information on the init.xml file, refer to Example init.xml File.
keypasskeystorepassagentcertsubjecttruststorepasswordpe2tlsauthpe2certsubjectkeypasscgtlsauthkeystorepasscgtlsauthtrustStorePasswordencryptionKeyFile
Important
When you upgrade to a new Connector Gateway version, be sure to copy the values from your old init.xml file into the new Connector Gateway version's init.xml file.
Caution
Since the -recycleencryptionkey command updates init.xml, SailPoint strongly recommends that you create a backup of the init.xml file prior to running the command as a precaution.
Recycle the Default Encryption Key
You must recycle your Default Encryption key if your Connector Gateway version is older than ConnectorGateway-Jun-2025. The Default Encryption key used in prior versions won't work with ConnectorGateway-Jun-2025 and subsequent releases.
Use the following command to recycle it:
java -jar ConnectorGateway.jar -recycleEncryptionKey <new_key_file> default
In the command, <new_key_file> is the full file path containing the new encryption key file.
Recycle a Custom Encryption Key
To recycle existing custom keys, use the following command:
java -jar ConnectorGateway.jar -recycleEncryptionKey <new_key_file>
In the command, <new_key_file> is the full file path containing the new encryption key file.
Uninstalling the Connector Gateway
Uninstall the Connector Gateway from Windows or UNIX computer. The process to do so varies depending on your operating system.
Microsoft Windows
- Stop the
SailPointConnectorGateway_<service name>Windows service. -
Run following command from command prompt, to uninstall Connector Gateway installed on 32-bit or 64 bit Java run:
- (32-bit)
ConnectorGateway32.exe //DS//"SailPointConnectorGateway_<service name>" - (64-bit)
ConnectorGateway64.exe //DS//"SailPointConnectorGateway_<service name>"
- (32-bit)
-
Manually remove the installation directory.
UNIX
- Stop the SailPoint Connector Gateway process.
- Manually remove the installation directory.
Security Configurations for Mainframe Integration Components
This section provides details about the security configurations for communication between SailPoint, the Connector Gateway, and Mainframe Connectors.
There are three components to carry out all the transactions which support Mainframe Integration:
- SailPoint
- Connector Gateway
- Mainframe Connector.
It is crucial to secure the communication channels between these three components. The security mechanisms supported by the Mainframe integration include:
-
TLS Communication - TLS for the following communication channels must be enabled to secure the complete solution:
- TLS between SailPoint and Connector Gateway
- TLS between Connector Gateway and Mainframe Connector
-
Client Authentication: Configurations in Mainframe Connector - The Mainframe-based connectors support Client Authentication. Client Authentication verifies every incoming request from SailPoint before executing them. To ensure the authentication process works correctly, the Mainframe Connector expects the client to send credentials with every registered user's request. Before processing a request, the Mainframe Connector first confirms that the user that requested it is authorized to perform transactions.
Prerequisites
-
Upgrade considerations
- Apply FSD0116 on the Mainframe Connector.
-
Install the latest Connector Gateway.
You can download the latest Connector Gateway at the Mainframe Connector Downloads page.
-
To enable TLS between SailPoint and Connector Gateway
- The X.509 certificate with CN part of the
<domainName>must match with FQDN of the system running Connector Gateway. - If the certificate is not available, create a CSR (Certificate Signing Request) from the Connector Gateway machine.
- Submit the CSR to a trusted (internal or third party) CA for signing. Ensure that the CA is on a trusted root CA list of the machine.
- The X.509 certificate with CN part of the
-
To enable TLS between Connector Gateway and Mainframe Connector
-
The following respective components for z/OS versions must be installed for TLS communication:
z/OS Version Cryptographic Services z/OS Security Level 3 z/OS 3.1 System SSL Base: FMID HCPT510 System SSL Security Level: FMID JCPT511 z/OS 2.5 System SSL Base: FMID HCPT450 System SSL Security Level: FMID JCPT451 z/OS 2.4 System SSL Base: FMID HCPT440 System SSL Security Level: FMID JCPT441
-
-
To utilize available hardware cryptography for performance and advanced features, the task started by CSF must be active in the system where the Mainframe application server is active.
- Configure an AT-TLS policy on Mainframe system. For more information, refer to Implementing AT-TLS Policy for Mainframe Connector Communication.
- The X.509 certificate with the CN part of the
<domainName>must match with FQDN of the system running the Mainframe Connector. - If the certificate is not available, create a CSR (Certificate Signing Request) from the Mainframe machine.
- Submit the CSR to a trusted (internal or third party) CA for signing. Ensure that the CA is on a trusted root CA list of the machine.
Troubleshooting
Refer to Connector Gateway (CG) and Mainframe Connectors - FAQ and Troubleshooting for any issues.
TLS Communication
Completely secure the connection with the source by enabling and configuring Transport Level Security (TLS) protocol between the each of the components that make up your system.
Enabling TLS Communication
The Transport Layer Security (TLS) protocol provides encryption, authentication and integrity to all applications. To use TLS-secured communication for the Mainframe Connector, TLS communication must be defined and configured in the following relevant components:
- TCP/IP in the system where the Mainframe Connector will be active
- Connector Gateway
- SailPoint
Enabling Traces
Enabling logs for Cluster enables debug level logs for all sources which use that cluster.
On the Connector Gateway:
-
Edit the
log4j2.propertiesfile on the Connector Gateway by setting the following line:log4j2.rootLogger = DEBUG, commonLog -
Restart the Connector Gateway.
Configure TLS Between the Connector Gateway and Mainframe
To enable TLS communication between the Connector Gateway and Mainframe, the Connector Gateway must validate the CN of the subject of certificate against the value provided in the agentCertSubject parameter in the init.xml file. The agentCertSubject parameter must only be set by using the following command:
java -jar ConnectorGateway.jar -agentCertSubject <VALUE>
For example:
java -jar ConnectorGateway.jar -agentCertSubject CertSubject
By running the above command, the Connector Gateway encrypts the value and stores it in the init.xml file under the SM tag as follows:
<agentCertSubject>ENCRYPTED_VALUE</agentCertSubject>
Note
The value of agentCertSubject parameter must not be set directly in the init.xml file, it must be set only by using the above command.
If agentCertSubject is not specified then the Connector Gateway validates the CN of the certificate subject against the FQDN of the machine hosting the Mainframe Connector.
To enable TLS between the Connector Gateway and the Mainframe Connector:
- Set up AT-TLS on the Mainframe where the Mainframe Connector (Agent) is installed. The certificate must be exported from the Mainframe and imported into the Connector Gateway machine.
-
Use the following command to set the
enableCGtoAgentTLSparameter totrueand set the truststore path:java -jar ConnectorGateway.jar -enableCGtoAgentTLS "true" -trustStore "truststorePath"where
trustStoreis the full path of truststore.Note
All the components the Connector Gateway, CCG, and the Mainframe Connector must be restarted after modifying the configurations.
Configure Mutual TLS Authentication Between the Connector Gateway and Mainframe
After you enable and configure TLS authentication, you can configure mutual TLS authentication on the Connector Gateway and Mainframe hosts.
Mutual TLS enables the Connector Gateway to validate the authenticity of Mainframe at the same time that Mainframe validates the Connector Gateway itself.
To enable mutual TLS authentication between Mainframe and the Connector Gateway:
-
In the init.xml file, set the
enableCGTLSAuthparameter totrueand provide supporting authentication credentials:Important
Don't set the
keyStorePassCGTLSAuthandkeyPassCGTLSAuthparameter values directly in the init.xml file. They must be set only by using the method in this step.java -jar ConnectorGateway.jar – enableCGTLSAuth "true" - keyStoreCGTLSAuth "keystorePath" –keyStorePassCGTLSAuth "keystorePassword" –keyPassCGTLSAuth "keyPassword"Consider the following for these commands:
Variables Description enableCGTLSAuth Only used if enableCGtoAgentTLS is set to true. When this is set totrue, Mainframe validates the authenticity of the Connector Gateway. This is set tofalseby default.keyStoreCGTLSAuth This is a file location where a keytool utility generated keystore.jks file can be found. Typically this is in the Connector Gateway host. This keystore.jks file is used by Mainframe to authenticate the Connector Gateway. keyStorePassCGTLSAuth The keystore.jks file is protected with a keystorePassword. The password grants access to the keystore.jks file upon successful mutual TLS authentication. keyPassCGTLSAuth This private/secret keyPasswordis a fallback authentication method used if the configured keystore password fails, and the keytool needs to recover the keys.Note
The
keystorePasswordandkeyPasswordvalues are encrypted by the Connector Gateway while updating the init.xml file. -
Copy or transfer the certificate from the Connector Gateway host to the Mainframe dataset and add it as a trusted certificate.
-
Set the
HandshakeRole ServerWithClientAuthandClientAuthType Requiredvalues in the Mainframe AT-TLS policy.For more information on these values, refer to Implementing AT-TLS Policy for Mainframe Connector Communication.
Configure TLS/mTLS Between SailPoint Mainframe Connector and the Connector Gateway (CG)
This section describes how to configure Transport Layer Security (TLS) and mutual TLS between SailPoint Mainframe Connector and CG.
- TLS: Configuration between the SailPoint Connector and CG.
- Mutual TLS: Configuration between CG and Mainframe system.
TLS and Mutual TLS require certificates for authentication. Certificates can be self-signed or issued by a Public Key Infrastructure (PKI).
This following steps use keytool and a self-signed certificate example.
Prerequisites
- Configure the SailPoint Connector.
- Install and configure the SailPoint Connector Gateway.
- Configure at least one virtual appliance cluster and successfully test the connection. For instructions, refer to the Virtual Appliance Reference Guide.
Validate the CG Connection
Before configuring TLS and Mutual TLS, validate the connection to the CG and enable TLS in the source configuration.
- Go to Admin > Connections > Sources.
- Select the Source you configured.
- Go to Connection Settings, and disable the Enable TLS toggle.
-
Go to Review and Test and select Test Connection to validate the connection.
Important
Test Connection must be successful.
-
After the connection is successful, go to Connection Settings and enable the Enable TLS toggle.
- Select Save.
Create the Encryption Key File
Important
The following steps apply only to CG 2025 and later. They do not apply to CG versions earlier than Connector Gateway-Jun-2025.
- In the CG deployment directory, create an empty
.txtfile. - Change the name to
encryptionKeyFileor another suitable name. -
Add a key value to the file and save it.
For more details on key value, refer to Details of encryptionKeyFile.
The file stores the symmetric key that encrypts sensitive values in init.xml.
Caution
If the encryption key file is not provided, the CG uses a hard-coded default key which is not recommended for production environment.
Configure the Encryption Key File in init.xml
-
In the
init.xml, set the<encryptionKeyFile>parameter to the absolute path of the encryption key file, including the file name.Screenshot
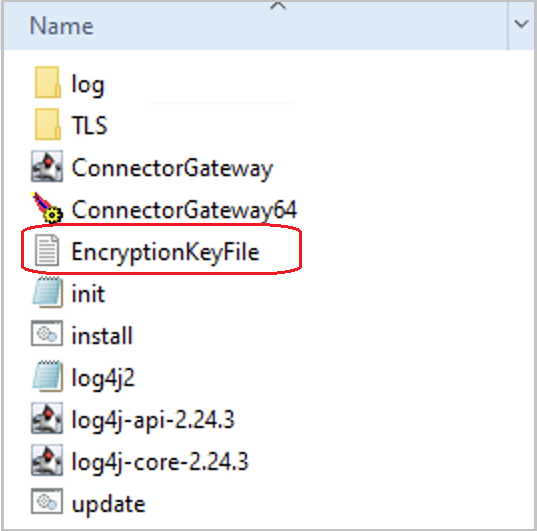
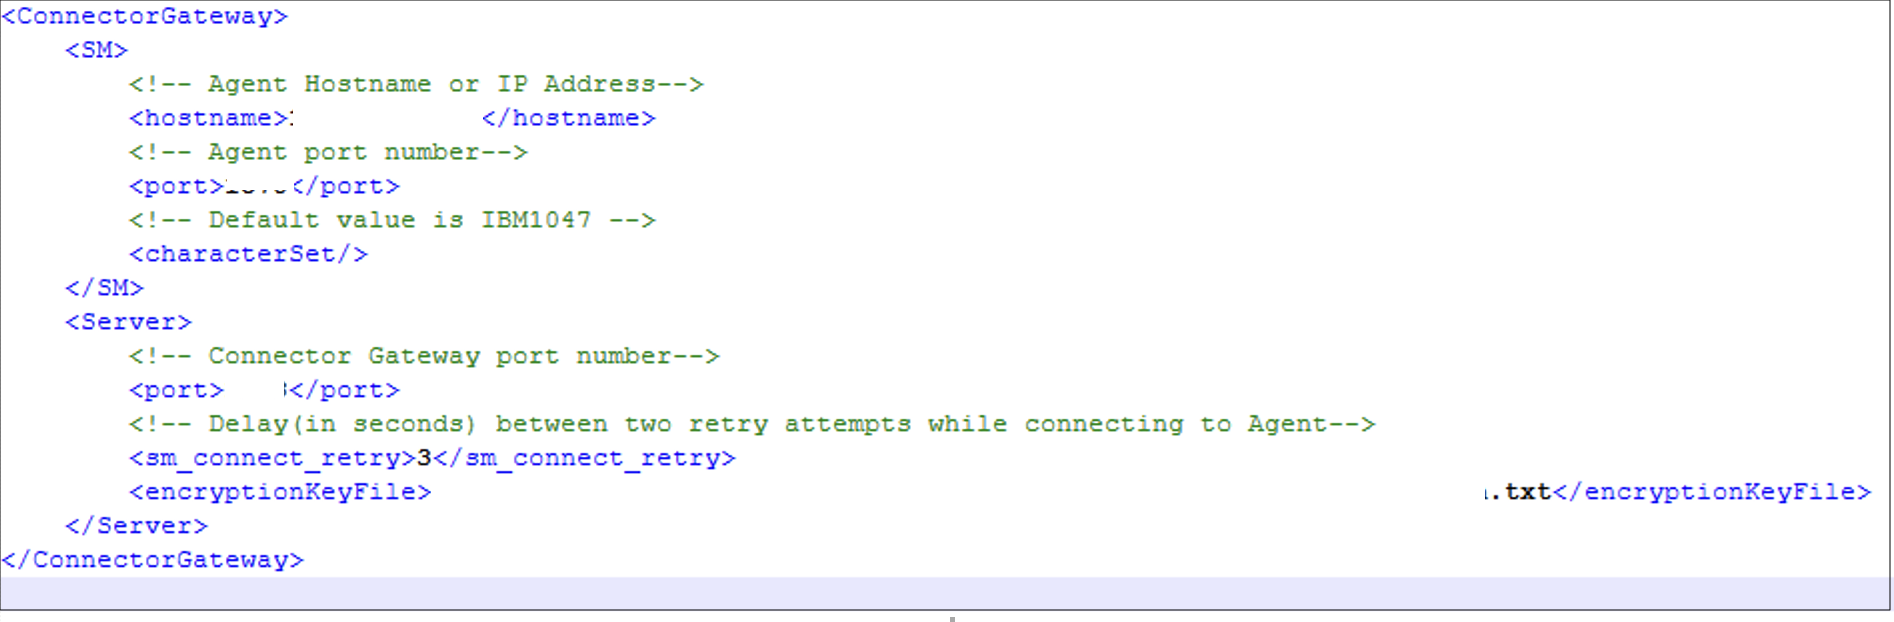
Configure TLS (CG as TLS Server)
-
Create and configure a server certificate on the CG. The Connector validates the server certificate during the TLS handshake.
Note
A client certificate is not required.
-
Use the
keytoolto run the following command to generate thekey pairandkeystore:keytool -genkey -keyalg RSA -alias OneWayCGAuth -keystore keystore.jks -storepass password -validity 360 -keysize 2048Use the settings:
- Algorithm: RSA, 2048-bit
- Validity: 360 days (or per policy).
keystoreformat: JKS,- Alias and passwords: User defined (for example,
OneWayCGAuth, password).
-
Generate the certificate using the Common Name (CN), for example
OneWayCGAuth. This value is used later in the Certificate Subject / CGCertSubject on the SailPoint Mainframe Connector.Screenshot
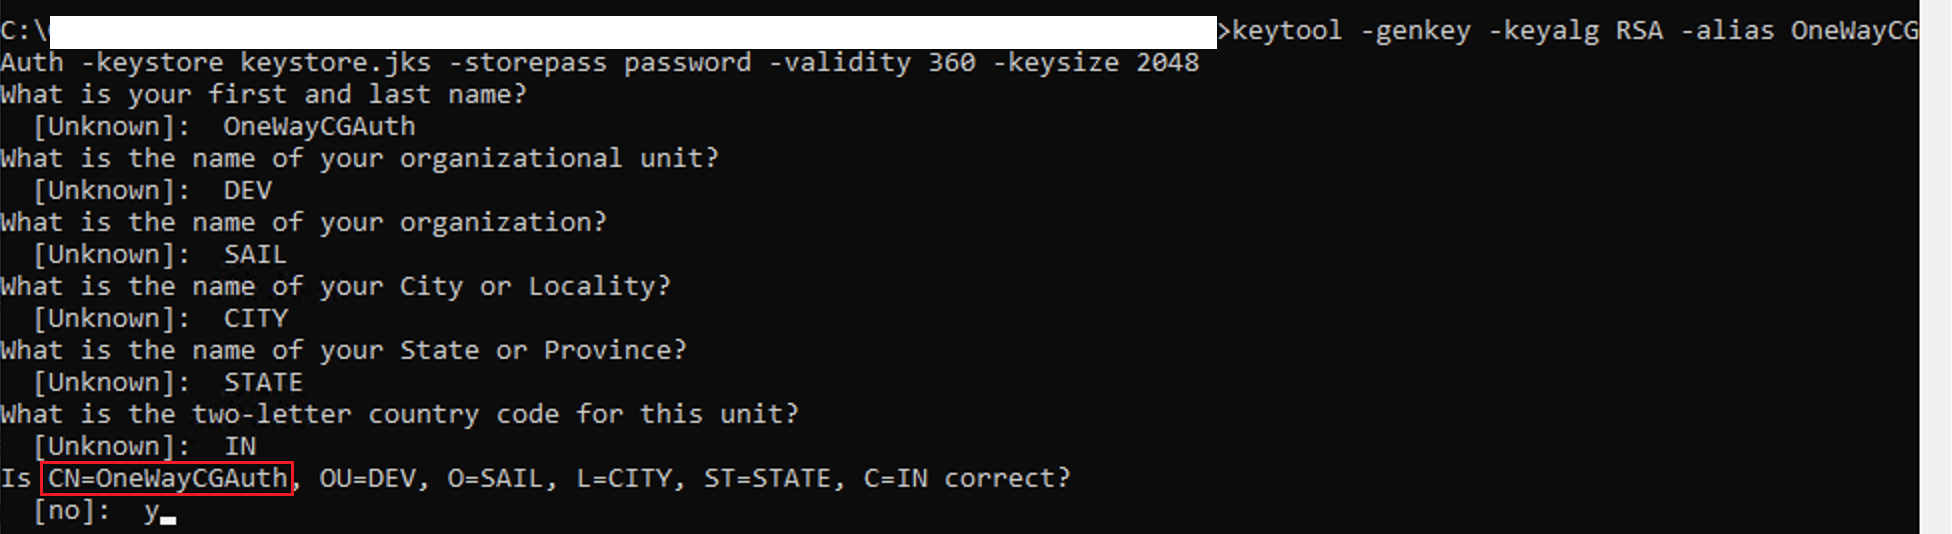
-
Run the following command to export the server certificate (CER):
keytool -export -alias OneWayCGAuth -storepass password -file server.cer -keystore keystore.jksScreenshot

The certificate is stored in
server.cer.
Configure TLS and keystore in init.xml
-
From the CG deployment directory that contains
ConnectorGateway.jar, run the following command to configure thekeystore:Important
Before you run commands that update
init.xml, make sureencryptionKeyFileis configured ininit.xml.java -jar ConnectorGateway.jar -keystorepass <storepass> -keypass <keypass> -keystore "<absolute_path_to_keystore.jks>"Important
The command stores encrypted
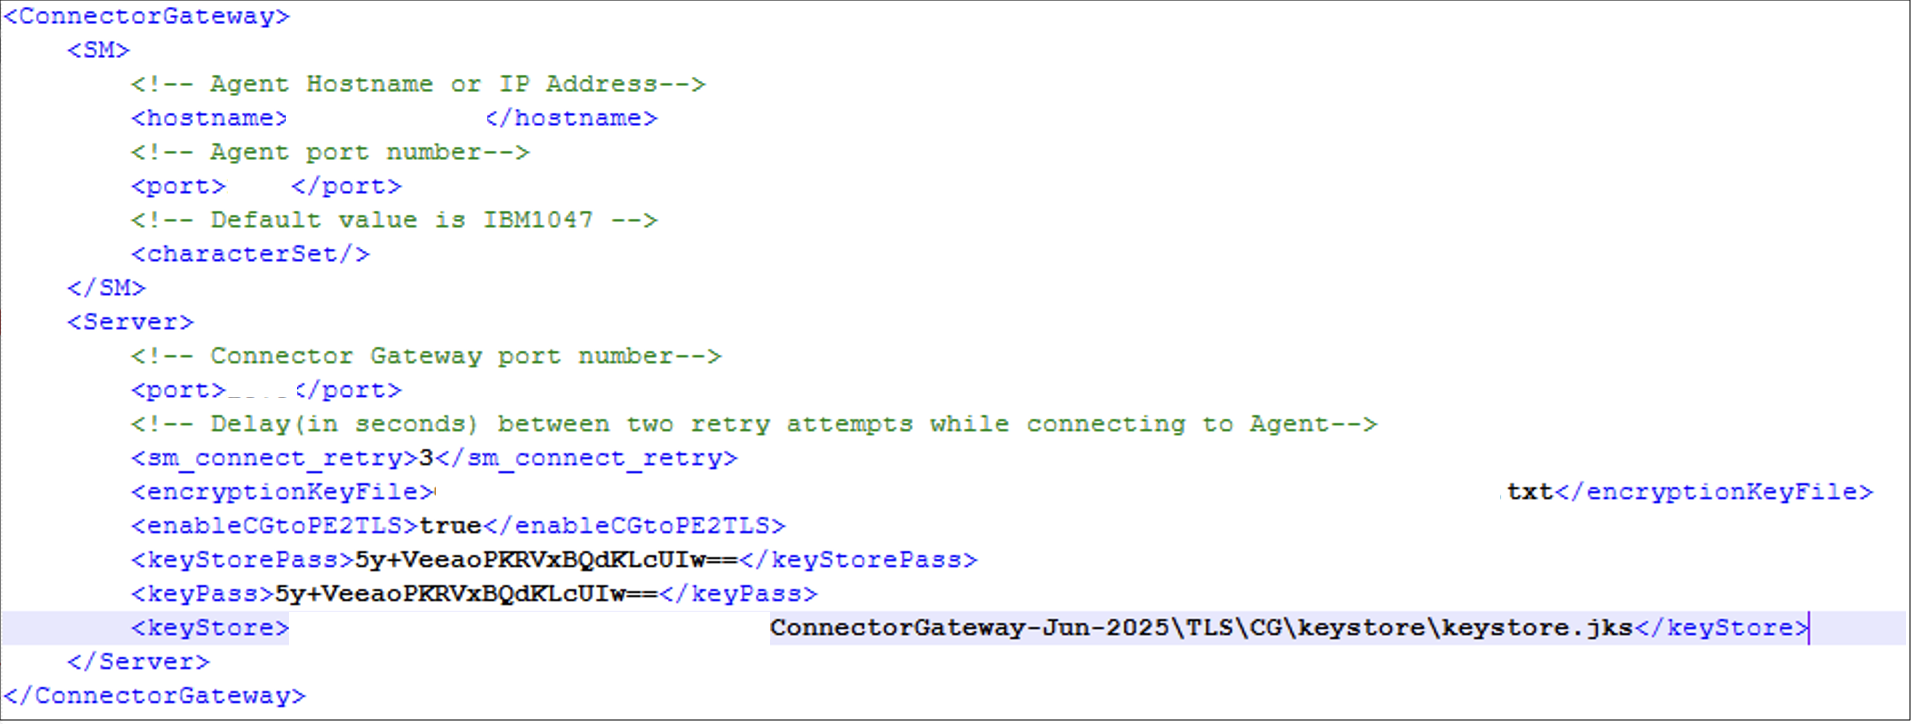
keystorePassandkeyPass(keystore path) intoinit.xml. -
Run the following command to enable TLS:
java -jar ConnectorGateway.jar -enableCGtoPE2TLS "true" -
Restart the CG to apply the changes. After the configuration,
init.xmlcontains entries similar to the following:Screenshot
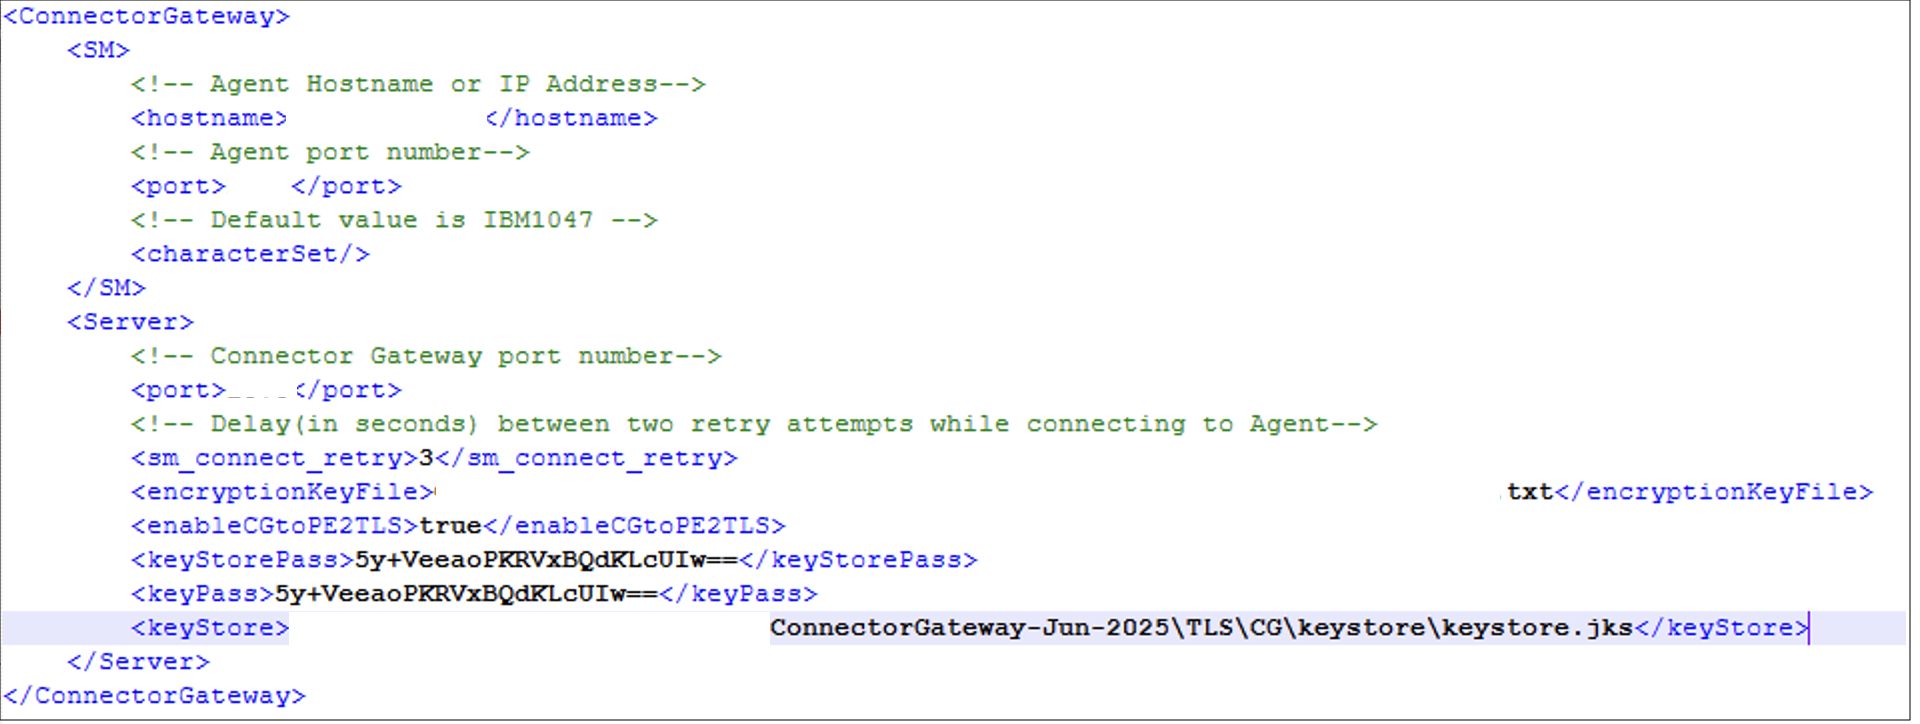
Configure the Connector
- Copy the
server.certo/home/sailpoint/certificates. - Restart the Client Connector Gateway (CCG) service on the virtual appliance.
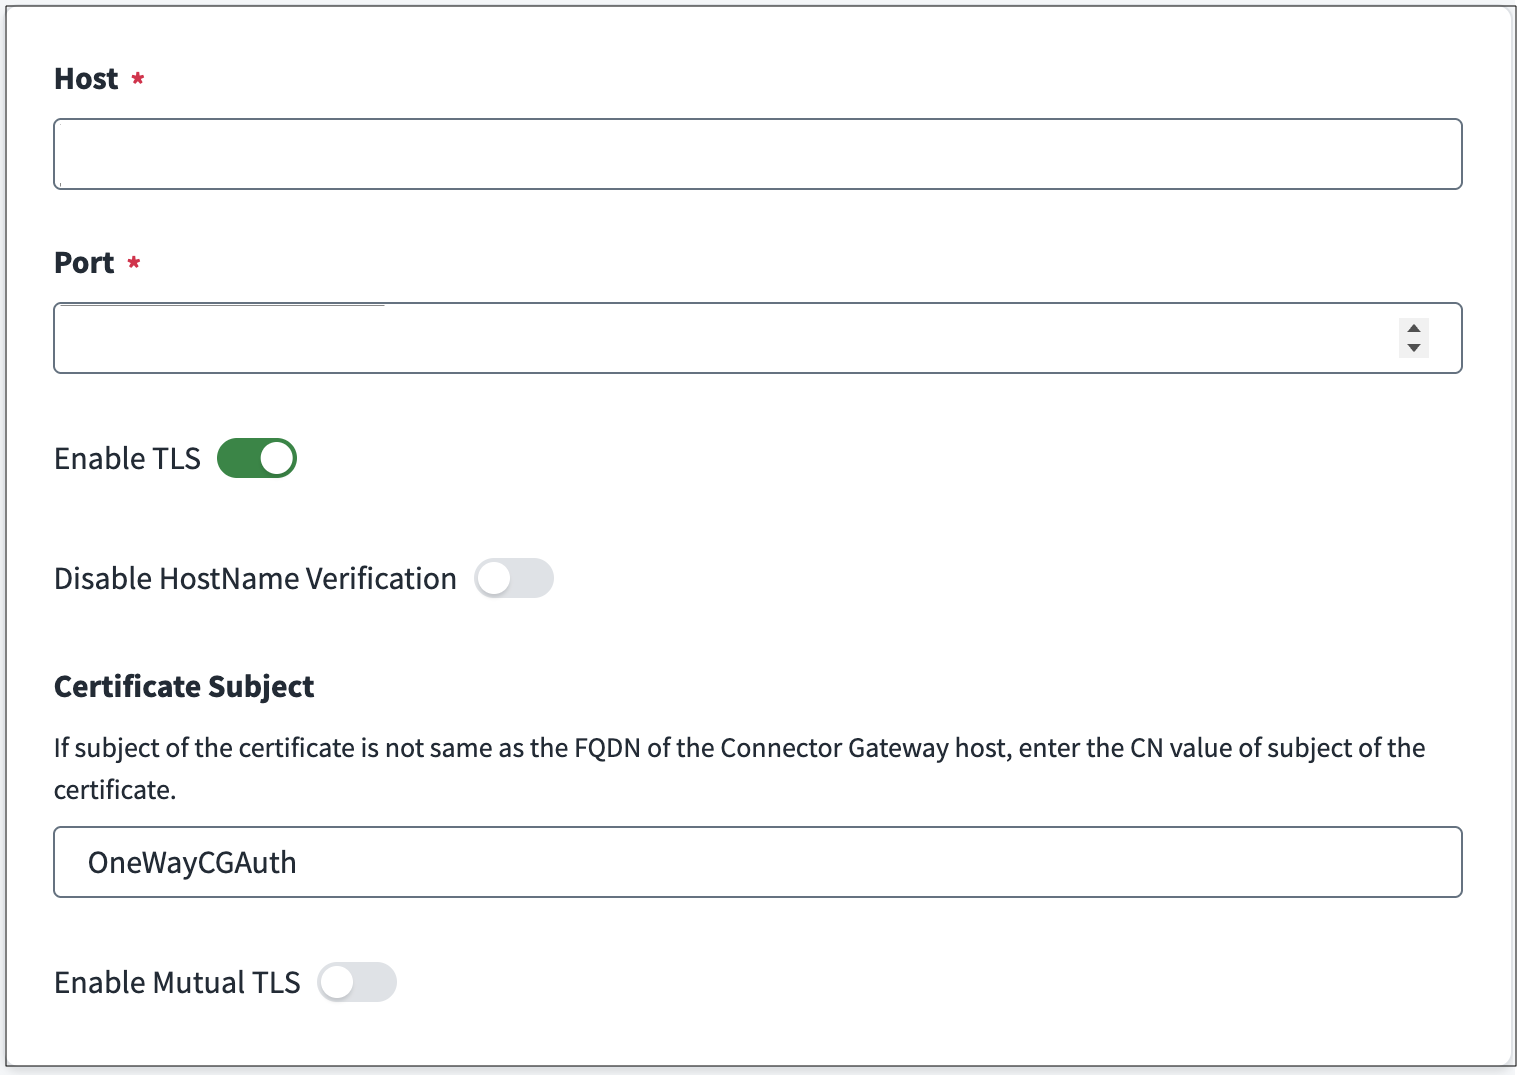
- Open the source.
- Go to Connection Settings.
-
In the Certificate Subject, enter the Common Name (CN) of the CG certificate, for example:
OneWayCGAuth.Screenshot
-
Select Save.
-
Go to Review and Test and select Test Connection to validate the connection.
Important
Test Connection must be successful.
Configure Mutual TLS
After you configure the TLS successfully, configure Mutual TLS to enable client certificate authentication.
In Mutual TLS, the Connector presents a client certificate and the CG validates it against a truststore.
Generate the Client Certificate for the CG Connection
- Generate a dedicated keystore and export the client certificate on the SailPoint virtual appliance.
-
Run the following command to generate the key pair and keystore:
keytool -genkey -keyalg RSA -alias TwoWayServerAuth -keystore keystore.jks -storepass password -validity 360 -keysize 2048 -
Run the following command to export the certificate:
keytool -export -alias TwoWayServerAuth -storepass password -file server.cer -keystore keystore.jks -
Generate the certificate using the Common Name (CN), for example:
TwoWayServerAuth. This value is used later asPE2CertSubjectin CG configuration.
Configure the Connector
-
Copy the
server.cerandkeystore.jksto/home/sailpoint/certificates.Rename the files if necessary to avoid overwriting existing files.
-
Restart the CCG service on virtual appliance.
-
Copy the
server.certo the CG and optionally copy thekeystore.jksfor reference.The certificate is now imported into the CG
truststore.
Configure CG truststore and init.xml
- Create a directory on the CG. For example:
ConnectorGateway_location\TLS\CG\truststore. - Copy the JVM
cacertsfile into thetruststoredirectory. Example location:JAVA_HOME/lib/security -
Run the following command to import the SailPoint connector certificate into the
cacertstruststore:keytool -import -v -trustcacerts -alias TwoWayServerAuth -file server.cer -keystore cacerts -keypass <password>Note
If trust or certificate chain warnings appear, try another JVM's
cacertsfile or make sure that the certificate chain is complete. -
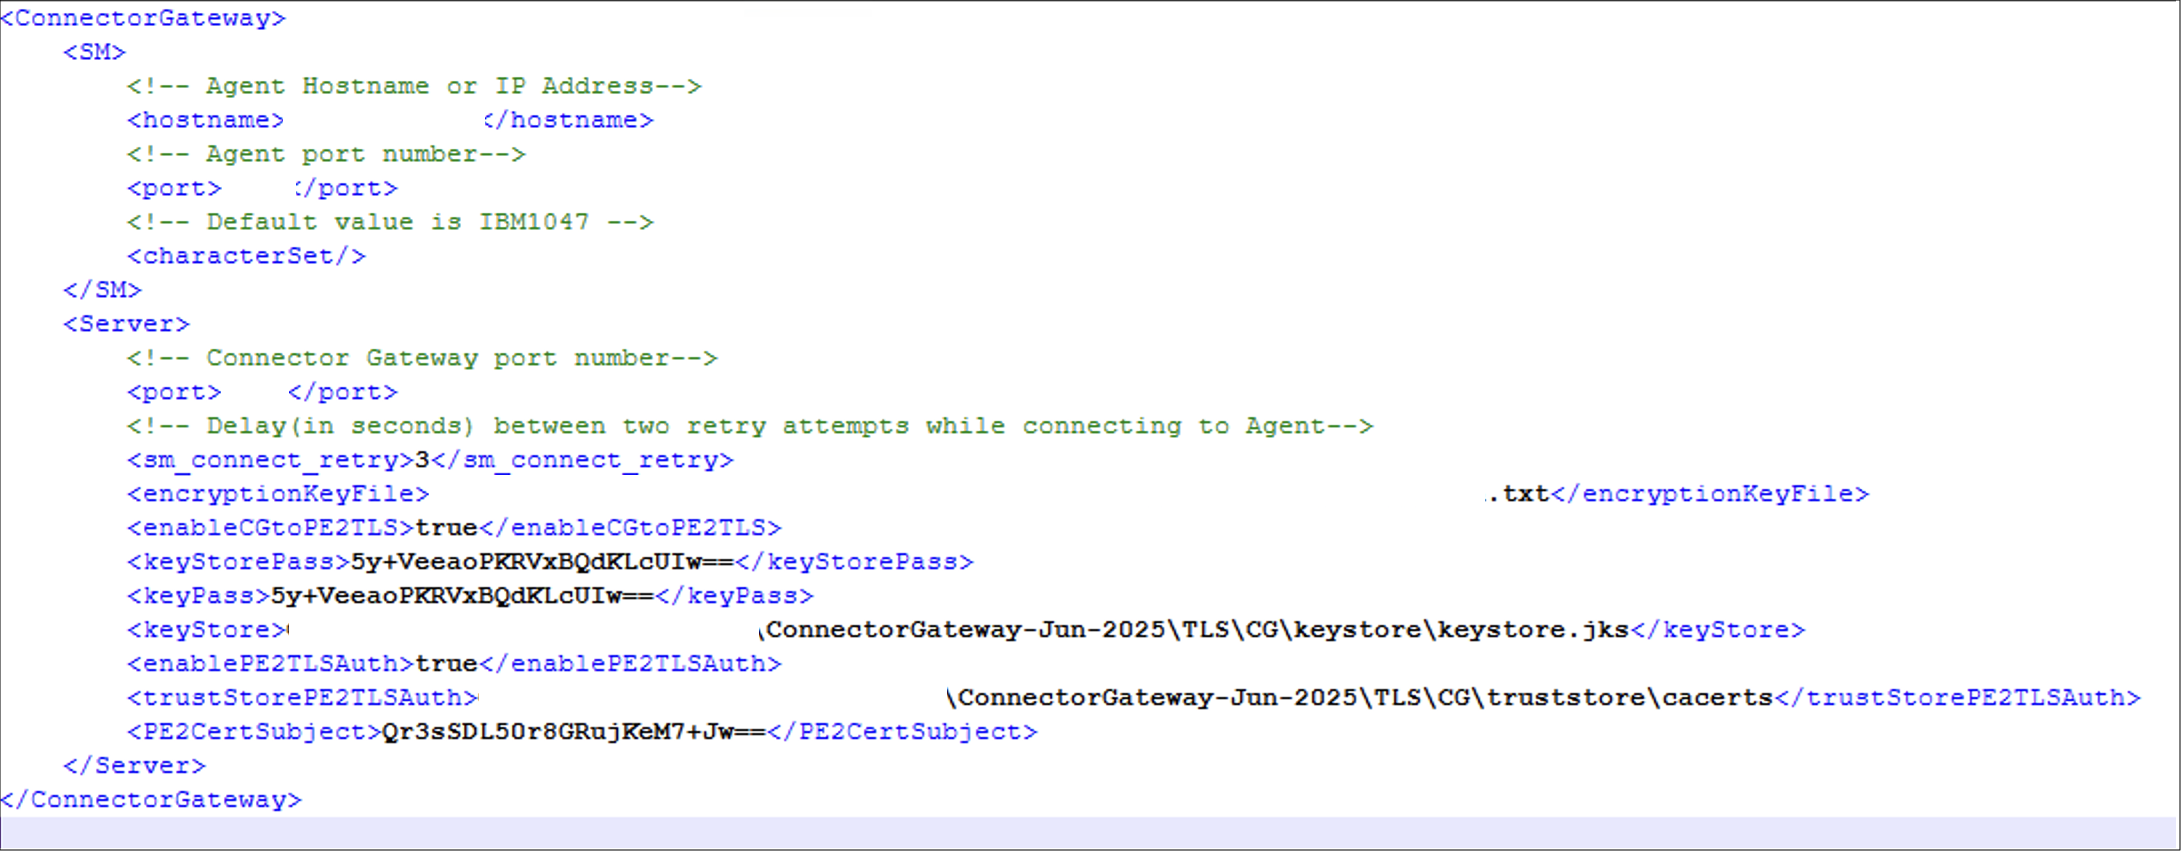
Run the following command to add the Mutual TLS configuration to
init.xml:Important
Before you run commands that update
init.xml, make sureencryptionKeyFileis configured ininit.xml.java -jar ConnectorGateway.jar -enablePe2TLSAuth true -trustStorePE2TLSAuth "<absolute_path_to_truststore_cacerts>" -PE2CertSubject TwoWayServerAuth -
Restart the CG.
Screenshot
Configure Mutual TLS in SailPoint Mainframe Connector
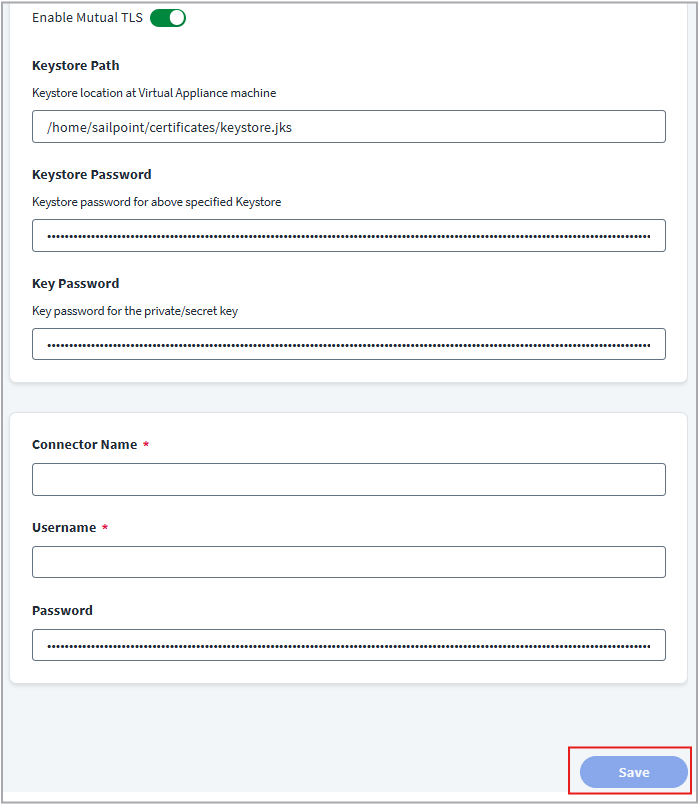
- Go to Configuration Settings and enable the Enable Mutual TLS toggle.
- In KeyStore Path, enter the path to the Keystore file on the Virtual Appliance. For example:
/home/sailpoint/certificates/keystore.jks - In Keystore Password, enter the password for the specified Keystore.
- In Key Password, enter the password for the private/secret key.
-
Select Save.
Screenshot
-
Go to Review and Test and select Test Connection to validate the connection.
Summary of init.xml Elements
| Attribute Name | Description |
|---|---|
encryptionKeyFile |
Specifies the path to file that contains 16/24/32 - byte encryption key used to encrypt sensitive values in init.xml. Required for CG 2025 and later. |
keystore / keystorePass / keyPass |
Specify the CG server certificate for TLS. These values are encrypted when generated using ConnectorGateway.jar. |
enableCGtoPE2TLS |
Enables TLS on CG for connections from SailPoint Connectors. |
enablePe2TLSAuth |
Enables client certificate authentication for Mutual TLS. |
trustStorePE2TLSAuth |
Specifies the path to the truststore (for example, cacerts) that contains SailPoint Connector certificates. |
PE2CertSubject |
Specifies the Common Name (CN) of the allowed SailPoint Connector certificate. This value is stored in encrypted form in init.xml. |
Configuring TLS on the Mainframe Connector
Secured communication to the Mainframe Connector must be implemented using an AT-TLS policy. An AT-TLS policy states that communication must be implemented on a port defined to Mainframe as non-secured. The TLS processing is done by TCPIP and is transparent to the Mainframe Connector. For more information, refer to Implementing AT-TLS Policy for Mainframe Connector Communication.
The secured communication is implemented using server authentication.
Common implementation procedure to set up TLS for the Mainframe Connector
- A valid server certificate with its associated server private key must be defined. This certificate must be signed by a trusted Certificate Authority's (CA).
- The server certificate and the CA certificate must be connected to a key ring.
- The server certificate signed by CA must be transferred (using FTP with ASCII mode) to the client and installed there to be used for certificate verification by the TLS handshake process.
Note
For testing purposes, a local CA can be defined for signing the server certificate.
Implementing AT-TLS Policy for Mainframe Connector Communication
For detailed information about implementing AT-TLS policy, refer to the Application Transparent Transport Layer Security Data Protection chapter of z/OS Communications Server IP Configuration Guide.
The required policy attributes for AT-TLS policies are listed below. You can copy and paste them into your AT-TLS policy.
- Local Port Range - ports defined in Mainframe Connector as non-secured
- Direction = Inbound
- TLS Enabled = On
- TLS v1.1 = On
- TLS v1.2 = On
-
# For one way TLS
Handshake Role = Server
-
# For mutual TLS
Handshake Role = ServerWithClientAuth
-
# For one way TLS
Client Authorization Type = PassThru
-
# For mutual TLS
Client Authorization Type = Required
-
Application Controlled = Off
- Secondary Map = Off
- The name of the certificate created for the secured communication and the name of the key ring to which the server certificate and the CA certificate are connected, must be specified.
Note
TCPIP must be granted permission to access the key ring to which the Mainframe Connector certificate and the CA certificate are connected.
Sample File for AT-TLS Policy
RULE for RACF Connector CTSGATE

####################################################

TTLSRule CTSGATE
{
LocalAddr ALL
RemoteAddr ALL
LocalPortRange 2470-2471
Direction Inbound
Priority 255 # highest priority rule
Userid CTSGATE
TTLSGroupActionRef GrpAct_CTSGATE
TTLSEnvironmentActionRef GrpEnv_CTSGATE
TTLSConnectionActionRef GrpCon_CTSGATE
}
TTLSGroupAction GrpAct_CTSGATE
{
TTLSEnabled On
Trace 7
HandshakeRole Server
}
TTLSEnvironmentAction GrpEnv_CTSGATE
{
Trace 7
HandshakeRole Server
EnvironmentUserInstance 0
TTLSKeyringParmsRef PrmKeyRing_CTSGATE
TTLSEnvironmentAdvancedParmsRef PrmEnvAdv_CTSGATE
}
TTLSEnvironmentAdvancedParms PrmEnvAdv_CTSGATE
{
TLSv1.1 On
TLSv1.2 On
#Comment out the following line out if enabling Mutual TLS
ClientAuthType PassThru
#To Enable Mutual TLS between Mainframe and Connector Gateway use below
#ClientAuthType Required
}
TTLSConnectionAction GrpCon_CTSGATE
{
#Comment out the following line out if enabling Mutual TLS
HandshakeRole Server
#If you are enabling Mutual TLS between Mainframe and Connector Gateway use below
#HandshakeRole ServerWithClientAuth
TTLSCipherParmsRef PrmCipher_CTSGATE
TTLSConnectionAdvancedParmsRef PrmConAdv_CTSGATE
CtraceClearText Off
Trace 7
}
TTLSConnectionAdvancedParms PrmConAdv_CTSGATE
{
ApplicationControlled Off
CertificateLabel CTSGATE
SecondaryMap Off
}
TTLSCipherParms PrmCipher_CTSGATE
{
# supported cipher suites - we used a wide list, that should be decreased according to specific needs V3CipherSuites TLS_DH_DSS_WITH_DES_CBC_SHA
V3CipherSuites TLS_DH_RSA_WITH_DES_CBC_SHA
V3CipherSuites TLS_NULL_WITH_NULL_NULL
V3CipherSuites TLS_RSA_WITH_NULL_MD5
V3CipherSuites TLS_RSA_WITH_NULL_SHA
V3CipherSuites TLS_RSA_EXPORT_WITH_RC4_40_MD5
V3CipherSuites TLS_RSA_EXPORT_WITH_RC2_CBC_40_MD5
V3CipherSuites TLS_RSA_WITH_DES_CBC_SHA
V3CipherSuites TLS_DHE_DSS_WITH_DES_CBC_SHA
V3CipherSuites TLS_DHE_RSA_WITH_DES_CBC_SHA
V3CipherSuites TLS_RSA_WITH_AES_256_CBC_SHA256
V3CipherSuites TLS_RSA_WITH_AES_256_CBC_SHA
V3CipherSuites TLS_ECDHE_ECDSA_WITH_AES_128_CBC_SHA256
V3CipherSuites TLS_ECDHE_RSA_WITH_AES_128_CBC_SHA256
V3CipherSuites TLS_RSA_WITH_AES_128_CBC_SHA256
V3CipherSuites TLS_ECDH_ECDSA_WITH_AES_128_CBC_SHA256
V3CipherSuites TLS_ECDH_RSA_WITH_AES_128_CBC_SHA256
V3CipherSuites TLS_DHE_RSA_WITH_AES_128_CBC_SHA256
V3CipherSuites TLS_DHE_DSS_WITH_AES_128_CBC_SHA256
V3CipherSuites TLS_ECDHE_ECDSA_WITH_AES_128_CBC_SHA
V3CipherSuites TLS_ECDHE_RSA_WITH_AES_128_CBC_SHA
V3CipherSuites TLS_RSA_WITH_AES_128_CBC_SHA
V3CipherSuites TLS_ECDH_ECDSA_WITH_AES_128_CBC_SHA
V3CipherSuites TLS_ECDH_RSA_WITH_AES_128_CBC_SHA V3CipherSuites TLS_DHE_RSA_WITH_AES_128_CBC_SHA
V3CipherSuites TLS_DHE_DSS_WITH_AES_128_CBC_SHA V3CipherSuites TLS_ECDHE_ECDSA_WITH_AES_128_GCM_SHA256
V3CipherSuites TLS_ECDHE_RSA_WITH_AES_128_GCM_SHA256
V3CipherSuites TLS_RSA_WITH_AES_128_GCM_SHA256
V3CipherSuites TLS_ECDH_ECDSA_WITH_AES_128_GCM_SHA256
V3CipherSuites TLS_ECDH_RSA_WITH_AES_128_GCM_SHA256
V3CipherSuites TLS_DHE_RSA_WITH_AES_128_GCM_SHA256
V3CipherSuites TLS_DHE_DSS_WITH_AES_128_GCM_SHA256
V3CipherSuites TLS_ECDHE_ECDSA_WITH_3DES_EDE_CBC_SHA
V3CipherSuites TLS_ECDHE_RSA_WITH_3DES_EDE_CBC_SHA
V3CipherSuites TLS_ECDH_ECDSA_WITH_3DES_EDE_CBC_SHA
V3CipherSuites TLS_ECDH_RSA_WITH_3DES_EDE_CBC_SHA
}
TTLSKeyringParms PrmKeyRing_CTSGATE
{
Keyring CTSRING
}
- Relevant entities - TCPIP and PAGENT
- In TCPIP, AT-TLS must be active
- PAGENT must be up
- PAGENT requires a policy
- Refresh definitions: after member/file is updated, use the
F PAGENT,UPDATEorF PAFGENT,REFRESH - CTSGATE does not have to be restarted when the policy is changed
- CA certificate must be sent to Connector Gateway side.
Note
The HandshakeRole ServerWithClientAuth and ClientAuthType Required attributes are commented out in the sample AT-TLS policy provided above. If you are configuring mutual TLS, remove the comment tags same and comment out the HandshakeRole Server and ClientAuthType PassThru line instead. These are not needed for mutual TLS.
Client Authentication: Configurations in Mainframe Connector
SailPoint supports the use of the APPL resource for Mainframe Connector administrator authentication. To configure this, define an APPL resource in the Mainframe security product and provide READ access to the administrator(s). This allows transaction executions on the Mainframe connector.
Perform the following steps to define the APPL resource and permissions:
-
Define the resource on Top Secret.
(
SAILAPPL: the resource name can be changed)TSS ADDTO <ACID> APPL <SAILAPPL>where:
<SAILAPPL>is the APPL resource name assigned to the Mainframe Connector<ACID>is the Top Secret Administrator ID that will own the resource
-
Permit administrator read access to the resource.
TSS PERMIT <ACID> APPL <SAILAPPL> ACCESS(READ)where:
<SAILAPPL>is the application name defined earlier.<ACID>is the Top Secret Administrator ID allowed to execute transactions on Mainframe Connector.
Parameters in the Mainframe Connector
The Mainframe Connector verifies the administrator credentials received with the transaction before processing the transaction. Before processing the transaction, the Mainframe Connector checks if the administrator has read access to the defined APPL resource.
The following RSSPARM parameters are supported in the Mainframe Connector:
APPL_NAME - Defines the APPL resource. The syntax is as follows:
RSSNAME APPL_NAME <SAILAPPL>
where <SAILAPPL> is name of the APPL resource defined in the security product for the Mainframe Connector administrator's authentication.
Note
This parameter is optional. The Mainframe Connector verifies that the administrator requesting a transaction is permitted to use the APPL resource defined by this parameter.
ALLOW_ADMIN_WITHOUT_PSWD - Allow administrators to make configuration changes without the need to provide a password
RSSNAME ALLOW_ADMIN_WITHOUT_PSWD Y
The default value for the parameter is N
The NOPW parameter determines whether an administrative User ID provided by SailPoint for the Mainframe Connector can be used without providing a password.
This parameter must be set in RSSPARM to Y when one of the following is true:
- Administrator User ID is defined in the Security product without a password
- The mainframe security fix is applied but SailPoint and the Connector Gateway are not upgraded with the security fix
Note
SailPoint recommends upgrading all the components in the integration and setting ALLOW_ADMIN_WITHOUT_PSWD to N.
Configuration Parameters for SailPoint
The following table describes the additional configuration parameters for SailPoint API (System Configuration and Application Configuration):
IBMcharacterSet - The related character set in SailPoint for the code page used on the Mainframe Connector side. Default value is IBM1047. The value can be modified as follows:
<entry key="IBMcharacterSet" value="IBM1047"/>
disableHotpathForUpdate - Disables the hotpath for all Update Account operations. This prevents the SailPoint database from updating with all Update operations changes from the managed system. If this parameter is set to true then disableHotpathForChgPwd and disableHotpathForManageAcntOp are ignored and the hotpath is disabled.
Default value is false (hotpath is enabled).
To disable the hotpath for all update operations, set the value to true as follows:
<entry key="disableHotpathForUpdate" value="true"/>
disableHotpathForChgPwd - Disables the hotpath for Change Password operations only. If the hotpath is disabled, the connector executes the query and sends the status immediately to improve the performance. By disabling the hotpath, the latest information from the connector is not updated in the SailPoint database.
Default value is false (hotpath is enabled).
To disable the hotpath for Change password, set the value to true as follows:
<entry key="disableHotpathForChgPwd" value="true"/>
disableHotpathForManageAcntOp - Disables the hotpath for Enable, Disable, and Unlock operations. This prevents the SailPoint database from updating with all Enable, Disable, and Unlock operation changes from the managed system.
Default value is false (hotpath is enabled).
To disable the hotpath for Enable, Disable, and Unlock operations, set the value to true as follows:
<entry key="disableHotpathForManageAcntOp" value="true"/>
splAccountAttributes - Set unspecified attributes in the schema which are expected to be sent or received by SailPoint. For example, RU_LOCKED and RU_SUSPENDED. The field is mapped to be locked, so this field is not required in the schema.
<entry key="splAccountAttributes">
  <value>
    <Map>
      <entry key="RU_LOCKED" value="false"/>
      <entry key="RU_SUSPENDED" value="false"/>
    </Map>
  </value>
</entry>
UserAdminMap - The USER_ADMIN field for an Account is not in readable format. It contains only numerical keys. To make it readable, you can map the keys to other attributes in the Application definition as follows:
<entry key="UserAdminMap">
  <value>
    <Map>
      <entry key="1" value="User"/>
      <entry key="2" value="Auditor"/>
      <entry key="3" value="Administrator"/>
      <entry key="4" value="Both"/>
      <entry key="5" value="Ignore"/>
    </Map>
  </value>
</entry>
Run the aggregation task to view the changes in SailPoint.
Important
While setting the value of the USER_ADMIN field in SailPoint, you must enter the value as defined in the Map. For example, the value must be "User" and not 1 if the User value is defined in the Account schema.
syncSchema - If set to true, the SailPoint application schema synchronizes with the Mainframe Connector.
Default value is true.
For example:
<entry key="syncSchema" value="true"/>
smReadTimeout - This is the timeout value, in minutes, for messages exchanged between SailPoint and the Mainframe Connector for a transaction.
Default value is 10 minutes.
For example:
<entry key="smReadTimeout" value="10"/>
failWhenSkip and failWhenWarn - The Mainframe Connector, by default, considers the SKIP return code as a success and the WARN return code as a failure. However, in some scenarios it may be required to consider SKIP as failure and WARN as success.
This can be achieved by setting the following attributes with accepted value being either true or false. To implement these changes, add the following entries:
<entry key="failWhenSkip" value="false"/>
<entry key="failWhenWarn" value="true "/>
Support for Account Aggregation Filter
Customize the scope for account aggregation for Mainframe sources using filters. A list of strings can be configured in the Start Filter Condition for Accounts field. The connector aggregates all the accounts from Mainframe sources which starts with any of the configured character sets.
Note
- The filter strings don't support wild card characters like asterisks (*), spaces, or hyphens (-).
- Each filter string value must be a prefix of any account and must not be longer than seven characters.
Perform the following steps to configure filters for the Mainframe source:
-
Apply the FSD0135 PTF on the Mainframe Connector.
Note
For more information on the Mainframe E-Fixes and PTF's, refer to Mainframe Connectors Downloads.
-
In the connector configuration UI, go to the Aggregation Settings > Start Filter Condition for Accounts.
-
Set the values for the filter as separate strings in the list. For example, if you want to aggregate the accounts starting with Emp_ or E24 then the filter list must have the following entries:
- Emp_
- E24
-
Once the filters are configured, perform the Test Connection and save the application.
- Start an account aggregation so that only the accounts starting with the configured filter strings are aggregated.
Support for Prefix Value
This connector supports the prefix value to be passed in the plan. It is enhanced to read the 'prependBeforeVal' or 'appendAfterVal' attribute from the attributes map of AttributeRequest in the provisioning plan. It will then prefix/append it to the value of the attribute before passing it to the SailPoint connector for Top Secret. This allows the pre/post scripts to access meta data of the provisioning request for each attribute.
The sample provisioning plan is as follows:
<?xml version='1.0' encoding='UTF-8'?>
  <!DOCTYPE ProvisioningPlan PUBLIC "sailpoint.dtd" "sailpoint.dtd">
   <ProvisioningPlan nativeIdentity="TESTUSR" targetIntegration="Mainframe" trackingId="26a13f3e109d47f8831fb1d9088cf38d">
    <AccountRequest application="Mainframe" nativeIdentity="TESTUSR" op="Modify">
     <AttributeRequest name="VLDRSTCT" op="Add" value="Y"/>
      <AttributeRequest name="SITE" op="Add" value="WEB"/>
       </AccountRequest>
        <AccountRequest application="Mainframe" nativeIdentity="TESTUSR" op="Modify">
         <AttributeRequest name="SourceGroups" op="Add"  value="INSTCLNT()">
          <Attributes>
           <Map>
            <entry key="prependBeforeVal" value="ADD;"/>
             </Map>
              </Attributes>
               </AttributeRequest>
                </AccountRequest>
                 <AccountRequest application="Mainframe" nativeIdentity="TESTUSR" op="Modify">
                   <AttributeRequest name="SourceGroups" op="Add"  value="INSAPALL()">
                 <Attributes>
                <Map>
               <entry key="prependBeforeVal" value="ADD;"/>
              </Map>
             </Attributes>
            </AttributeRequest>
           </AccountRequest>
          <Attributes>
         <Map>
        <entry key="identityRequestId" value="0000043469"/>
       <entry key="requester" value="spadmin"/>
      <entry key="source" value="LCM"/>
     </Map>
    </Attributes>
   <Requesters>
  <Reference class="sailpoint.object.Identity" name="spadmin"/>
 </Requesters>
</ProvisioningPlan>
TLS Configuration on Virtual Appliances
Enabling a source to communicate with a virtual appliance using a TLS connection encrypts all data sent between the source and the VA.
Sources That Support TLS
The following sources can be configured to communicate over a TLS connection:
Manually Uploading a Certificate to a Virtual Appliance
Import a Certificate and Keychain to the Virtual Appliance
Important
When adding a certificate to the virtual appliance (VA), ensure that the certificate you copy is in Privacy-Enhanced Mail (PEM) format.
-
Before manually adding a new certificate for the source to your virtual appliance's truststore, ensure the following:
- The virtual appliance (VA) is not connected to the source.
- Connection testing between the source and VA is suspended.
- Scheduled aggregations are temporarily paused, if necessary.
-
The source server has been configured for TLS.
- The
va-config-<va_id>.yamlfile has been configured for your virtual appliance. -
You must complete the following steps for every virtual appliance on the virtual appliance cluster connected to the source:
- Copy the PEM-encoded certificates to the
/home/sailpoint/certificatesdirectory. This directory might not be empty because it's where the VA adds any certificates it gets from the source. -
Restart the CCG using the following command:
sudo systemctl restart ccg -
Watch the
/home/sailpoint/log/ccg-start.logfile. If successful, the import should log messages from the form:{"@timestamp":"2017-04-21 06:57:12 +0000","level":"INFO","type":"ccg","message":"Checking CCG Sources certificates"} {"@timestamp":"2017-04-21 06:57:12 +0000","level":"INFO","type":"ccg","message":"Cert files found: [\"/home/sailpoint/certificates/411818.pem\"]"} 06:57:12 +0000","level":"INFO","type":"ccg","message":"Importing cert /home/sailpoint/certificates/411818.pem"}Note
If you see an error instead of the log messages above, this is an indication that your certificate is in an invalid format. Verify you're using a PEM format for your certificate and then try again.
Sometimes the export of a certificate may not work properly with the VA. Using the openSSL command to get the certificate is a good way to get the latest certificate.
-
Use the openSSL command to get the latest certificate:
-
Run the following command in openSSL:
openssl s_client -connect server.example.com:636 > output < /dev/null -
From the command output file, copy the certificate content between
--BEGIN CERTIFICATE--and--END CERTIFICATE--. - Create a new file called
cert.pemin the/home/sailpoint/certificatesfolder. - Save the copied certificate contents in the new
cert.pemfile.
-
-
Restart the CCG using the following command:
sudo systemctl restart ccg
- Copy the PEM-encoded certificates to the
Using an External Certificate Authority (CA)
Add the Certificate to the Virtual Appliance
If you're using an external certificate authority, you only have to connect to the VA from the source to import the certificate.
Prerequisites:
- The ability to use TLS 1.0 - 1.2
- You have created at least one virtual appliance cluster
- CA root and intermediate certificates are in the Java CAcerts keystore
- The certificate is on the source
Complete the following steps:
-
In the source, ensure that the following are true:
- The Hostname for the source matches the hostname in the virtual appliance's configuration.
- The source is connected to the virtual appliance you configured to use TLS.
Note
If you are using Active Directory with IQService enabled, the Hostname cannot be an IP Address.
-
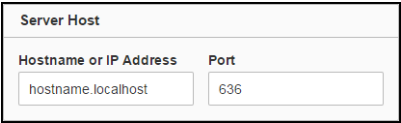
Change the Port to 636.
Screenshot
-
If available, select the Advanced Options checkbox.
-
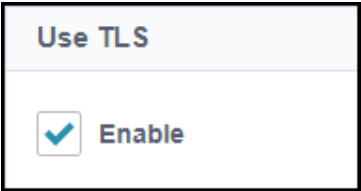
In the Use TLS field, select the Enable checkbox.
Screenshot
-
Test the connection.
Note
The source's certificate is auto-imported to the VA.
Replace an Expired Certificate Issued by an External Certificate Authority
When your certificate has expired, replace it on the source and then reboot your VA.
Prerequisites
- Complete the process described in Add the Certificate to the Virtual Appliance.
Complete the following steps:
- Add the new certificate on the source with a new name.
-
Restart the CCG using the following command:
sudo systemctl restart ccg
Note
The source's certificate is auto-imported to the VA.
Using an Internal Certificate Authority
Add the Certificate to the Virtual Appliance
If you're using your own certificate authority, you will need to add the root and intermediate certificates to the VA.
Note
This process might also be required if your source is not automatically uploading the certificate from the VA.
Prerequisites:
- You have created at least one virtual appliance cluster
- The certificate is on the source
Complete the following steps:
- Import the certificate and the entire key chain (Root and Intermediate Certificates) to the VA as described in Import a Certificate and Keychain to the Virtual Appliance.
-
Restart the CCG using the following command:
sudo systemctl restart ccg -
In the source, ensure that the following are true:
- The Hostname for the source matches the hostname in the virtual appliance's configuration.
- The source is connected to the virtual appliance you configured to use TLS.
Note
If you are using Active Directory with IQService enabled, the Hostname cannot be an IP Address.
-
Change the Port to 636.
Screenshot
-
If available, select the Advanced Options checkbox.
-
In the Use TLS field, select the Enable checkbox.
Screenshot
-
Test the connection.
Note
The source's certificate is auto-imported to the VA.
Replace an Expired Certificate Issued by an Internal Certificate Authority
If you're using an internal CA, you need to add the new certificate on both the source and the VA with a new name.
Prerequisites:
- Complete the process described in Add the Certificate to the Virtual Appliance
Complete the following steps:
- Add the new certificate on the source with a new name.
- Import certificate and entire key chain (Root and Intermediate Certificates) to VA as described in Import a Certificate and Keychain to the Virtual Appliance.
-
Restart the CCG using the following command:
sudo systemctl restart ccg -
Test the connection.
Documentation Feedback
Feedback is provided as an informational resource only and does not form part of SailPoint’s official product documentation. SailPoint does not warrant or make any guarantees about the feedback (including without limitation as to its accuracy, relevance, or reliability). All feedback is subject to the terms set forth at https://developer.sailpoint.com/discuss/tos.