Connecting SailPoint and ServiceNow CMDB
To connect SailPoint and ServiceNow CMDB, perform the following tasks:
Adding Discovery Connector in SailPoint
Discovery connectors have categories that encompass a group of discovery sources to find enterprise applications. You can automatically discover enterprise applications using discovery sources, which search for applications your organization has on-boarded or can on-board. For more information, refer to Discovering Enterprise Applications.
- Go to Admin > Connections > Discovery Connectors.
- Select Create Connector.
- Select Connector Category.
- Select Continue.
- Search for a source type and select Configure.
- Review the directions and select Start Connector Setup.
-
Review the pre-populated source name, source owner, and description. To update, select Edit.
Note
Source name must be unique.
-
(Optional) If enabled for your organization, select the Use a Credential Provider checkbox to manage the source's authentication using a credential provider.
Note
To add a Credential Provider in SailPoint, go to Admin > Connections > Credential Providers. For more information about credential providers, refer to Credential Providers.
-
Configure the authentication to allow SailPoint to connect to the source. For more information, refer to the Connection Settings page.
- Select Finish. A test connection is performed in the background.
-
If the test connection is successful, your source is created, and you are prompted to run a discovery.
-
If you want to discover applications now, select Discover.
- Additional Settings > Discovery Settings - The latest application discovery history is shown.
- Additional Settings > Discovery Activity - Discovered applications are listed.
-
If you want to discover applications later, select Cancel. As no discovery has taken place, in the source details:
- Additional Settings > Discovery Settings - The latest application discovery history is blank.
- Additional Settings > Discovery Activity - No discovered applications are listed.
You are navigated to the Sources page, where the source created is listed.
-
Base Configuration
Provide the base configuration parameters. Information you entered in the Connector Setup dialog is automatically entered into the fields in the Base Configuration page. You can edit this information, if necessary.
Note
Ensure that the name and description of each connector is unique.
- Enter a descriptive Connector Name for the connection.
- Enter the Description that provides details necessary to distinguish it from similar connection sources.
-
In Connector Owner, enter the name of the owner responsible for administrating, operating and managing the source system.
-
Select Save.
Connection Settings
Choose the appropriate authentication type and provide the information required to connect and interact with the source.
Note
Each time you change the Authentication Type for the ServiceNow CMDB connector, you must perform a Test Connection.
You can configure your source using one of the following authentication types:
- Configure the Connection with Basic Authentication
- Configure the Connection with OAuth 2.0 Authentication
Configure the Connection with Basic Authentication
Screenshot
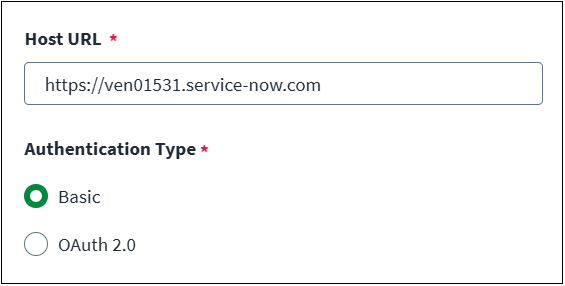
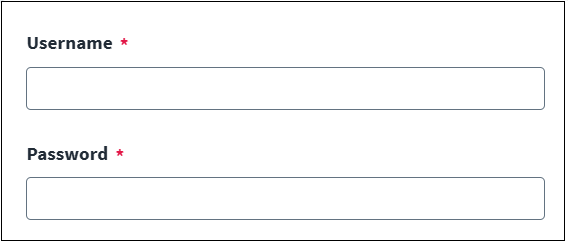
- Enter the Host URL for the ServiceNow instance that is used for communication.
- Select Basic as the Authentication Type.
- Enter the Username and Password that have the appropriate permissions.
- Select Save.
Configure the Connection with OAuth 2.0 Authentication
Screenshot
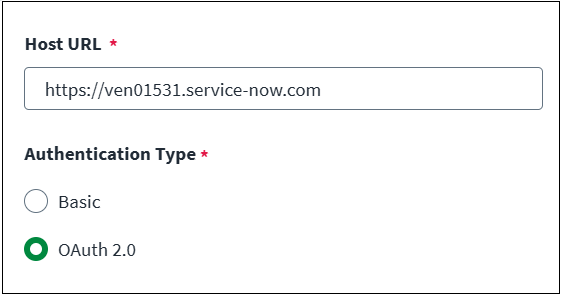
- Enter the Host URL for the ServiceNow instance that is used for communication.
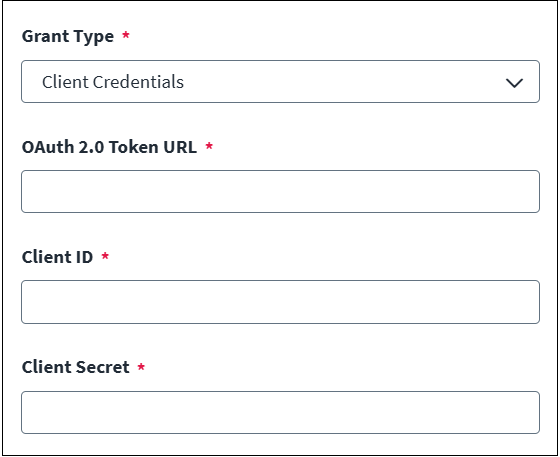
- Select OAuth 2.0 as the Authentication Type. Select Refresh Token or Client Credentials as the Grant Type.
Refresh Token
Screenshot
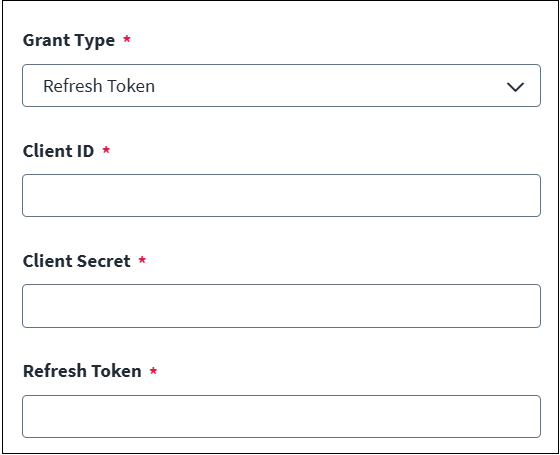
- Enter the Client ID and Client Secret for OAuth 2.0 authentication.
-
Enter the Refresh Token for OAuth 2.0 authentication. For more information on creating an OAuth 2.0 profile on your ServiceNow instance, refer to ServiceNow: Create an endpoint for clients to access instance.
To create a refresh token, use the following cURL command:
$ curl -d "grant_type=password&client_id=be3aeb583ace210011c15b24a43e25d8
&client_secret=client_password
&username=admin&password=admin"
POST https://instancename.service-now.com/oauth_token.do
For more information, refer to ServiceNow: OAuth API request parameters.
-
Select Save.
Client Credentials
Screenshot
Note
- The Okta External OIDC Provider in ServiceNow is supported with the Client Credentials Grant Type.
- To configure OAuth 2.0 in the SailPoint Identity Governance connector, an OAuth 2.0 Token URL, Client ID, and Client Secret are required. The OAuth 2.0 Token URL, Client ID, and Client Secret are specific to the Okta instance that is configured in ServiceNow as an External OIDC Provider.
- For configuration in ServiceNow, refer to Product Documentation | ServiceNow.
-
Enter the OAuth 2.0 Token URL.
For example, if you use the Okta External OIDC Provider:
{yourOktaDomain.com}/oauth2/{authorizationServerId}/v1/tokenFor example, if you use the Inbound client credentials grant type by ServiceNow:
https://instancename.service-now.com/oauth_token.do -
Enter the Client ID and Client Secret.
- Select Save.
Review and Test
Perform a test to confirm the connection to SailPoint.
- Go to Review and Test.
-
Confirm that the entries in each field are correct.
If you note any mistakes, return to the section and make corrections.
-
Select Test Connection.
SailPoint Application Onboarding
SailPoint application onboarding enables you to easily onboard new applications and create sources following the successful onboarding of a discovery source. To use this feature, continue to Discovered Applications in the SailPoint user interface.
For more information, refer to Application Onboarding in the SailPoint SaaS documentation.
Documentation Feedback
Feedback is provided as an informational resource only and does not form part of SailPoint’s official product documentation. SailPoint does not warrant or make any guarantees about the feedback (including without limitation as to its accuracy, relevance, or reliability). All feedback is subject to the terms set forth at https://developer.sailpoint.com/discuss/tos.