Implementing Custom Connectors
This document describes how to create a custom connector using SailPoint's OpenConnector framework.
SailPoint includes many connectors through which it can connect to external systems, both to read account and entitlement information and to process account provisioning requests. Occasionally, however, there may be a need to create a custom connector to connect to an application for which SailPoint does not have a built-in connector.
Unless direct provisioning is required, custom connectors are seldom necessary because user data is generally available through files, database connections, etc. SailPoint's built-in connectors can consume data from delimited file extracts, database connections (JDBC), and web-services (REST), just to name a few. Even in cases where the data extract is not in a readily digestible format, there are configurations provided with these available connectors that can parse or otherwise pre-process the data to prepare it for recording in SailPoint; the developer writing the rules must, of course, be familiar with file parsing in Java. However, when provisioning is required or if these built-in features do not meet the business need, writing a custom connector using the open connector framework is a good option.
Important
SailPoint strongly encourages both partners and customers alike to purchase SailPoint Expert Services hours to assist with custom connector creation. These deep level implementations are powerful, but also complex to create without proper experience. In addition, custom connectors are not covered by SailPoint Support. Any deployment of custom code is your own responsibility to create and maintain.
Note
Use the SailPoint SDK/CLI to develop connectors to SaaS systems. For more information, refer to SaaS Connectivity.
Audience
The audience of this document is the implementer who will develop, build, and test the connector, and then install it in SailPoint. SailPoint recommends that the implementer should be proficient in Java, comfortable working within the constraints of a software framework, and versed in the use of an IDE such as Eclipse or IntelliJ IDEA. They must also know how to leverage REST APIs. SailPoint also highly recommends attending the SailPoint Fundamentals of Identity Security Cloud Implementation training course.
Feasibility
While SailPoint has the ability to support custom connectors, analysis must be done to determine feasibility of integration with the target system. When SailPoint first evaluates which connectors to build, product engineers need to understand which supportable means can successfully integrate with a target system. So, the engineers need to understand what APIs the target system supports, as well as what is feasible to do via the REST API. You will need to coordinate with technical documentation and subject matter experts (SMEs) to evaluate the feasibility of integrating with a system.
Connector Architecture
In SailPoint, a source is a configured instance which communicates with an associated connector to read or write user account or entitlement objects. Connectors are technical component interfaces which communicate with target systems via native APIs to read or write user account or entitlement objects. Essentially, sources communicate with connectors.
Screenshot
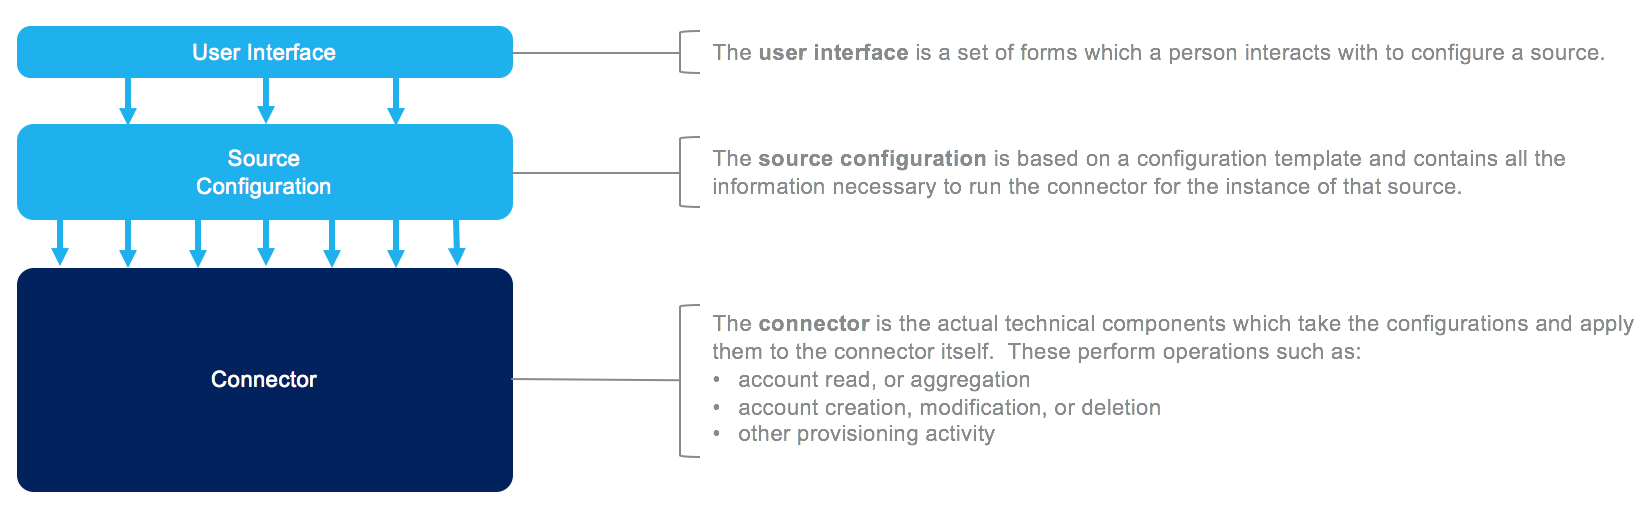
From a connector anatomical perspective, connectors are made up of three components:
- The user interface displays a set of forms which an administrator completes to configure a source.
- The source configuration is based on a configuration template. It contains all the information necessary to run the connector for the instance of that source.
- The connector is the technical component(s) which take the configurations and apply them to the connector itself. The connector performs operations such as:
- Account read or aggregation
- Account creation, modification, or deletion
- Provisioning activities
So in SailPoint's environment, where can you find these artifacts? It is important to understand the architecture of how the various components interact with one another.
In SailPoint, there are components which are stored in the cloud itself. However there is an on-premise cloud connector gateway which is deployed as part of the SailPoint-managed Virtual Appliance, or VA. The connectors run from the VA and communicate with the target system(s) which can be on your internal network, or in the cloud.
Screenshot
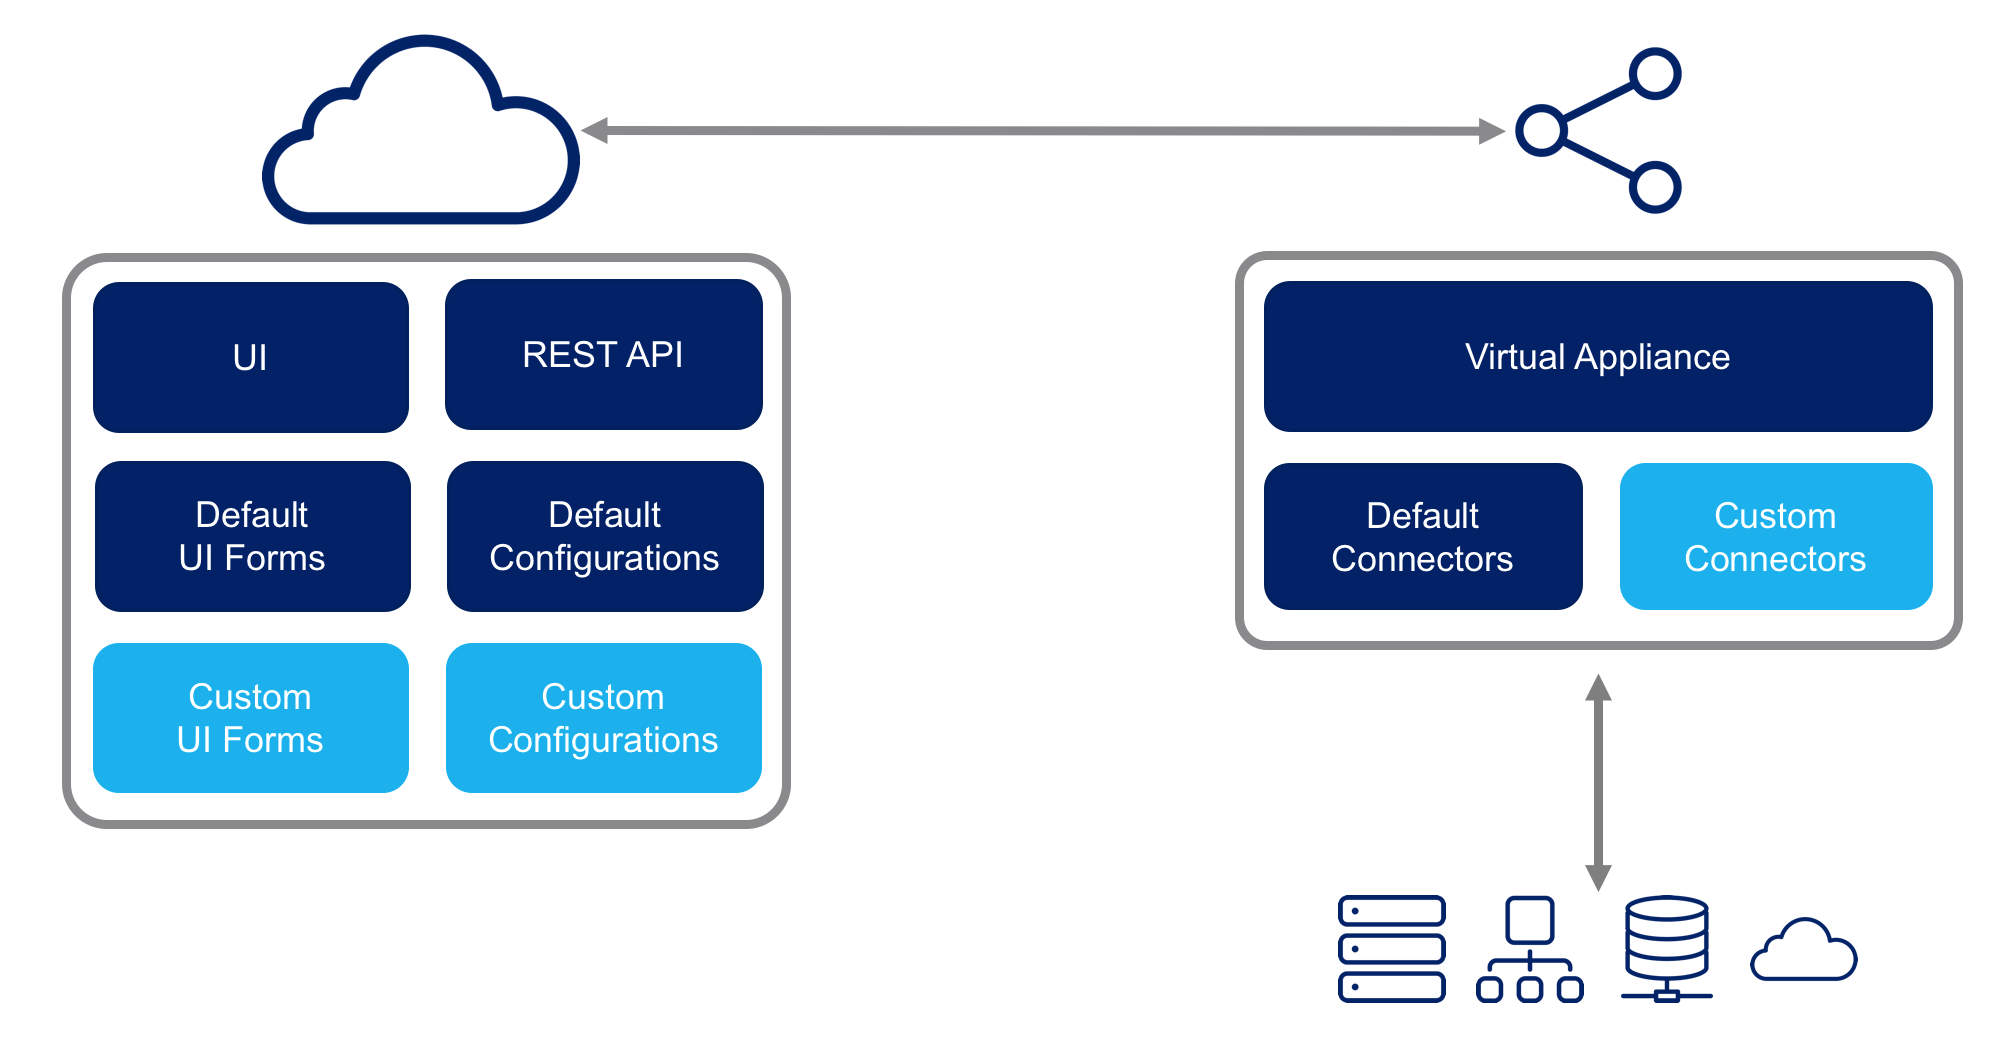
Based on the diagram, you can determine which components are deployed where, and how they should be configured.
User Interface Forms
- XML configuration
- Deployed in the cloud
Source Configuration Template
- XML configuration
- Deployed in the cloud
Custom Connector
- Compiled Java JAR package
- Deployed in the SailPoint Virtual Appliance
These will be used as a basis for the components which will be built in this guide.
Designing Custom Connectors
Once high level analysis of whether or not a connector can be built or not, you can start designing the various components.
The following topics are covered in this section:
- Source Configuration Template
- Object Type and Schema
- Choose Connector Features
- User Interface Forms
- Custom Connector Development
Source Configuration Template
The source configuration template is the default set of configurations for the source and the connector. In SailPoint, this defines three components:
- Default Connector Settings - Configuration values used by the connector, such as host, port, user, and password.
- Default Schema - Default user account attributes, as well as what makes an account unique.
- Default Correlation - Default logic to match user accounts with owners.
<Application
  name="Custom HR Connector"
  type="Custom HR Connector"
  connector="sailpoint.connector.ExampleConnector"
  featuresString="ITERATE" >

  <Attributes>
    <Map>
      <entry key="url" value=""/>
      <entry key="username" value=""/>
      <entry key="password" value=""/>
      <entry key="token" value="OAuth"/>
      <entry key="pageSize" value="200"/>
    </Map>
  </Attributes>

  ...

  <Schemas>
    <Schema
      identityAttribute="Employee Number"
      displayAttribute="Employee Number"
      nativeObjectType="account"
      objectType="account">

    <AttributeDefinition name="First Name" type="string"/>
    <AttributeDefinition name="Last Name" type="string"/>
    <AttributeDefinition name="Employee Number " type="string"/>

    ...

    </Schema>
  </Schemas>
</Application>
The above example is an Application XML object.
Important
"Application" is the internal name for a Source, not to be confused with Application SSO objects in SailPoint. The default configurations for the connector live in the Attributes section of the configuration.
Object Type and Schema
The account definition is in the schema section, specified with an objectType="account" attribute. While a connector can technically support multiple schemas, SailPoint currently only supports schemas with an objectType representing an account or group.
The identityAttribute attribute specifies the Account ID, which is the attribute which makes an account unique. For example, distinguishedName is the Account ID for LDAP.
The displayAttribute attribute specifies the Account Name, which is the attribute that an account is known by. Sometimes this can be set the same as the Account ID, but sometimes they differ. It depends on the object model from which you are reading. In the Application XML example above, these are set to the same attribute, called Employee Number.
Choose Connector Features
Determine the features for the connector. Available features are:
- AUTHENTICATE - Enables the connector to support authenticating a user and password combination against the source
- CREATE - Enables the connector to create a resource object. For example, can the connector create an account or group.
- DELETE - Enables the connector to delete a given resource object by ID.
- DISCOVER_SCHEMA - Enables the connector to report schemas (account or group) to SailPoint when queried, including both attribute names and types. Valid types are BOOLEAN, DATE, INT, SECRET, STRING.
- ENABLE - Enables the connector to enable or disable a resource object.
- GET - Enables the connector to read and return a map of a specific resource object by ID.
- ITERATE - Enables the connector to return an iterator of resource objects, such as filtered sets.
- PERMISSIONS - Enables the connector to return permission attributes.
- SET_PASSWORD - Enables the connector to set the password of a resource object.
- UNLOCK - Enables the connector to unlock a resource object.
- UPDATE - Enables the connector to update resource objects.
These features are listed as an enumeration in the openconnector.connector class, but this enumeration is not currently used to determine connector functionality; it is provided only as a connector design guide. The Application object also has a Feature enumeration, specified as the FeaturesString attribute in the application definition. This is used to control the functionality available through the connector. The Connector Feature enumeration overlaps with but is not identical to the Application Feature enumeration. They correlate as shown here:
| Connector Features | Application Features |
|---|---|
| AUTHENTICATE | AUTHENTICATE |
| CREATE | PROVISIONING |
| DELETE | PROVISIONING |
| DISCOVER_SCHEMA | DISCOVER_SCHEMA |
| ENABLE | ENABLE and PROVISIONING together |
| GET | Opposite of NO_RANDOM_ACCESS (this is an assumed function for all applications unless explicitly turned off) |
| ITERATE | No specific feature, assumed functionality for all applications |
| PERMISSIONS | DIRECT_PERMISSIONS |
| SET_PASSWORD | PASSWORD and PROVISIONING together |
| UNLOCK | UNLOCK and PROVISIONING together |
| UPDATE | PROVISIONING |
User Interface Forms
Once you understand all the configurations, you can start designing the user interface forms. Create the user interface forms which you interact with and provide configurable elements which an administrator can use to configure a source. For example:
Screenshot
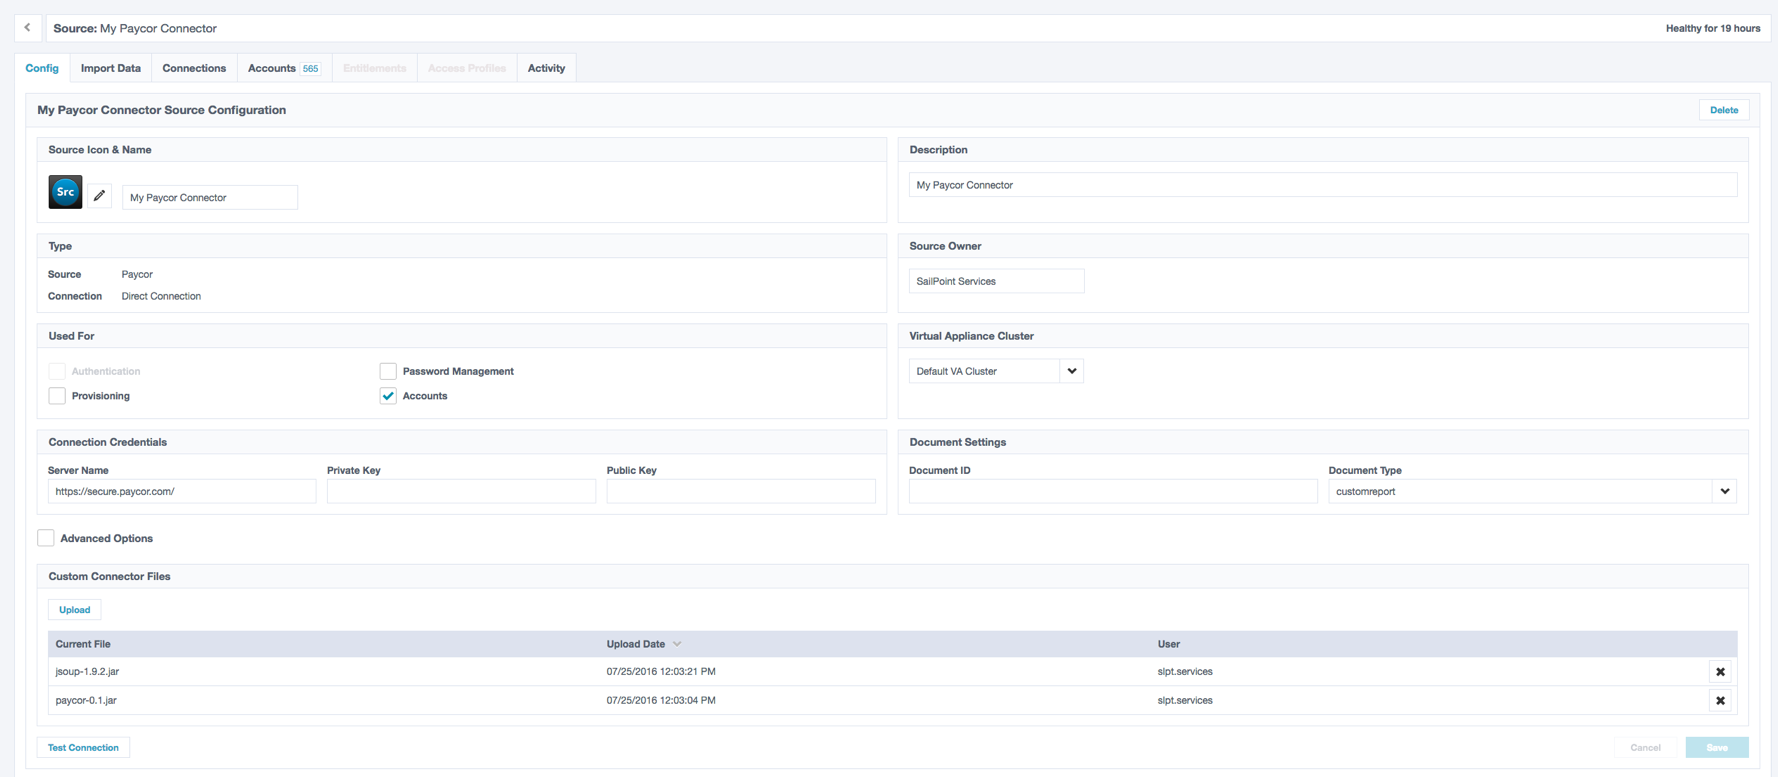
The technical implementation of this is built as an XML form object, which is understood by SailPoint and renders configurable form elements, such as text fields, checkboxes, radio buttons, or select boxes. These also support default values (assuming your source configuration template doesn't define these), and you can even mark fields as required or hidden. You can leverage SailPoint's Advanced section to hide more complex configurations if you need to.
For example:
<Form ... >
  <Section layout="horizontal">
    <Section label="Connection Credentials" layout="horizontal">
      <Field name="url" type="String" displayName="URL" required="true" defaultValue="https://tenant.myhr.com"/>
      <Field name="user" type="String" displayName="Username" required="true"/>
      <Field name="password" type="Secret" displayName="Password" required="true"/>
    </Section>

    <Section label="Advanced Settings" layout="horizontal">
      <Field name="pageSize" type="String" displayName="Page Size" defaultValue="20"/>
      <Field name="token" displayName="Document Type" type="String" required="true">
        <AllowedValues>
         <List>
          <String>OAuth</String>
          <String>PKI</String>
            ...
        </List>
        </AllowedValues>
      </Field>
      ...
</Form>
Custom Connector Development
Develop the technical implementation of the connector using the OpenConnector framework. The custom connector architecture uses the OpenConnector framework provided by SailPoint in the openConnector package. All custom connectors must inherit from openconnector.AbstractConnector, which implements the openconnector.Connector interface. The connectors are stateful and require configuration, use, and closure.
Note
The connector SDK, which includes the OpenConnector classes and the javadocs, is available for download here.
Using the openConnector framework, developers must implement separate methods for different types of operations. These methods are automatically called by SailPoint interfaces in the cloud connector gateway in the VA.
Popular methods of the OpenConnector framework are as follows:
Screenshot
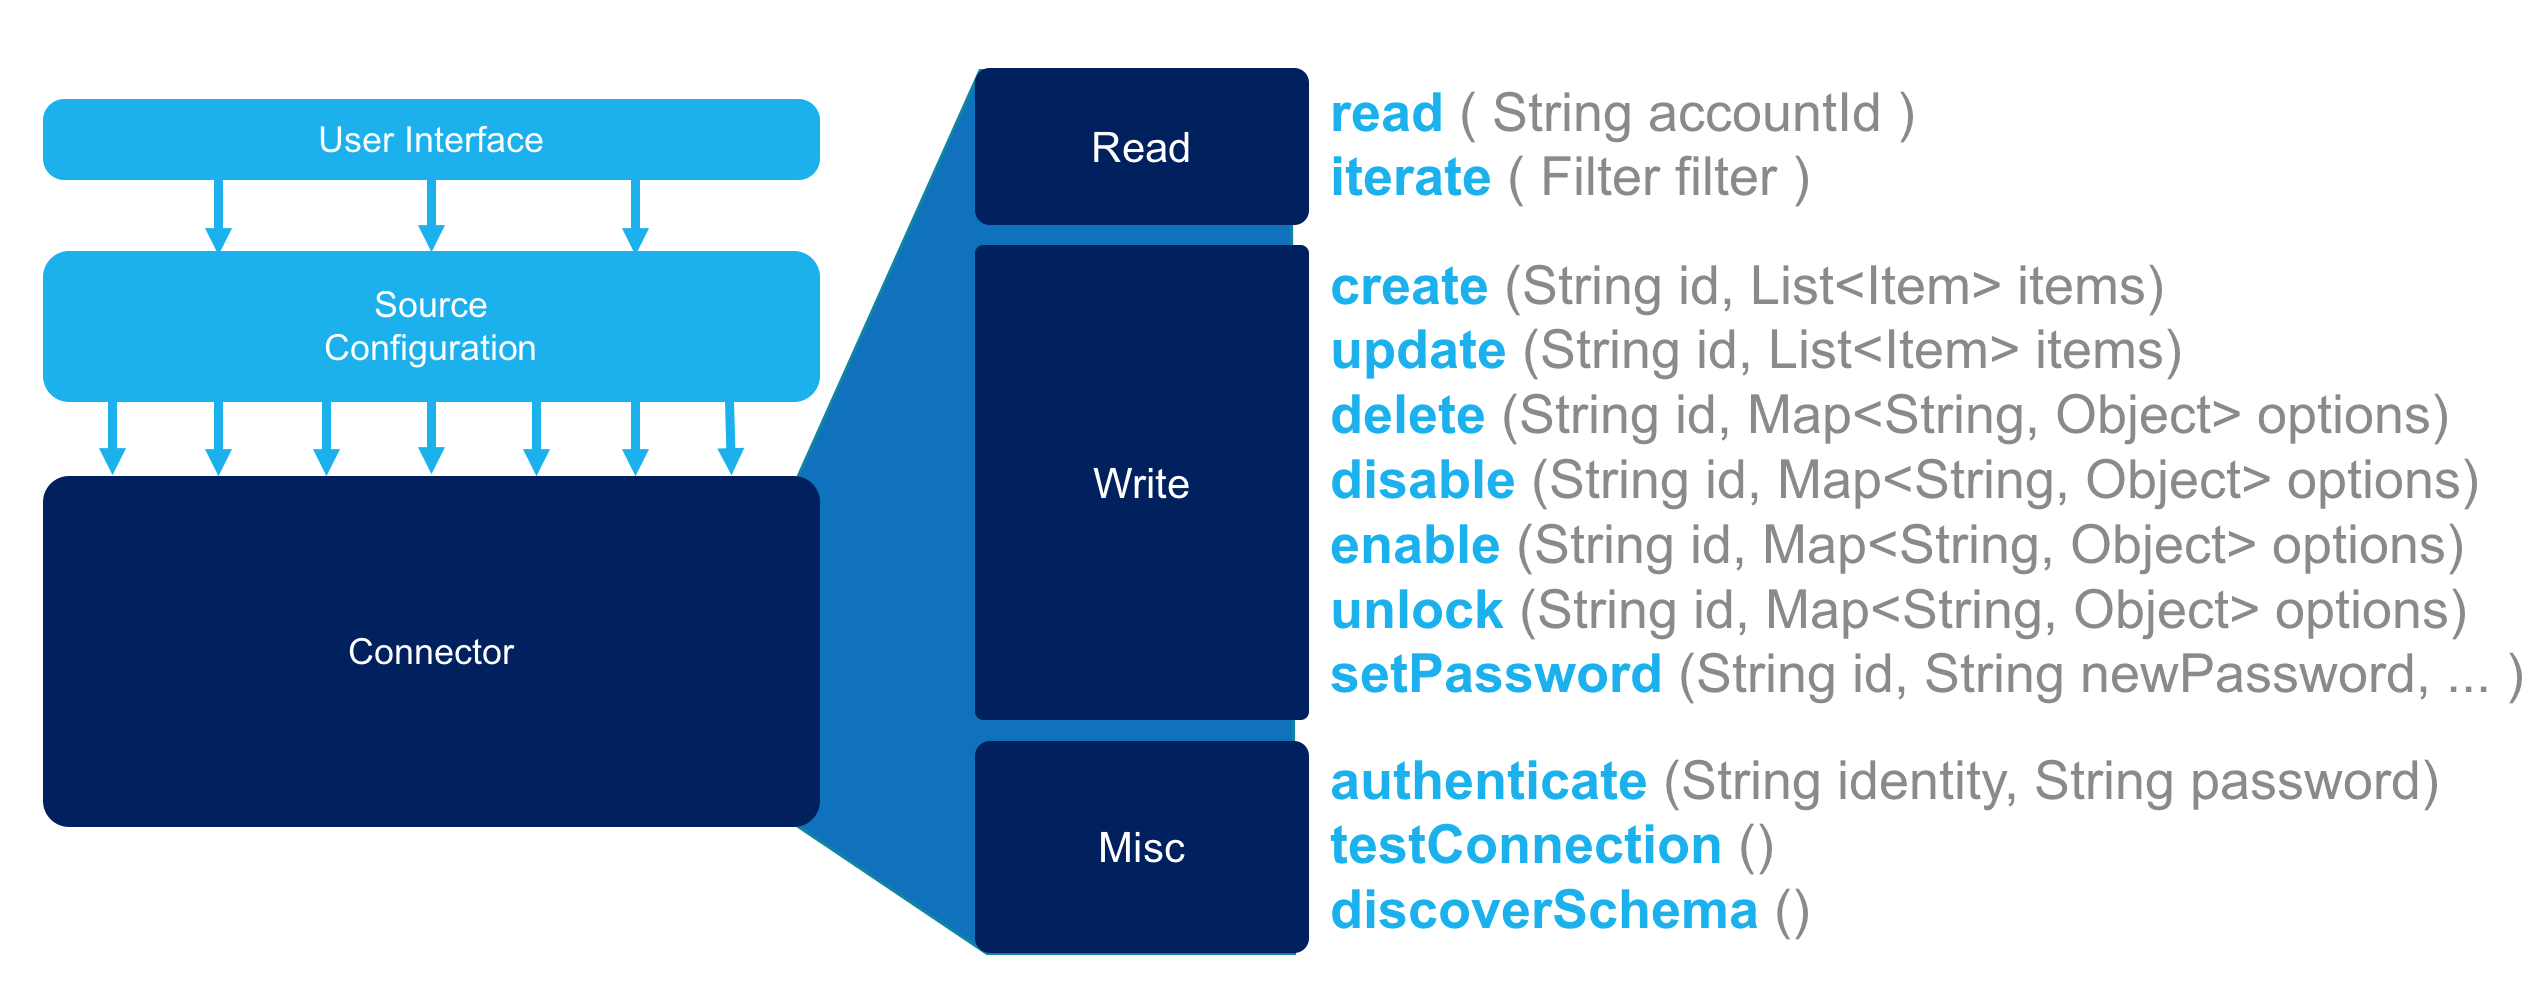
The following is a chart which details these in greater detail. Methods marked with an asterisk (*) are required for any custom connector, regardless of the feature set chosen. However, the custom connector can simply defer to the AbstractConnector's default behavior instead of implementing its own version of the method when that method has been defined in the AbstractConnector class. AbstractConnector's provided functionality for each of these methods is noted below. In some cases, AbstractConnector provides some default functionality that can be used or overridden by the custom class. In other cases, it contains no method or contains a method that throws an unsupported operation exception, both of which require the method to be written in the custom connector class for the operation to be supported.
| Method | Description | Default Behavior of AbstractConnector's Method |
|---|---|---|
getSupportedObjectTypes() * |
Should return a list of the connector's supported object types. | Returns Account |
getSupportedFeatures() |
Should return the list of supported features for the connector Note - This method is not currently used by SailPoint. Instead, the application object's FeaturesString is used to determine the connector's supported features. |
Returns GET and ITERATE |
configure() * |
Should set up any configuration information which might be helpful in supporting other connector functionality; this is called only once during connector construction Note - The default behavior is helpful since it makes the connector's attributes available to other methods, so if this method is implemented in the custom connector class, it should call its super method as well. |
Saves the connector config and log objects passed to it in local variables for later use by other methods. |
setObjectType() * |
Sets the object type, which can influence the read, iterate, and provision behaviors of the connector when the methods supporting those functions contain separate functionality for each object type; is called by the OpenConnectorAdapter to set the correct target object type before executing operations. | Sets the object type to the type named in the method call (defaulting to "account" if none are named) and retrieves the schema for that type from the connector configuration. |
close() |
Should perform any required steps to close the connection to the application. | Does nothing |
testConnection() * |
Should determine if the resource is accessible; e.g. connect to the application with login credentials pulled from the connector configuration. | Throws unsupported |
discoverSchema() |
Should return the schema (attributes and data types) of the currently selected object type. | Throws unsupported |
authenticate() |
Should connect to the application with the credentials provided in the method call and attempt to authenticate to the application with that user id and password. | Throws unsupported |
read() |
Should refresh the account or group in SailPoint corresponding to the provided native identity to match its current values in the application (i.e. targeted aggregation functionality). This can also be used in preparation for an update operation to ensure SailPoint has the latest data from the application before performing any updates. | Not implemented |
iterate() |
Should return an iterator over the accounts/groups in the application (can be a subset of accounts/groups based on a specified filter). | Not implemented |
provision() |
Should parse the provisioningPlan and drive provisioning activities. Note - Most custom connectors will not implement this method but will instead rely on the AbstractConnector's provision method to do the plan parsing. |
Splits the plan into individual actions for each request type (delete, create, update, enable, etc.) and calls other methods to provide the requested action. |
delete() ^ |
Should delete the object from the application based on the native identifier. | Throws unsupported |
create() ^ |
Should create an account (or group) in the application given a native identifier and a list of attribute values. | Throws unsupported |
update() ^ |
Should update the values for the specified account or group, matched by native identifier. | Throws unsupported |
enable() ^ |
Should enable the object on the application based on native identifier. | Throws unsupported |
disable() ^ |
Should disable the object on the application based on native identifier. | Throws unsupported |
unlock() ^ |
Should unlock the account on the application based on native identifier. | Throws unsupported |
setPassword() |
Should set/reset the account password on the application, given a native identifier, new password, optional current password, and expiration date. | Throws unsupported |
* - Required method
^ - These methods each accept a hashmap of options which can influence the operation. Any arguments passed in the request (within the provisioning plan) are passed to the target method by the provision() method to be used as needed by the connector.
Methods can throw any of the following exceptions: ConnectorException, AuthenticationFailedException, UnsupportedOperationException, ObjectAlreadyExistsException, ObjectNotFoundException, or ExpiredPasswordException.
Developing OpenConnector in Java
To create a custom connector based on this framework:
- Create the Java project, package, and class.
- Write the methods for the required features.
- Compile and deploy.
Create the Project, Package, and Class
- Start a new Java project.
- Add all the OpenConnector SDK libraries to the build path for the build process.
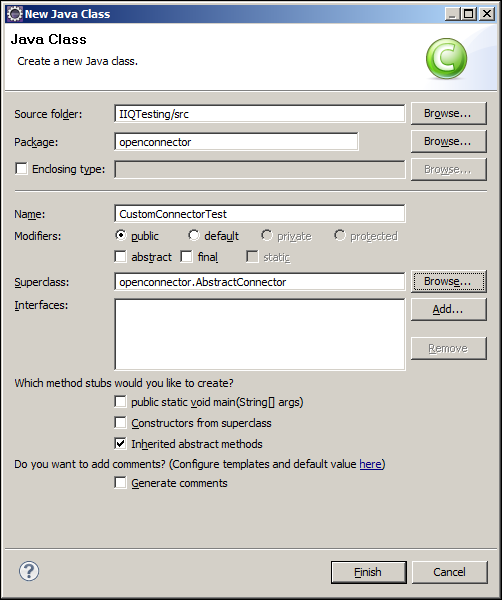
- Create a new package called "openconnector".
-
Create a new class in the openconnector package with the desired class name for the new connector. The following image illustrates how to do this in Eclipse, but any IDE can be used.
Screenshot
Deploying in SailPoint
To deploy a custom connector in SailPoint:
- Create a Connector via the REST API.
- Download the Connector Bundle and Update it via the REST API.
- Configure Source in the SailPoint interface or via the REST API.
- Upload Connector JAR(s) and Libraries.
Note
For more information on SailPoint's REST APIs, refer to Best Practices: REST API Authentication and REST API - Update Source (Partial) in the SailPoint Developer Community.
The next sections reference the V3 REST APIs. For information on how to authenticate to REST APIs, refer to the Developer Community.
The following topics are covered in this section:
- Create Connector
- Update Connector Bundle
- Configure Source
- Upload Connector JAR(s) and Libraries
- Test Connector
Create Connector
Create the connector type calling the Create Connector REST API.
POST https://sailpoint.api.identitynow.com/v3/connectors
JSON body:
{
  "name": "ExampleConnector",
  "type": "custom_exampleName",
  "className": "sailpoint.connector.OpenConnectorAdapter",
  "directConnect": "true",
  "status": "released"
}
Where:
name- This is the type of connector which you want to refer to this by. This is visible in the UI.type- The connector type. If not specified, the name will default to 'custom' + name.className- This is the fully qualified package and class name of the connector that is being written.- If you are implementing OpenConnector standard (what we recommend), then this will be set to
sailpoint.connector.OpenConnectorAdapter.
- If you are implementing OpenConnector standard (what we recommend), then this will be set to
directConnect- This will always betrueif you are creating a custom connector.status- This indicates the status of the connector. Each tenant can be configured to see different connector statuses. For implementer usage, set the status toreleased.
Update Connector Bundle
In the following examples, scriptName is the script name of the connector you created. If you are unsure, you can always call GET https://sailpoint.api.identitynow.com/beta/connectors to see all connectors in the system.
You can use the unescaped content of the applicationXml, correlationConfigXml, and sourceConfigXml fields to create a corresponding XML file containing the content modifications.
To update the bundles, use the following:
- To update the
applicationXml, usePUT https://sailpoint.api.identitynow.com/v3/connectors/:scriptName/source-template - To update the
correlationConfigXml, usePUT https://sailpoint.api.identitynow.com/v3/connectors/:scriptName/correlation-config - To update the
sourceConfigXml, usePUT https://sailpoint.api.identitynow.com/v3/connectors/:scriptName/source-config
Use the XML file as a 'file' form-data, and the configurations will be deployed into the SailPoint cloud.
Configure Source
Use the defined connector to create a source. You can follow the steps described in the documentation for a supported connector to create a source using the SailPoint UI.
You may also leverage the admin source configuration page to configure any settings using the new user interface you defined via the user interface forms.
Upload Connector JAR(s) and Libraries
Once the connector and sources are defined, upload the packaged JAR files in the user interface. When you upload these, they are copied to the VA(s) which are associated with the particular source.
Note
This process may take a while to upload, especially when you have many VA cluster members.
- Ensure that all third-party libraries that you use:
- Are from an authentic or trusted source.
- Do not incur legal obligations.
- Are free from known security vulnerabilities.
- Are compatible with the supported JDK versions shipped with VA (OpenJDK 11).
- Custom connectors should upload all third-party JAR dependencies required by the connector with a few exceptions. Custom connectors should not upload or pack the following libraries or classes with their source, as these are the infrastructure libraries which are shipped with the platform. Uploading these can cause class loading or conflict errors.
- OpenConnector framework classes or JAR - Responsible for providing connector infrastructure like interfaces and functionality control.
- Any default connector bundle JAR.
aspect*.jar- Responsible to provide the aspect infrastructure.commons-logging*.jar,log4j-*.jar,slf4j-api*.jar- Responsible to provide logging infrastructure.bsf*.jar,bsh*.jar- Used to execute Rules.
If any of the dependencies are missing in the uploaded connector JAR file, an error can occur during the test connection. The error shows which third-party library is missing.
Test Connector
Once complete, test the connector in the SailPoint interface. Run Test Connection and import accounts.
Documentation Feedback
Feedback is provided as an informational resource only and does not form part of SailPoint’s official product documentation. SailPoint does not warrant or make any guarantees about the feedback (including without limitation as to its accuracy, relevance, or reliability). All feedback is subject to the terms set forth at https://developer.sailpoint.com/discuss/tos.