Configuring Single Sign-On to IdentityIQ from Microsoft Teams
IdentityIQ Microsoft Teams requires a SAML-based Single sign-on (SSO) configuration. Enabling SSO for Microsoft Teams and IdentityIQ is required because it streamlines the login process for Microsoft Teams users, allowing them to bypass the IdentityIQ login when they click IdentityIQ links in Microsoft Teams notification.
Enabling single sign-on from Microsoft Teams to IdentityIQ is a three-step process that requires creating an SSO Provider Application in Azure, configuring SAML SSO within Azure for the Provider Application, then using some of the parameters from the Azure steps to enable SAML SSO within IdentityIQ.
Create an SSO Provider Application in Azure Active Directory
Note: It is essential to follow the specified sequence of steps as mentioned in the document when creating the necessary applications for integrating IdentityIQ with Microsoft Teams. For a visual guide to the recommended setup order, refer to Best Practices for Configuring IdentityIQ Microsoft Teams.
Important: This guide ONLY provides instructions for configuring specific Azure component configurations required to support IdentityIQ’s Notifications and Access Request Approval work item features in Microsoft Teams. It is intended as an aid to implementers but should be used in conjunction with Microsoft’s official documentation to ensure access to the most accurate and up-to-date information. For broader information on Azure or general setup tasks related to Microsoft Teams and SSO, please refer to Microsoft's official documentation.
The Azure SSO Provider Application facilitates seamless authentication to IdentityIQ when users follow a link embedded in a Microsoft Teams notification.
Perform the following steps to create an SSO Provider Application:
-
Sign into Azure portal and navigate to your Microsoft Entra ID.
-
Under Manage > Enterprise applications, select + New application.

-
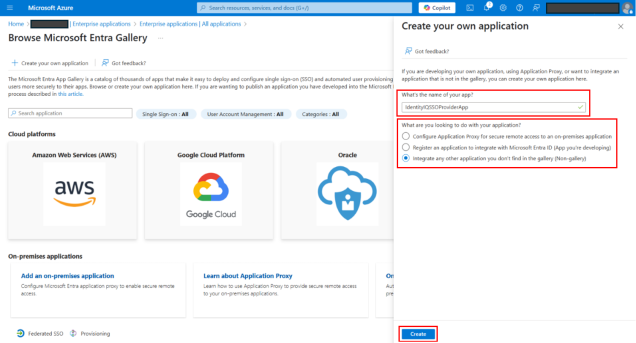
Select + Create your own application.
-
On the Application creation page, provide the following details:
-
Enter a Name for your application. See Best Practices for Configuring IdentityIQ Microsoft Teams to define an appropriate application name.
-
Select Integrate any other application you don't find in the gallery.
-
Select Create. Once the creation process is complete, Azure opens a Properties page for the application.
-
-
Define the users and groups that can use SAML SSO with IdentityIQ:
-
On Overview page, select Assign users and groups tile.
Alternatively, navigate to Manage > Users and groups and then select + Add user/group.
-
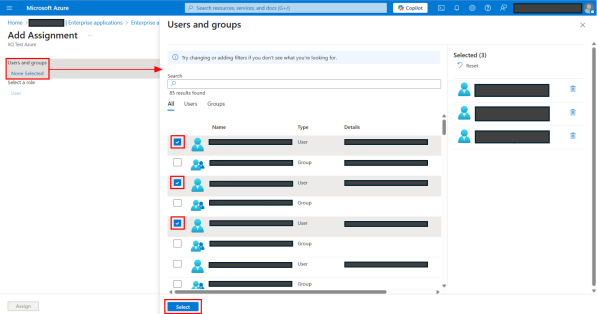
On Add Assignment page, under Users and groups, select None Selected.
-
On the Users and groups dialog, provide the following details:
-
Select the users and groups that you want to be able to use SAML SSO.
-
Select the Select button.
-
-
Select Assign.
-
-
In the left navigation, select Single sign-on.
-
Select the SAML tile.
-
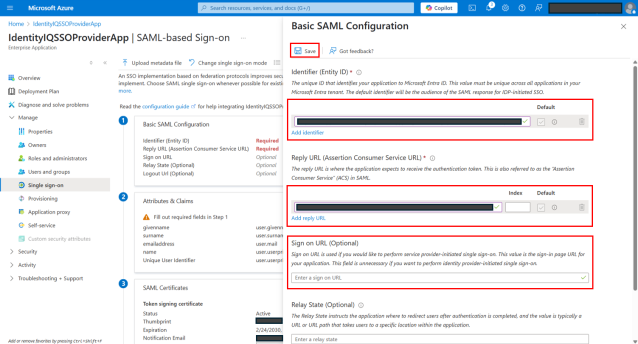
In the Basic SAML Configuration section, select Edit.
-
On the Configuration dialog, provide the following details:
-
Add an Identifier (Entity ID). This can be any name, but typically takes the form of a URL:
https://<IdentityIQ Server IP>:<Port>/<root context>. This value is used to link Azure and IdentityIQ. Make a note of it to use later when configuring SSO within IdentityIQ. -
Add a Reply URL (Assertion Consumer Service URL) to your IdentityIQ instance, in this format: https://<IdentityIQ Server IP>:<Port>/<root context>/home.jsf. This URL must be accessible to your Microsoft Teams users on your network.
-
Add a Sign on URL to your IdentityIQ instance, in this format: https://<IdentityIQ Server IP>:<Port>/<root context>.
-
Do not add a Logout URL.
-
Select Save.
-
-
In the Attributes & Claims section, select Edit.
-
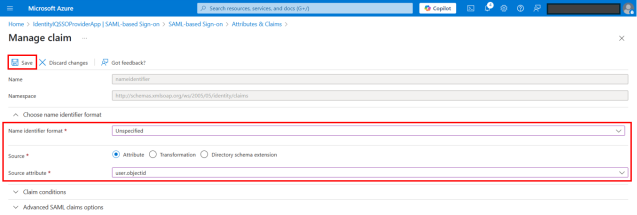
On the Attributes & Claims page, select Unique User Identifier (Name ID).
-
On the Manage claim page, provide the following details:
-
Select Unspecified for Name identifier format.
-
Select user.objectId for Source attribute.
-
Select Save.
-
-
In the SAML Signing Certificate section, download and save the Certificate (Base64). You will need this later, when configuring SAML SSO within IdentityIQ.
-
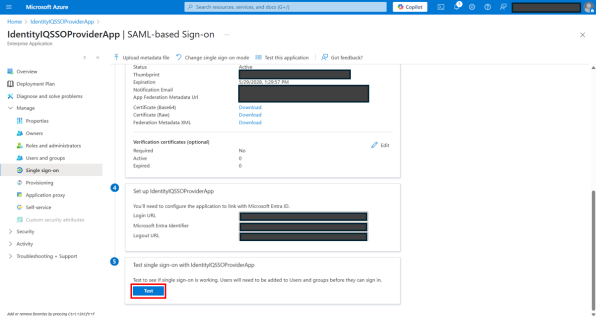
In the Set up (name) section, make a note of the Login URL, Microsoft Entra Identifier, and Logout URL that are listed. You will need these later, when configuring SAML SSO within IdentityIQ.
Configuring Single Sign-On in IdentityIQ
Perform the following steps for enabling Single sign-on in IdentityIQ:
-
Select the gear menu > Global Settings > Login Configuration.
-
Select the SSO Configuration tab.
-
Check to select the Enable SAML Based Single Sign-On (SSO) box. This opens a panel for entering SAML Based SSO details.
-
In the Identity Provider Settings section:
-
Enter an Entity ID / Issuer. This must match the Microsoft Entra Identifier from the Set up (name) section in Azure. (See step 14 in the previous section.)
-
Enter a SSO Login URL. This must match the Login URL from the Set up (name) section in Azure. (See step 14 in the previous section.)
-
Enter your Public X.509 Certificate. This is the certificate that was downloaded and saved in the Azure SAML Signing Certificate panel, as described the previous section.
-
In the Service Provider (IdentityIQ) Settings section:
-
Enter an Entity ID / Issuer. This must match the Identifier (Entity ID) value that was set in Azure in the Basic SAML Configuration panel, as described in the previous section.
-
Enter a SAML URL. This must match the Reply URL (Assertion Consumer Service URL) that was set Azure in the Basic SAML Configuration panel, as described in the previous section.
-
Set SAML Binding to HTTP POST.
-
Set the SAML Name ID Format to unspecified, if you are using the default identifiers as described in step 12 in the previous section. If you have opted to use a different set of values for uniquely identifying users, select the appropriate value here.
-
The SAML Correlation Rule manages the correlation of IdentityIQ identities to Azure/Teams identities. IdentityIQ provides a sample rule, ExampleAzureActiveDirectoryUsingTenantIdSAML. This rule is included in the
examplerules.xmlfile, located in the[install_directory]WEB-INF\configdirectory. If you are using the recommended default identifiers, you can use the sample rule without modification. If you have opted to use different unique identifiers, you can either edit this rule, or use a different rule that you have developed.
-
-
Save your changes.
For more information on configuring your IdentityIQ instance for SSO authentication, see SSO Configuration.
Testing SSO Provider Application Connection
Use one of the two methods mentioned below to test the SSO Provider Application connection.
-
First method:
-
Navigate to Azure portal and open the SSO Provider Application.
-
Under Manage > Single sign-on, select SAML tile.
-
Select Test.
-
-
Second Method:
-
Open the SSO Provider Application URL in a browser.
If you're redirected to the Microsoft login page, it indicates that the SSO Provider Application connection test is successful.
-
You now have successfully created an SSO Provider Application in Azure. For next step, refer Creating a Chat Application Proxy for IdentityIQ in Azure .