Configuring Zendesk Service Desk
In SailPoint, configure the following items for your Zendesk Service Desk integration:
On the Summary page, you can review the general settings and parameters for the connectivity and authentication.
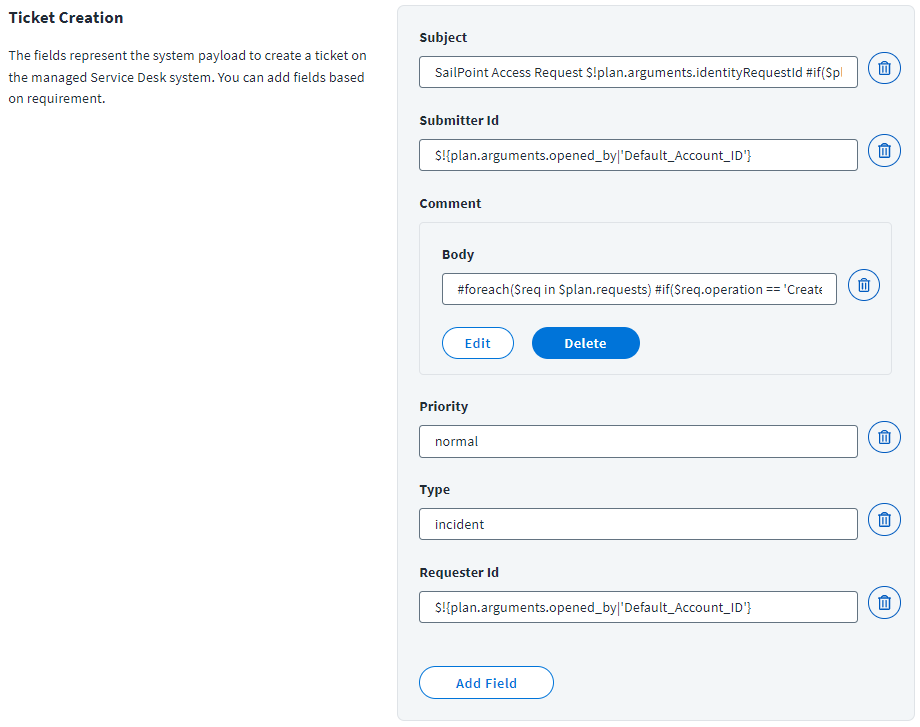
Ticket Creation
In a centralized approach spanning many users and resources to strengthen IT controls and provide proof of compliance to auditors and executive management, you can create a ticket for your integration based on your requirements. A ticket has all the relevant data filed for further processing.
The information provided in this section is used to create the payload from SailPoint to create a ticket on the managed Zendesk instance. You can customize this information by adding fields as required.
Important
SailPoint recommends that you include the Apache Velocity variables as needed to meet your specific use cases.
Important
Currently, Zendesk Service Desk supports only the Incident ticket type.
Screenshot
-
Enter a Subject for the ticket. For example:
-
Enter the numeric ID of the user who submitted the ticket in the Submitter ID field. For example:
In the example above, replace
Default_Account_IDwith the service account's ID for the Zendesk user from Requester Source on SailPoint. -
Enter the description of the requirement that generated the ticket in the Body field. For example:
#foreach($req in $plan.requests) #if($req.operation == 'Create') Create Account on application $req.resource #else For $req.id in application $req.resource #end #if($req.items) $newline #foreach($item in $req.items) #if ($item.name == '*disabled*' && $item.value == 'true') Disable Account. $newline #elseif ($item.name == '*disabled*' && $item.value == 'false') Enable Account. $newline #elseif ($item.name == '*locked*' && $item.value == 'false') Unlock Account. $newline #else $!item.Operation $item.name: $item.value $newline #end #end #else $newline $!req.Operation Account #end $newline #end -
Enter the Priority to indicate the urgency of the ticket. Accepted values are
urgent,high,normal, orlow. - Enter
Incidentas the ticket Type. This is currently the only supported ticket type. -
Enter the numeric ID, or an Apache Velocity variable, of the user requesting support through the ticket into the Requestor ID field. For example:
In the example above, replace
Default_Account_IDwith the service account's ID for the Zendesk user from Requester Source on SailPoint. -
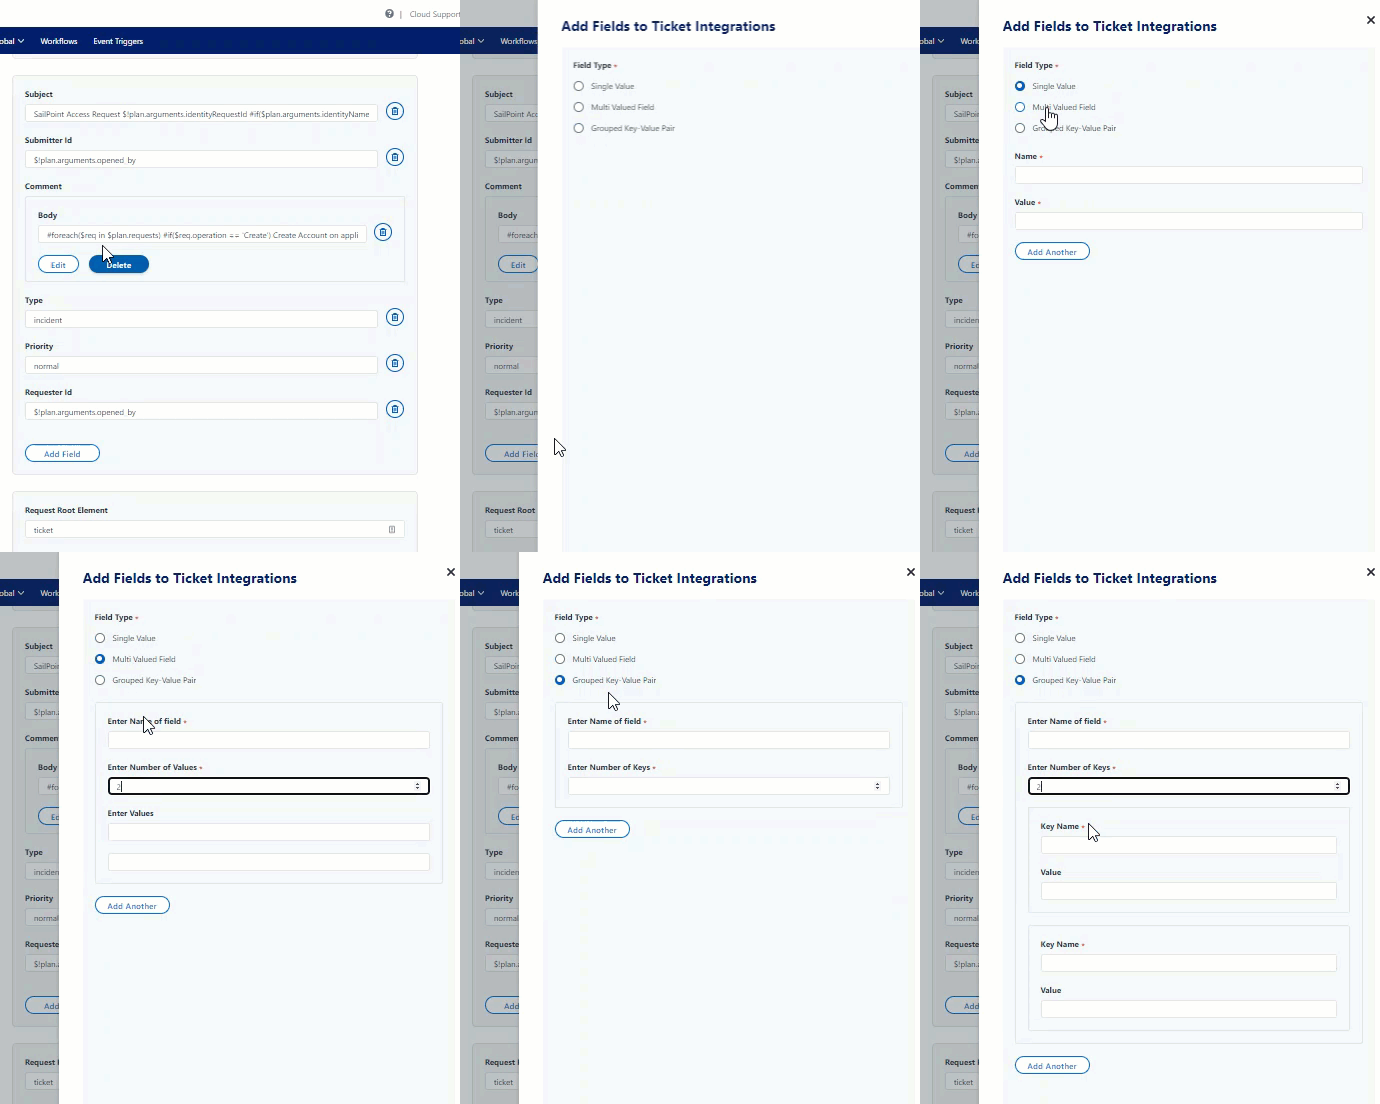
To add a field, select Add Field. Select the field type and enter the required information based on the type. Options are Single Value, Multi Valued Field, or Grouped Key-Value Pairs.
For example, to add a custom attribute such as
custom_attrin the request to the Zendesk managed system, add the field using the Single Value type. The corresponding value can be either static or dynamic. For the dynamic value, use Apache Velocity Template expressions.You can also customize the ticket fields based on your requirements by setting up a Before Provisioning rule to generate ticket fields. The default rule name is Sample Before Provisioning Rule for SDIM. You must contact SailPoint Services to create a Before Provisioning rule for your integration. You can use this service desk integration update patch to add that rule for multiple integrations.
Advanced Properties
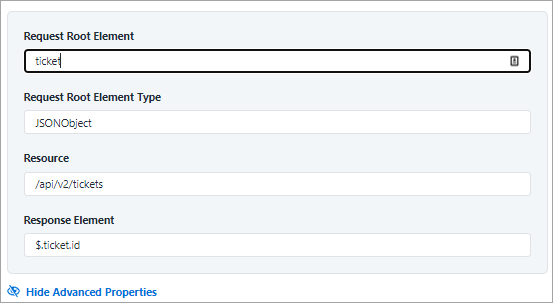
To add advanced properties to the details of the ticket, select Advanced Properties.
Screenshot
-
Enter the basic JSON root element of the request ticket in the Request Root Element field. For example:
-
Enter the type of the Request Root Element. For example:
-
Enter the resource used for the request ticket in the Resource field. Do not include the base URL for the instance in the value. Provide only the remaining directories for the endpoint. For example:
-
Enter the JSON path expression that indicates the location of the ticket number in the Response Element field. For example:
Note
The ticket number generated on the Service Desk system for the corresponding provisioning action can be seen under Search > Account Activity details of the identity. For more information, refer to Account Activity Using Search.
Status Mapping
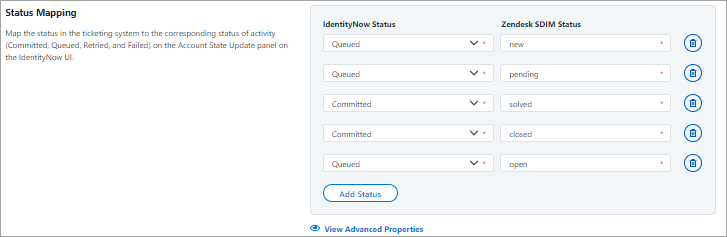
Map the status of the incident in SailPoint to the corresponding Zendesk status. To add another row for status mapping, select Add Status. Customize the status map to meet your needs by adding or deleting as needed.
Screenshot
Important
Each status must have at least one mapped value. For more information, refer to Get the time check configuration of queued service desk integration module tickets and Update the time check configuration of queued SDIM tickets.
Identity Security Cloud Status Options
- Committed
- Queued
- Failed
Zendesk Service Desk Status Options
- New
- Pending
- Solved
- Closed
- Open
Advanced Properties
To add more details to the status mapping, select View Advanced Properties.
-
Enter the resource used for the request ticket in the Resource field. Do not include the base URL for the instance in the value. Provide only the remaining directories for the endpoint. For example:
-
Enter the JSON path in the Response Element field for the status mapping. For example:
Requester Source
Screenshot

Select the source name that aggregated the ticketing system's users.
Documentation Feedback
Feedback is provided as an informational resource only and does not form part of SailPoint’s official product documentation. SailPoint does not warrant or make any guarantees about the feedback (including without limitation as to its accuracy, relevance, or reliability). All feedback is subject to the terms set forth at https://developer.sailpoint.com/discuss/tos.