Integrating SailPoint with SAP Fieldglass SaaS
Integration
This is an integration and requires additional licensing or subscriptions to utilize it. For more information, contact your customer success manager.
SAP Fieldglass is a Vendor Management System (VMS) that helps manage a contingent workforce and buyer company users. It helps businesses manage flexible workforces better, faster, and with more efficient control. It increases productivity by streamlining processes such as assignment management, contingent workforce management, services procurement, and worker profile management.
The SAP Fieldglass SaaS cloud integration with SailPoint's connector provides Identity Governance on buyer company users such as hiring managers, permanent employees of the buyer company, program management office users, and workers provided by Fieldglass. The integration also supports enforcing policies and permissions for granting and revoking access to buyer identities.
Note
To view the latest features, enhancements, and fixes for all SaaS connectors, refer to the SaaS Release Notes page.
Supported Features
The SAP Fieldglass SaaS connector supports the following features:
Important
Before you can use any of the following items marked with an asterisk (*), SailPoint must activate the feature for your site.
-
Aggregation
- Account Aggregation
- Groups Aggregation
-
Add/Remove Entitlement
- Groups
-
Account Provisioning
- Create User
- Update User (Attributes)
- Enable/Disable User
For more information on features, refer to Source Features.
Privilege Classification
SailPoint Privilege Classification helps organizations systematically categorize and manage the privilege levels of entitlements within their sources. By classifying entitlements as high, medium, or low, administrators can better understand the potential risk and impact associated with specific access rights. This allows automatic assignment of privilege levels based on system recommendations, custom-defined criteria, or a same level across all entitlements.
| Privilege Level | Description |
|---|---|
| High | Administrative level access to accounts |
| Medium | Administrative level access for a specific role or function |
| Low | Only basic access of data |
Note
To manage Privilege Classification, users must have administrative roles such as Org Admin, Source Admin or Source Sub-Admin.
For more information, refer to Managing Privilege Classification.
Example
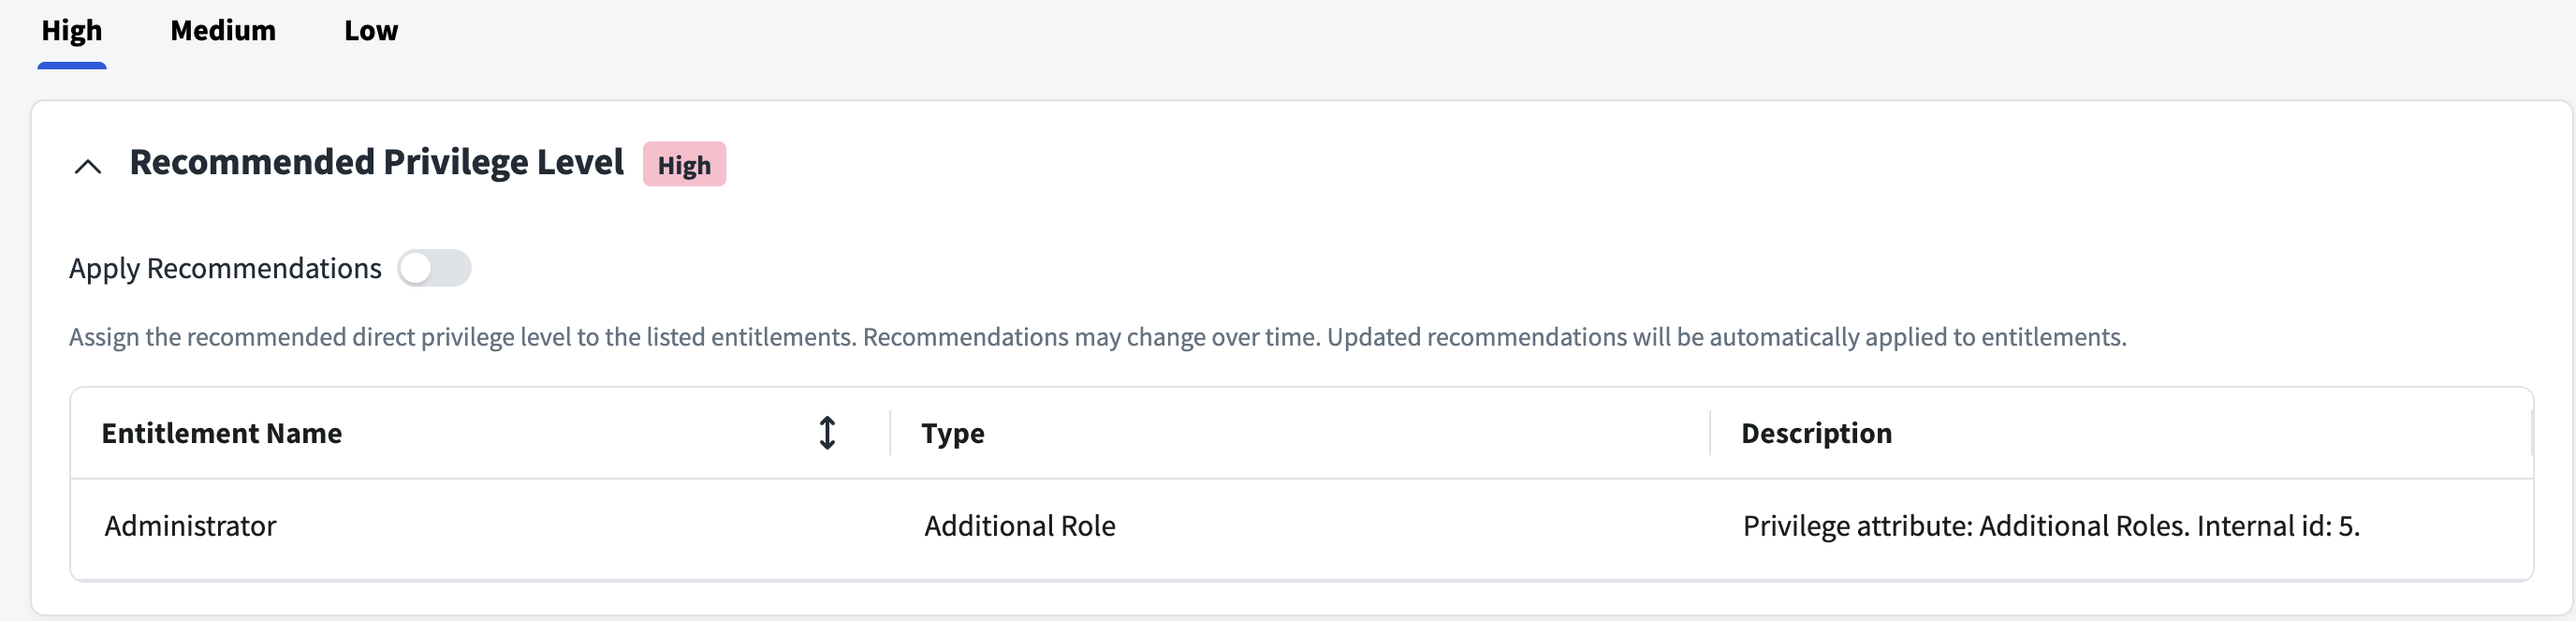
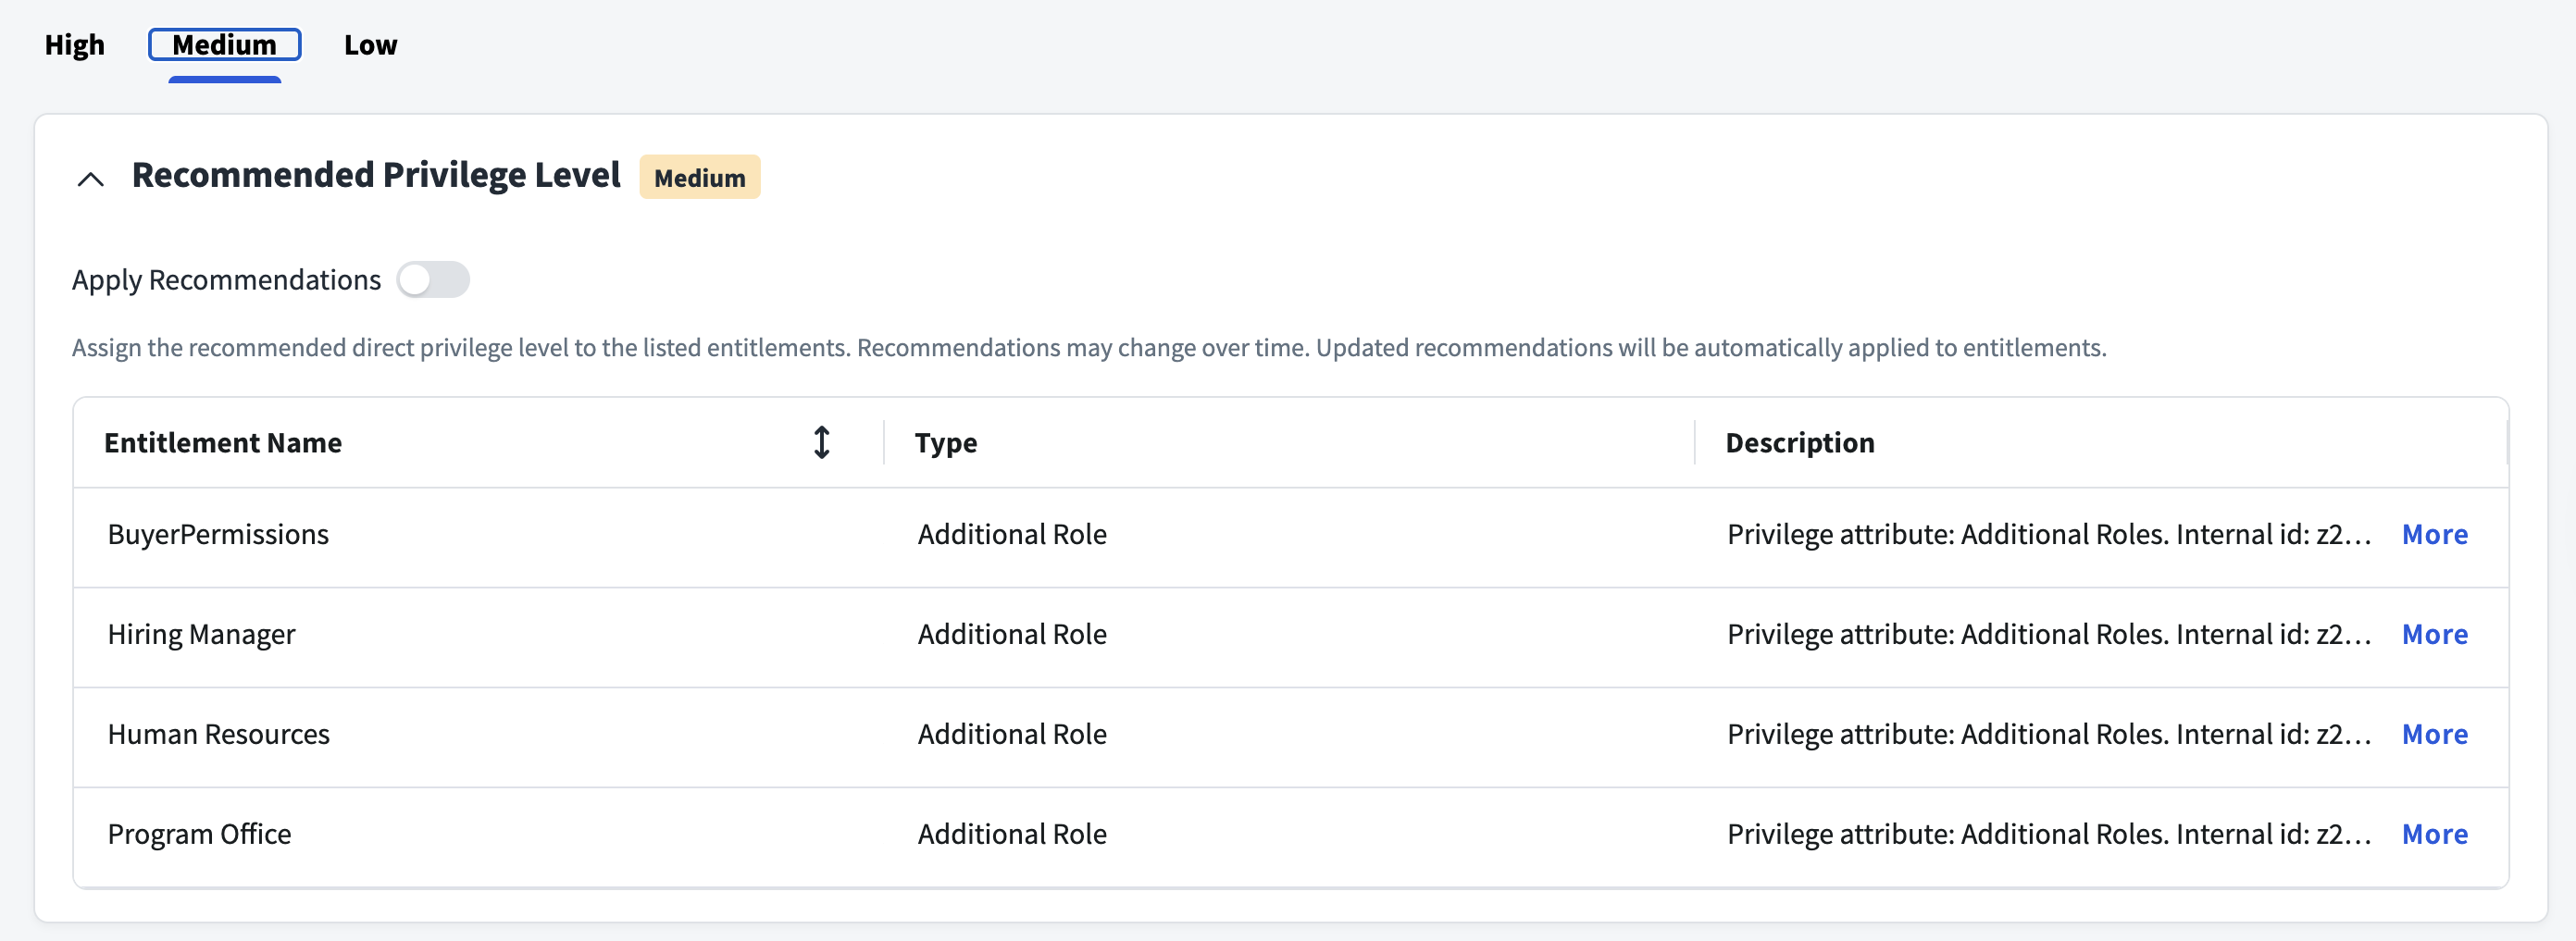
Prerequisites
You must set up a Client Application to establish SAP Fieldglass integration with SailPoint and perform all the operations.
The client application uses the OAuth 2.0 client credentials to request a new access token as the initial step of accessing protected resources of SAP Fieldglass services.
Create the X-Application Key
Screenshot
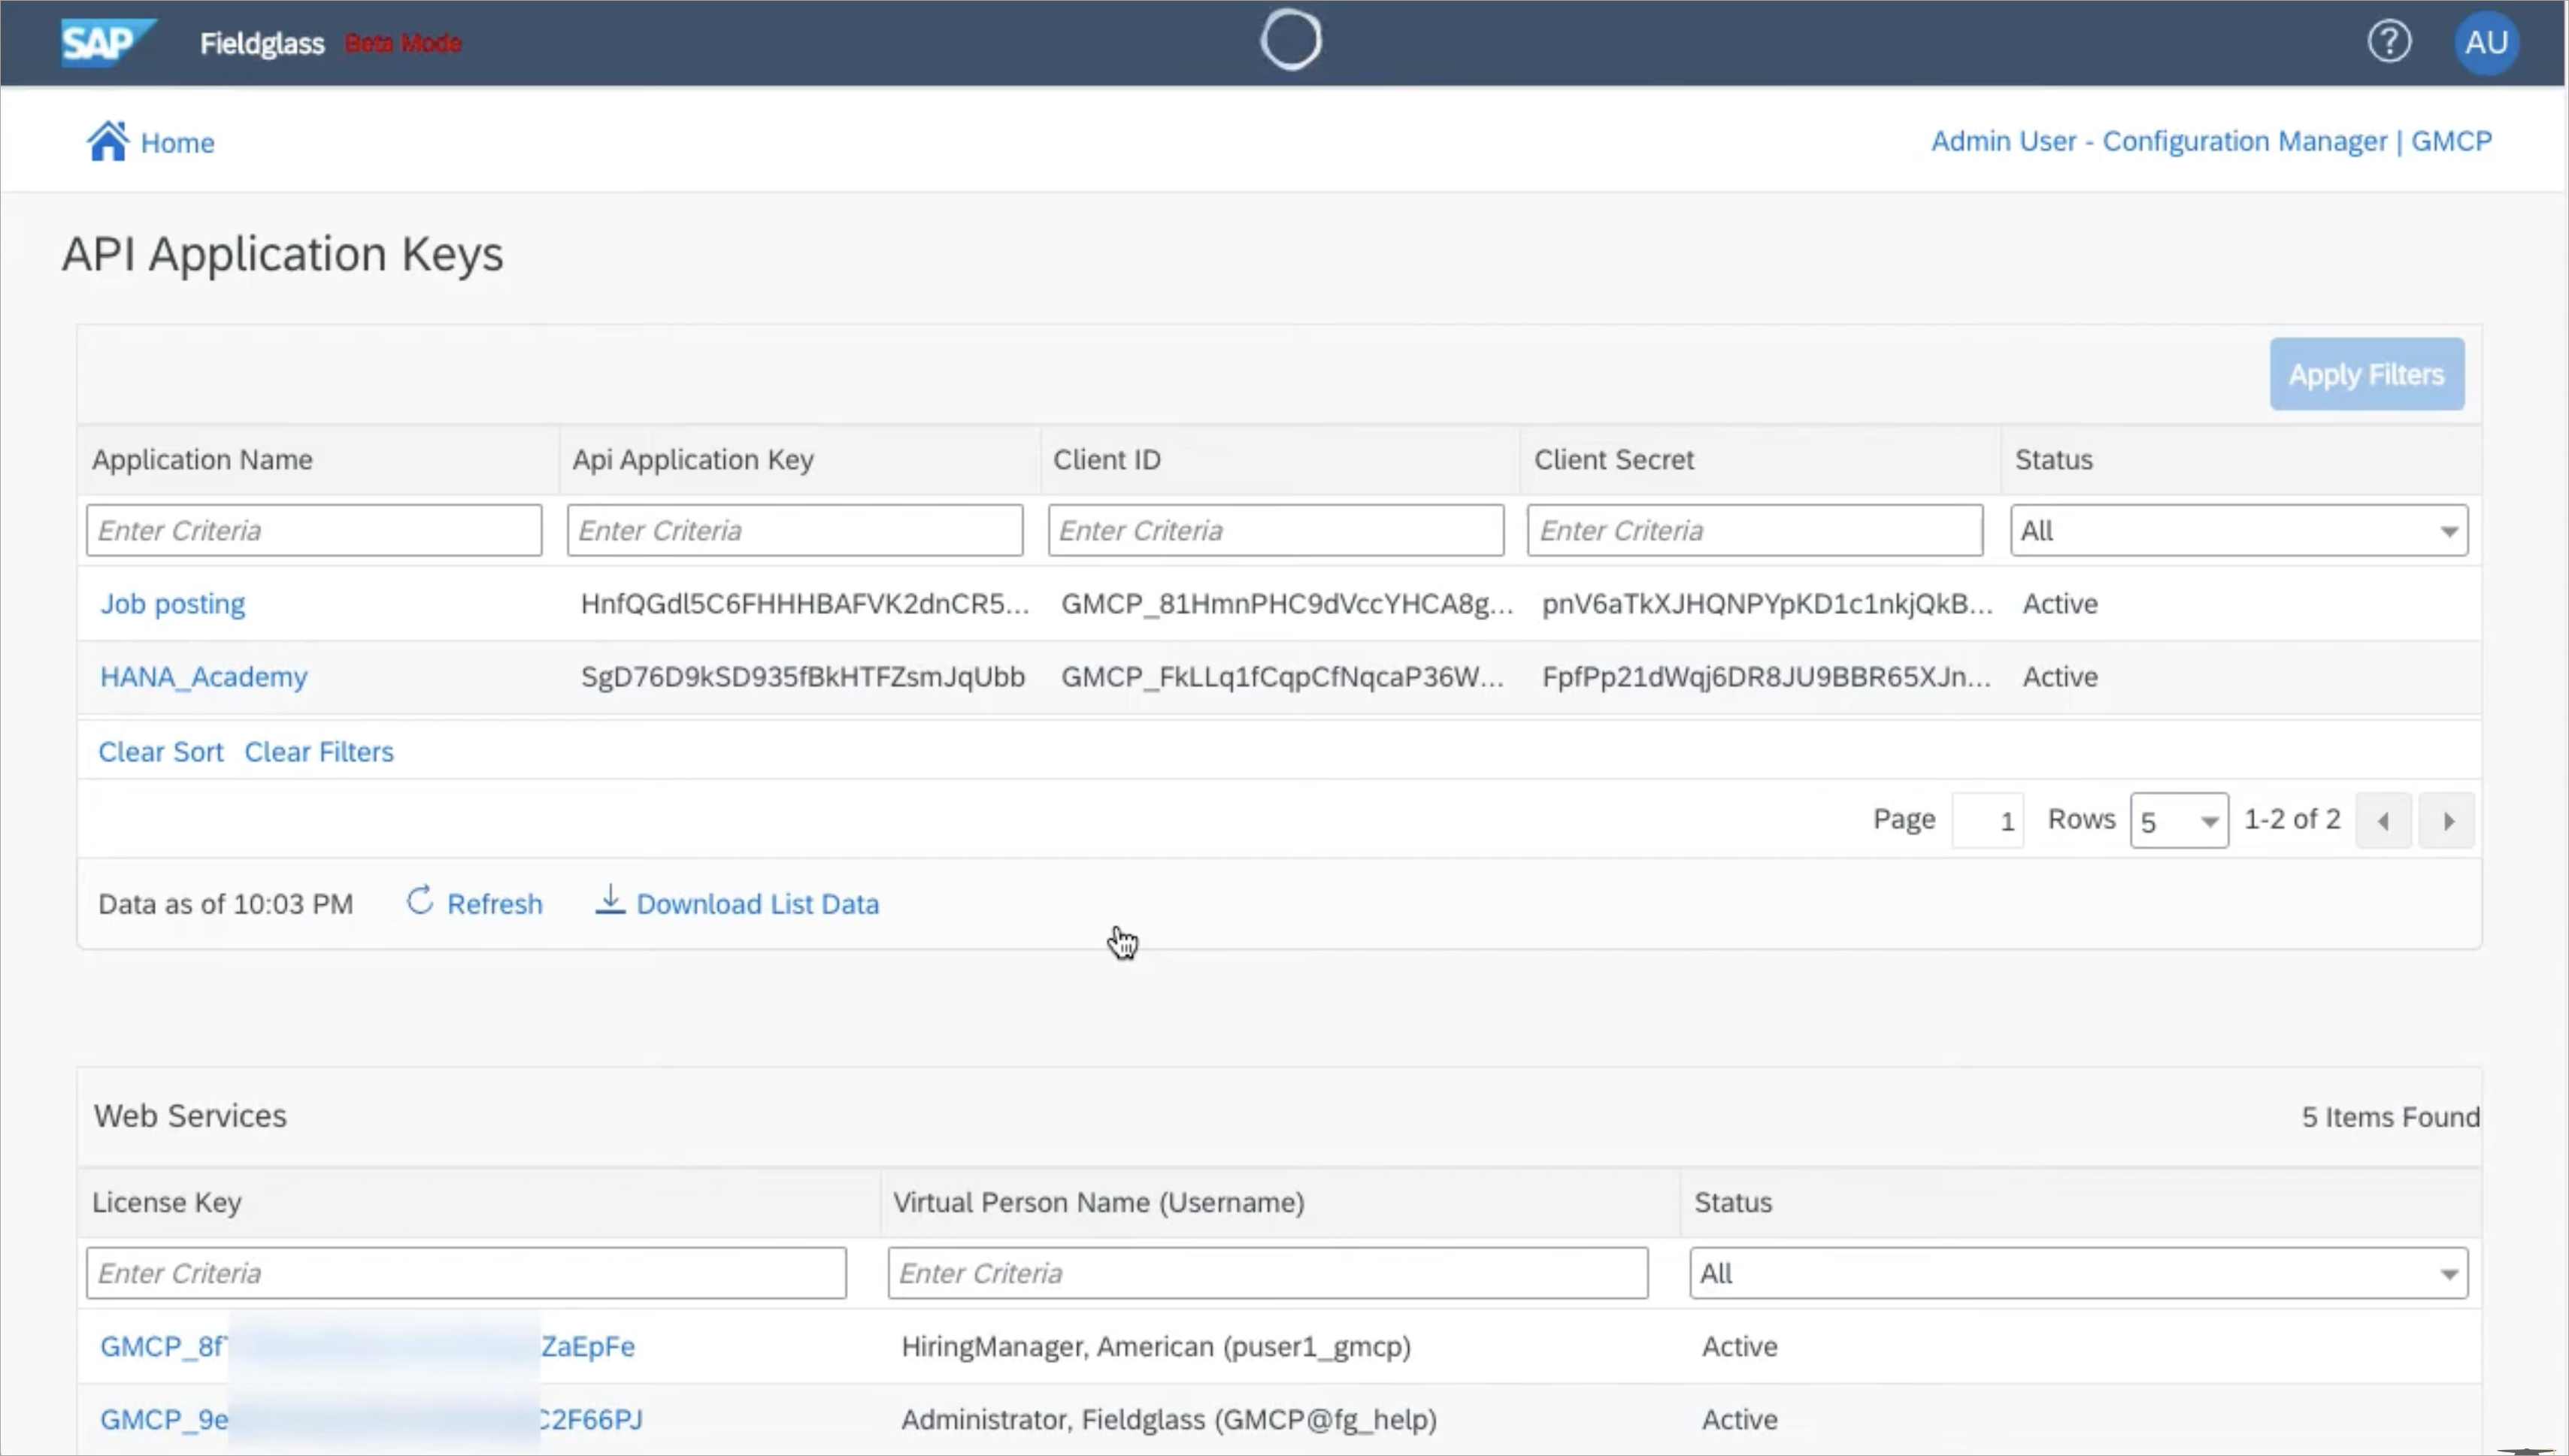
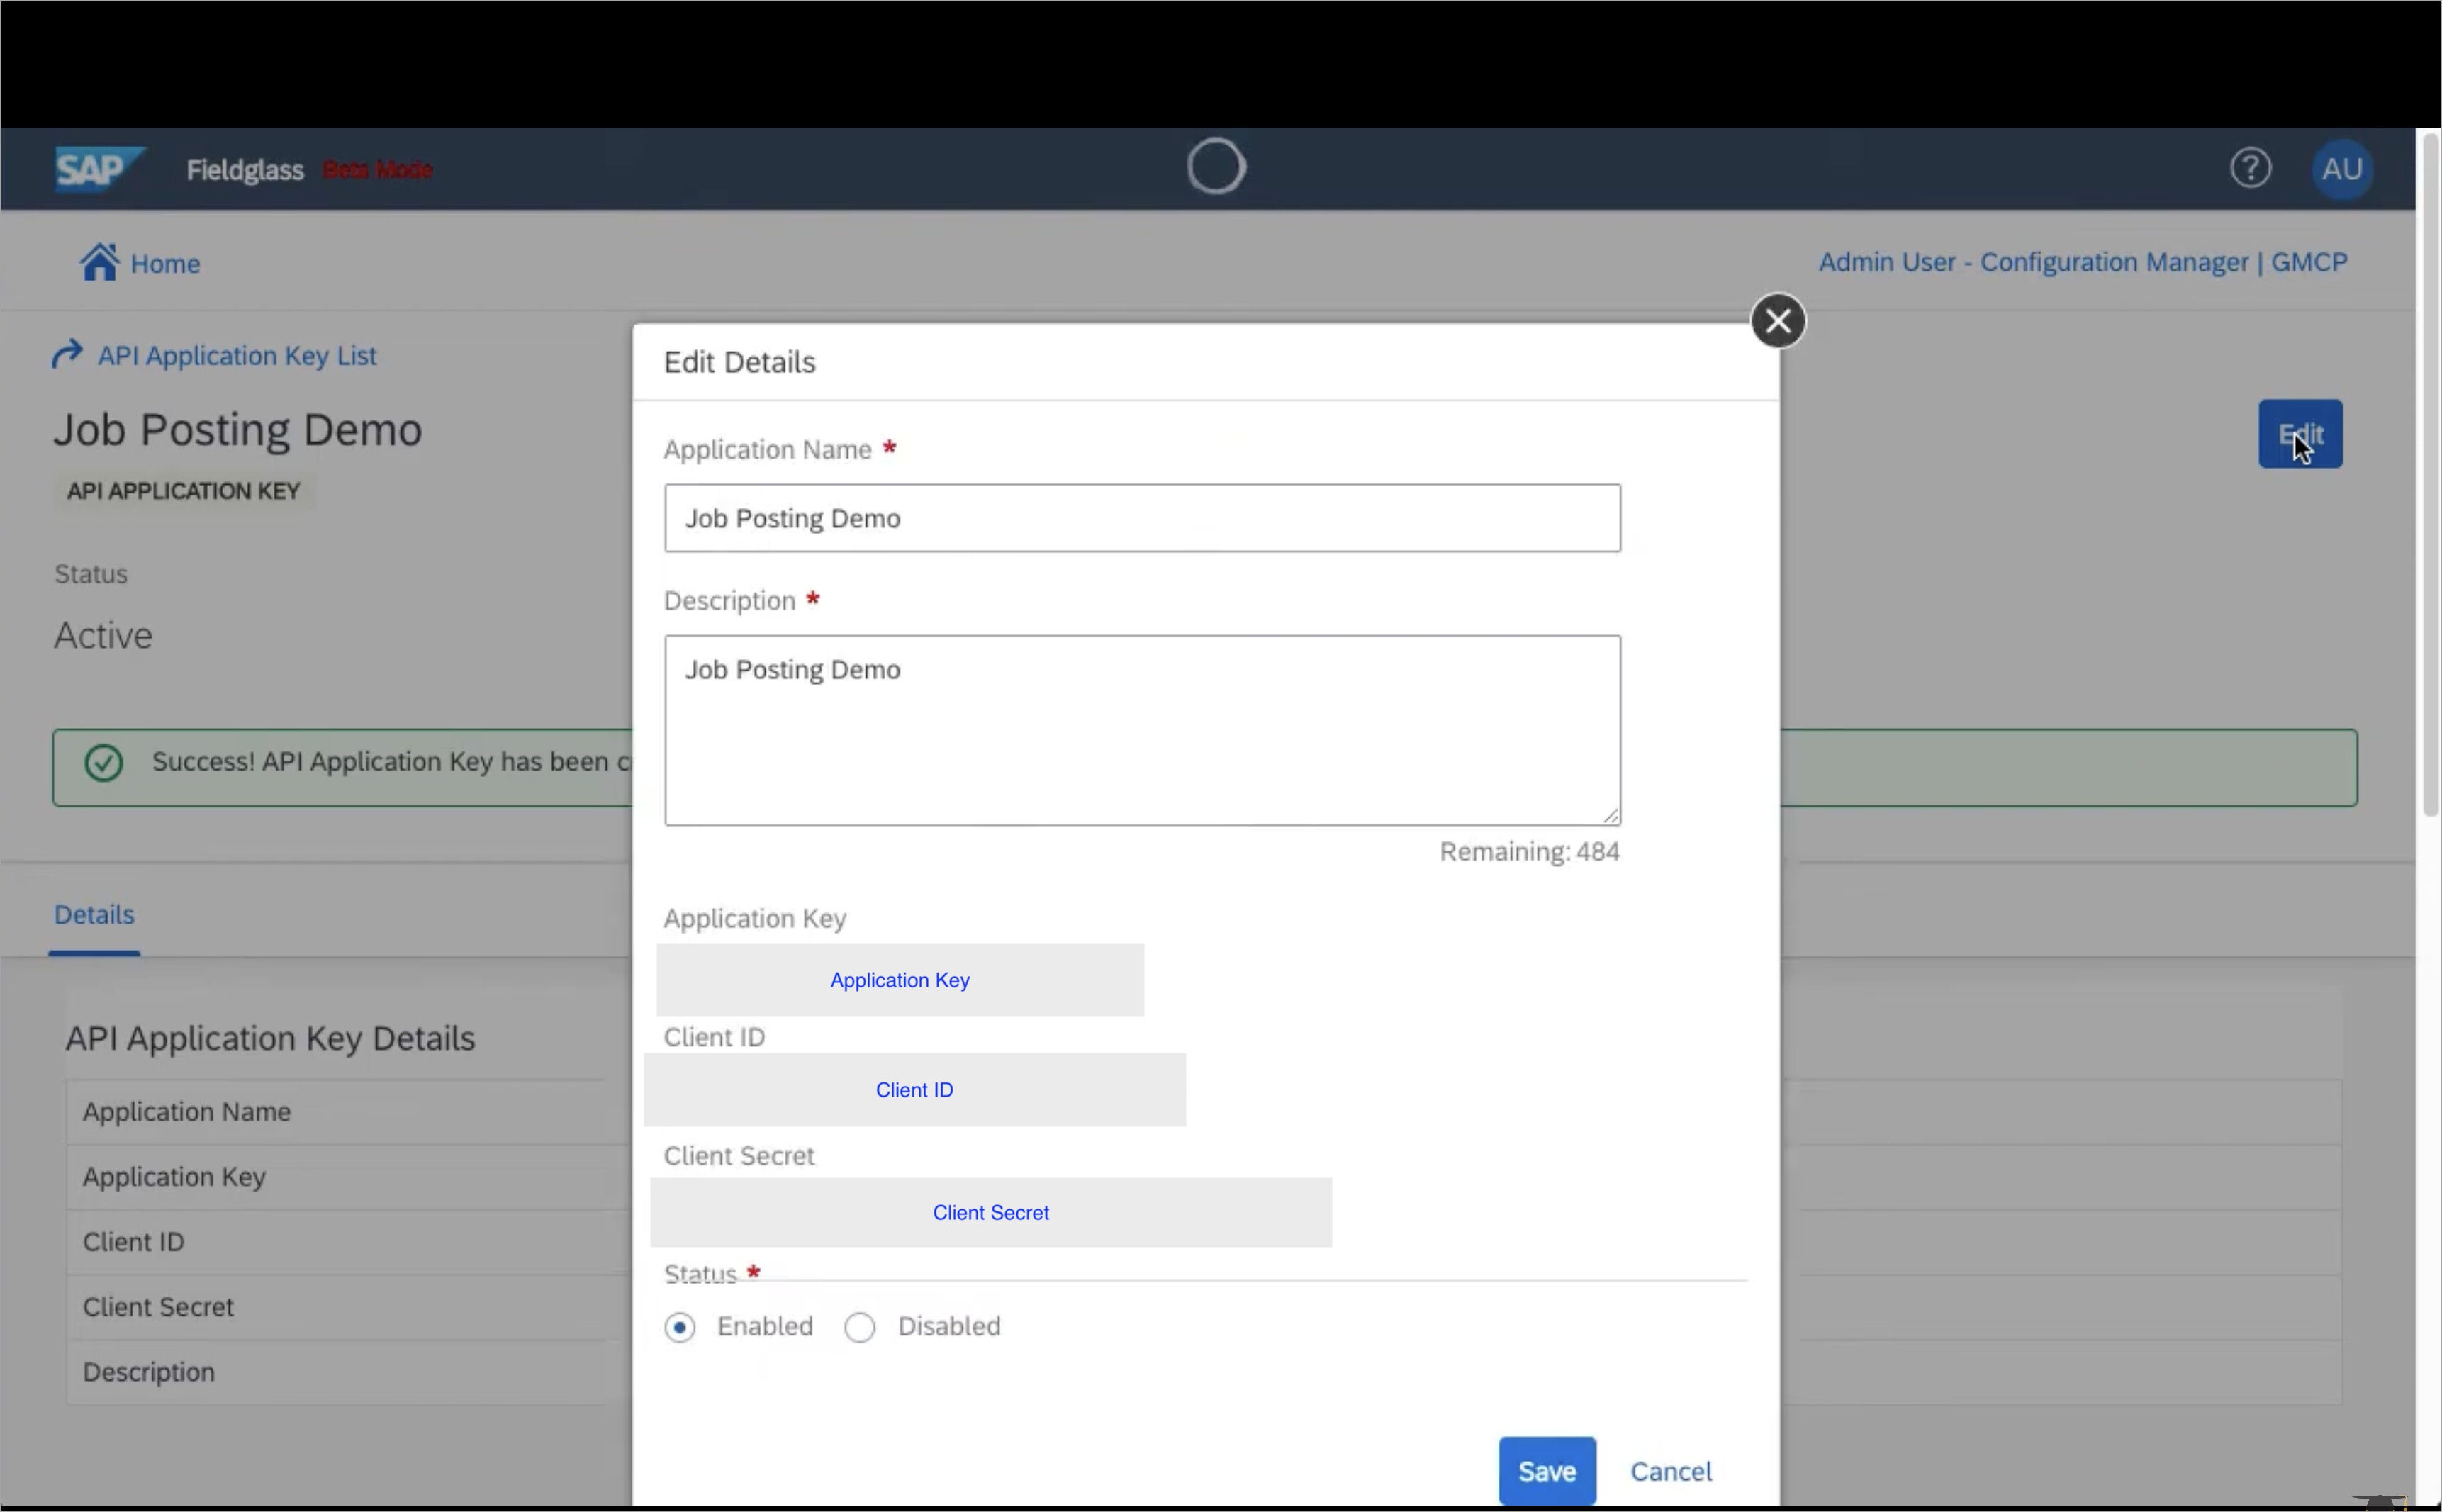
- Sign in to Fieldglass with Buyer credentials.
- Go to the linked accounts of the signed-in user as Configuration Manager.
- Select the API Application Key tile.
- Select New.
- Enter your Application Name and Description.
- Select Create. You will now see the details as UserName (Client ID), Password (Client Secret), Application Key, and Application Name.
- Select New to create a new Web service for the created Application Key.
- Set the Status as Enabled.
- Select Save.
Create the Report
Important
You will need Analytics access for creating and updating the Fieldglass reports.
Note
The report creation steps are the same for all Fieldglass modules. In our case we need Buyer and Worker modules for report creation.
-
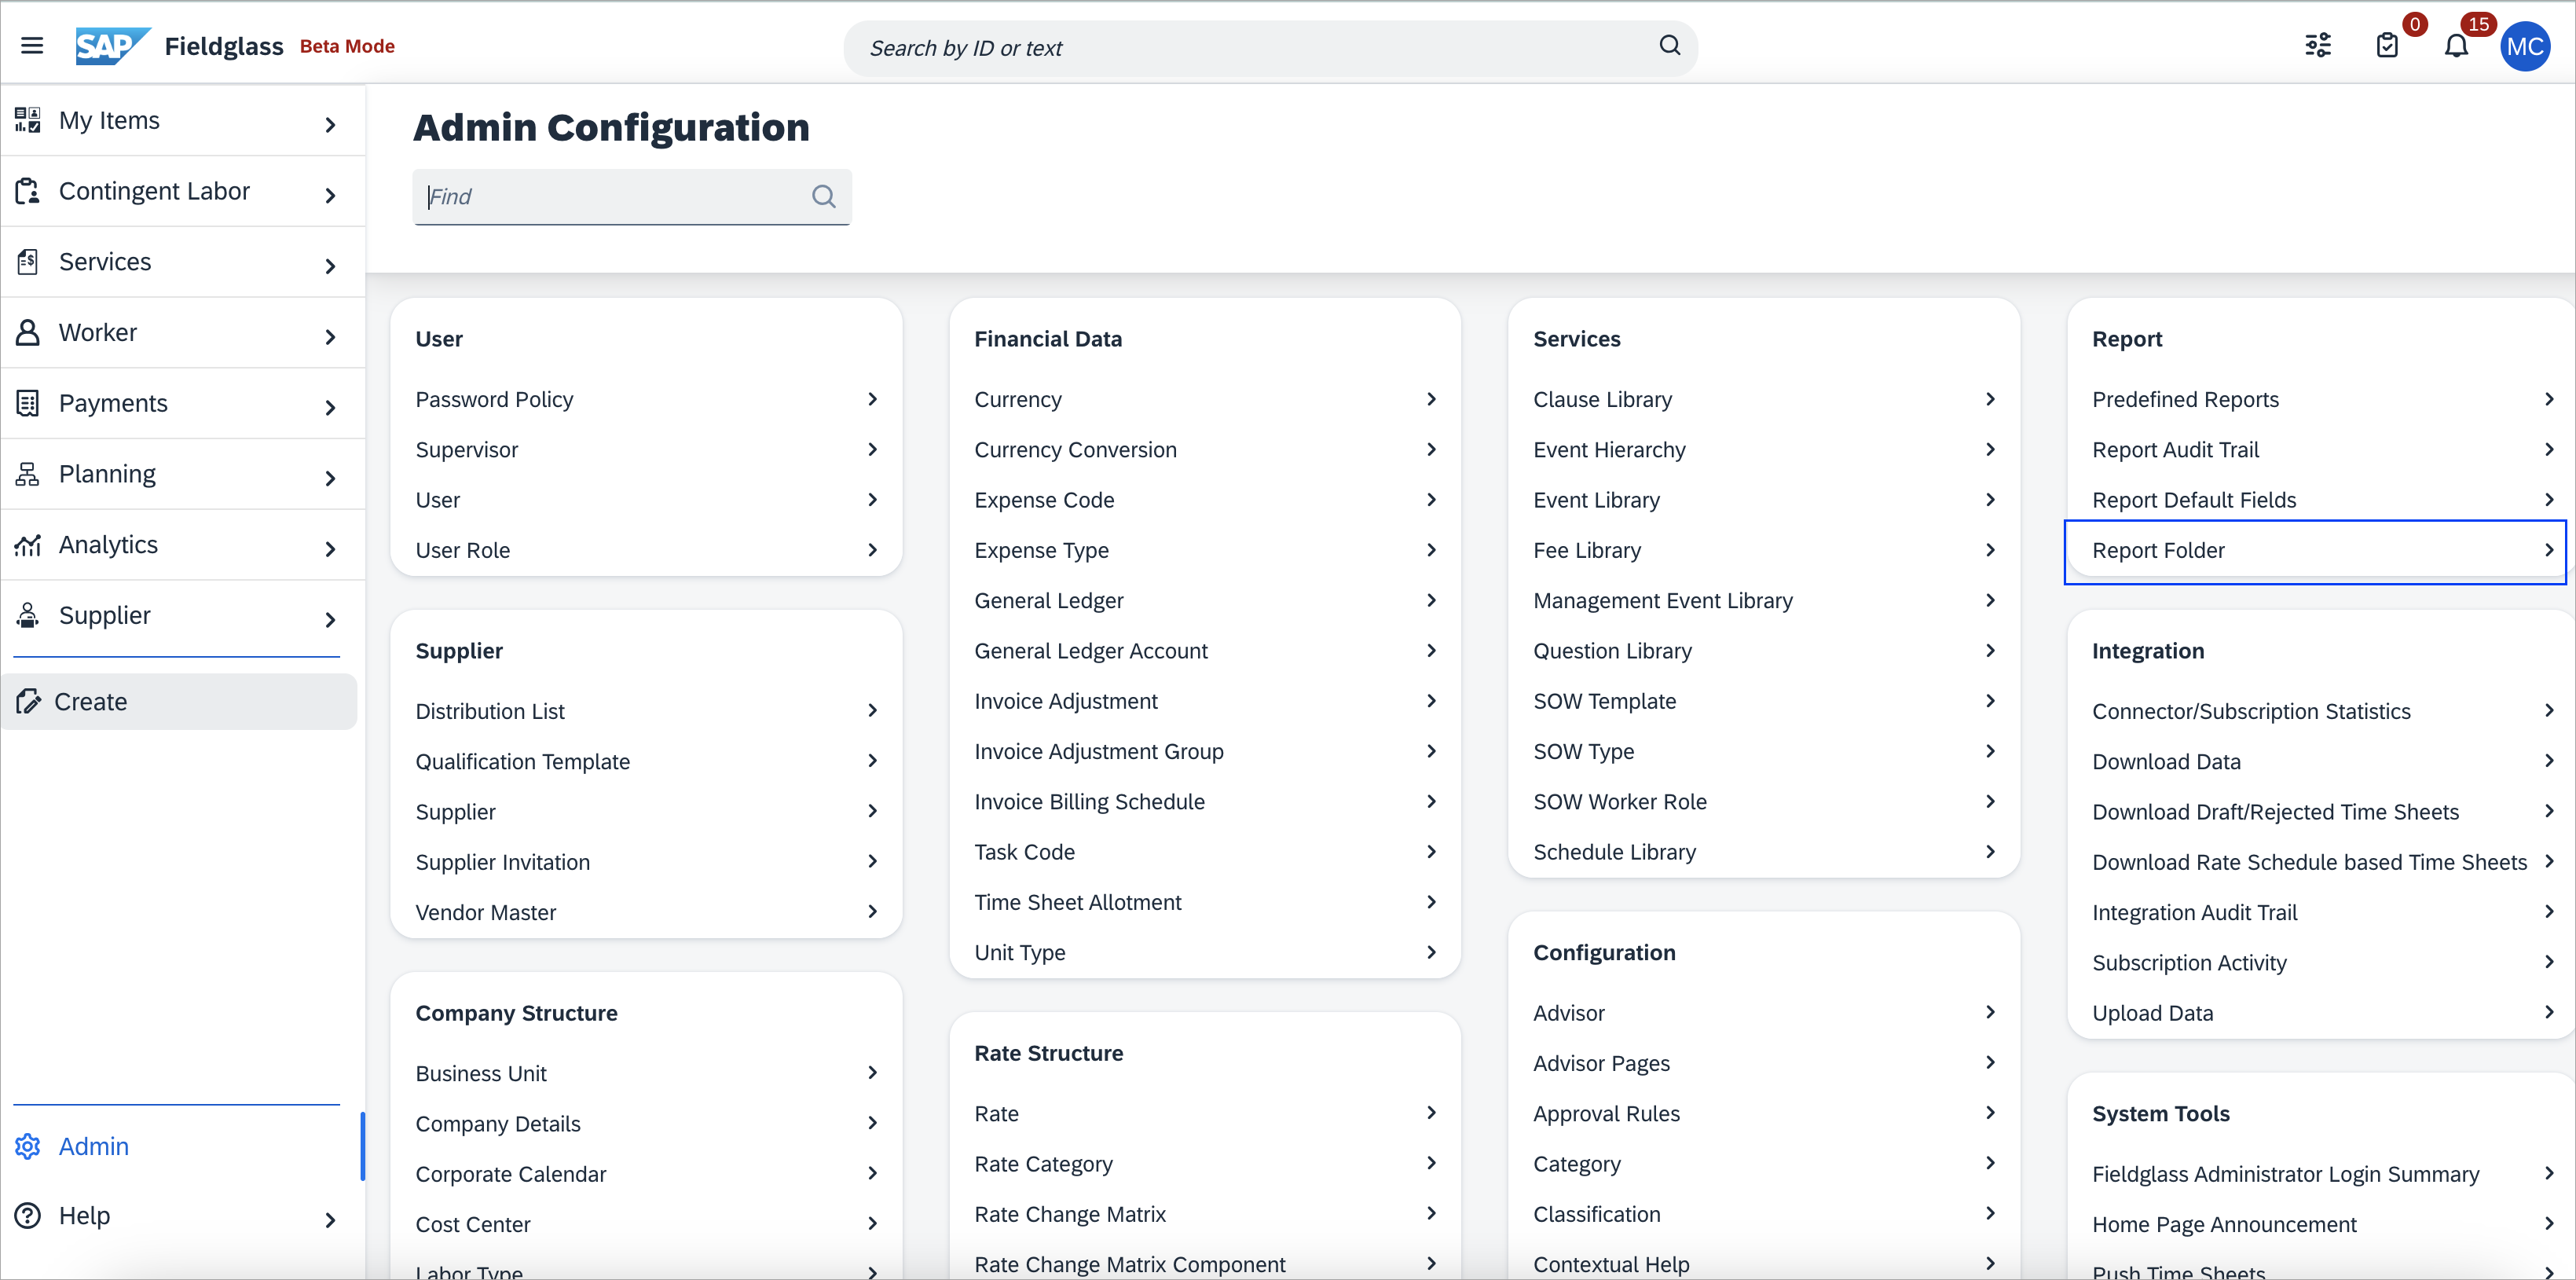
Create a report folder named SailPoint to maintain reports needed for the Fieldglass source. In SAP Fieldglass, go to Admin Configuration > Reports > Report Folder and create the SailPoint folder. Folders created under the SailPoint folder are used to associate reports to user roles.
Screenshot
-
From the home page, select the Analytics button, and then select Create Report.
-
Select the desired reporting category. For example: User, Worker, etc. A report template based on your selection will appear. You will need to create three reports:
- User Report
- Worker Report
- Single Worker Report
User Report Settings
-
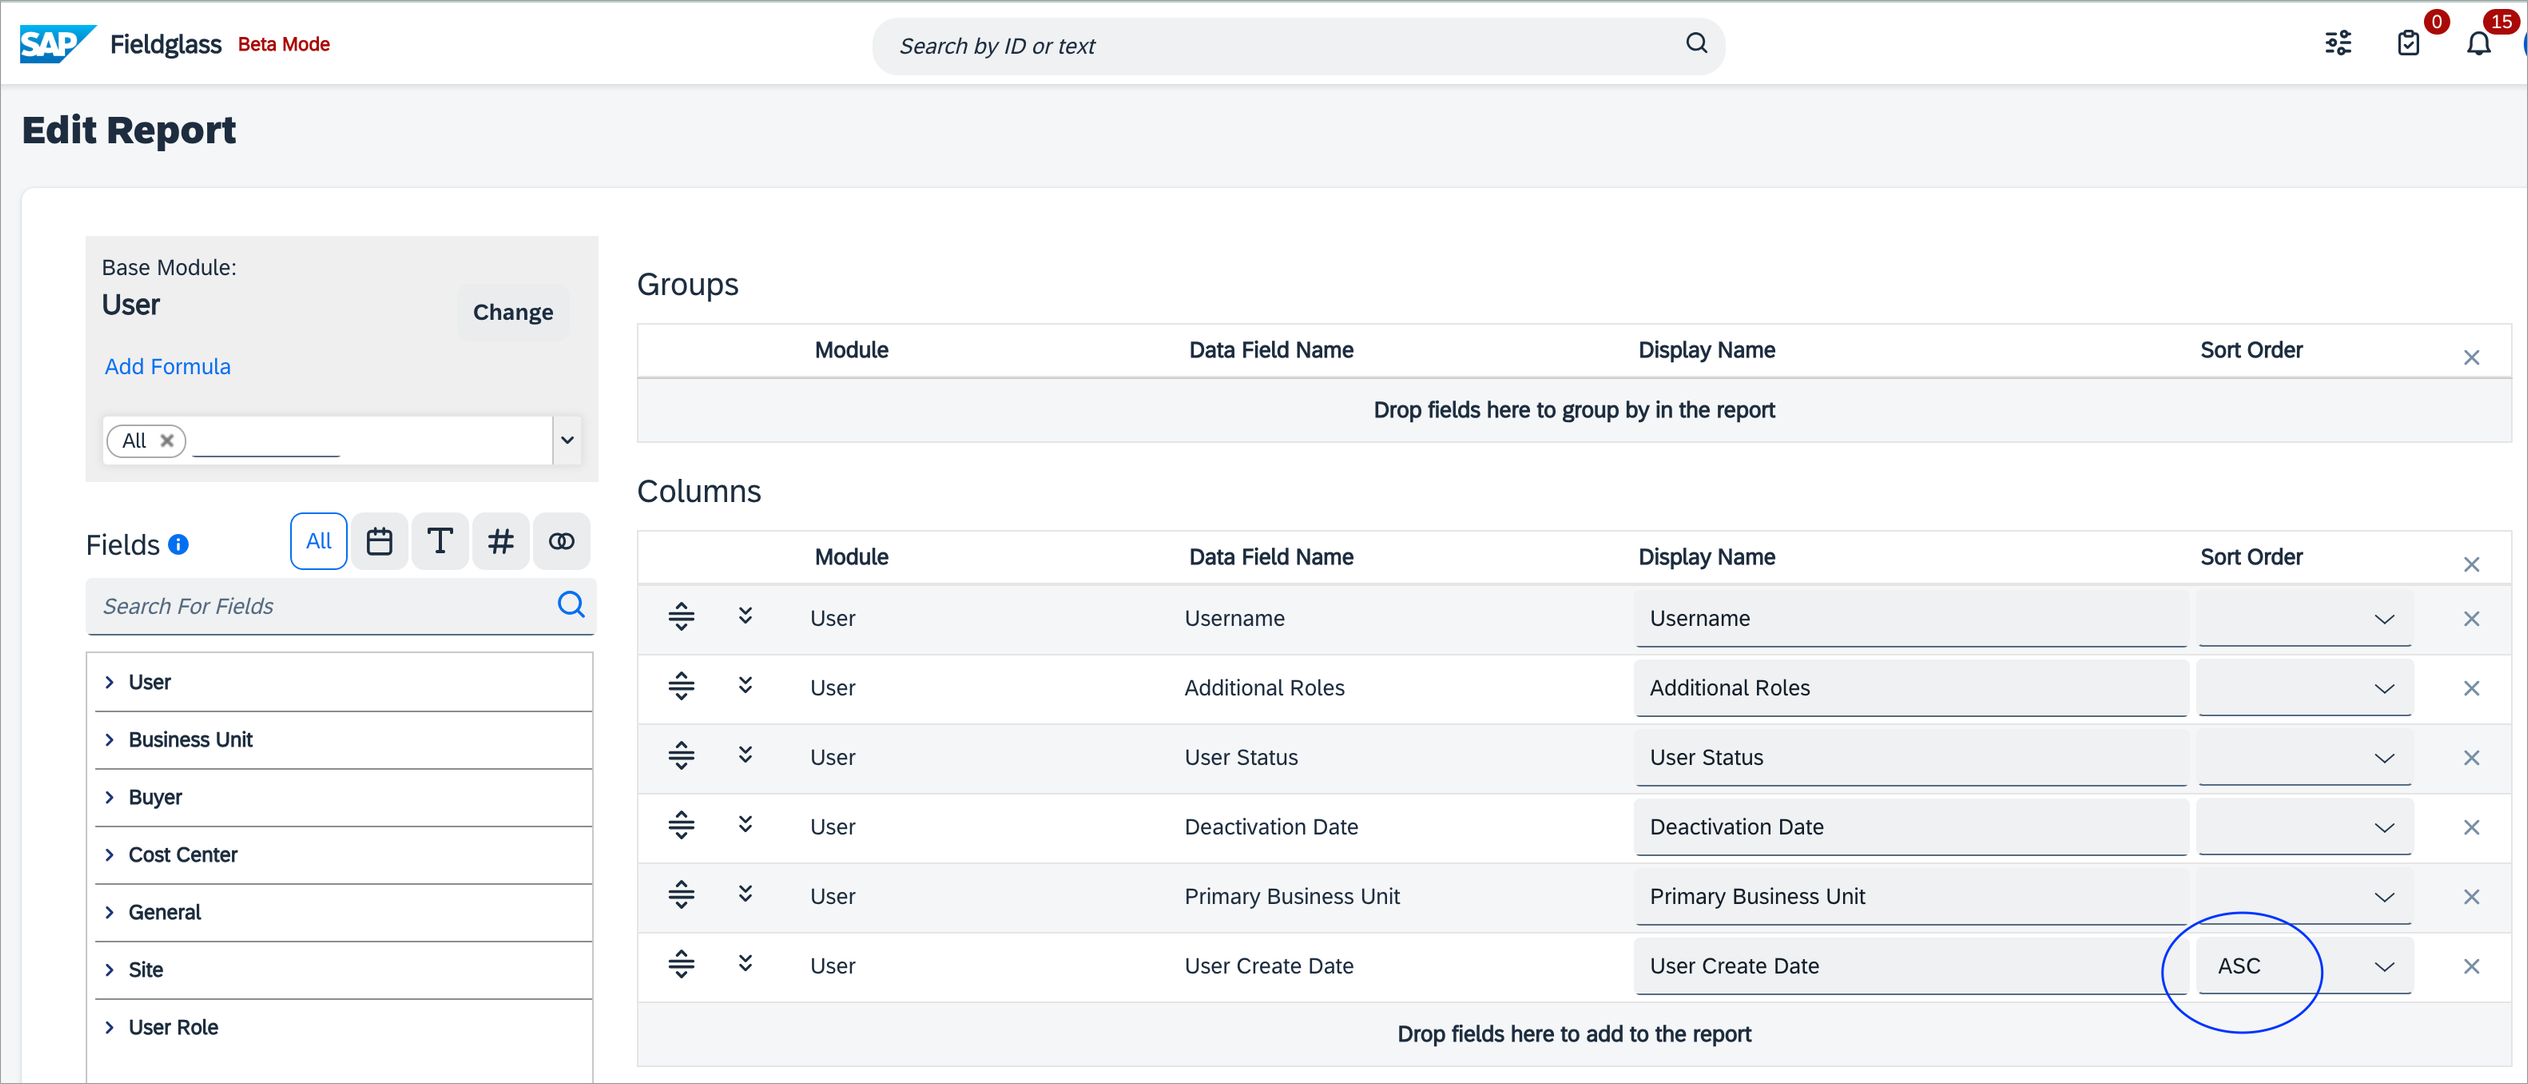
For User Report Settings, select Edit Report > ASC
Screenshot
-
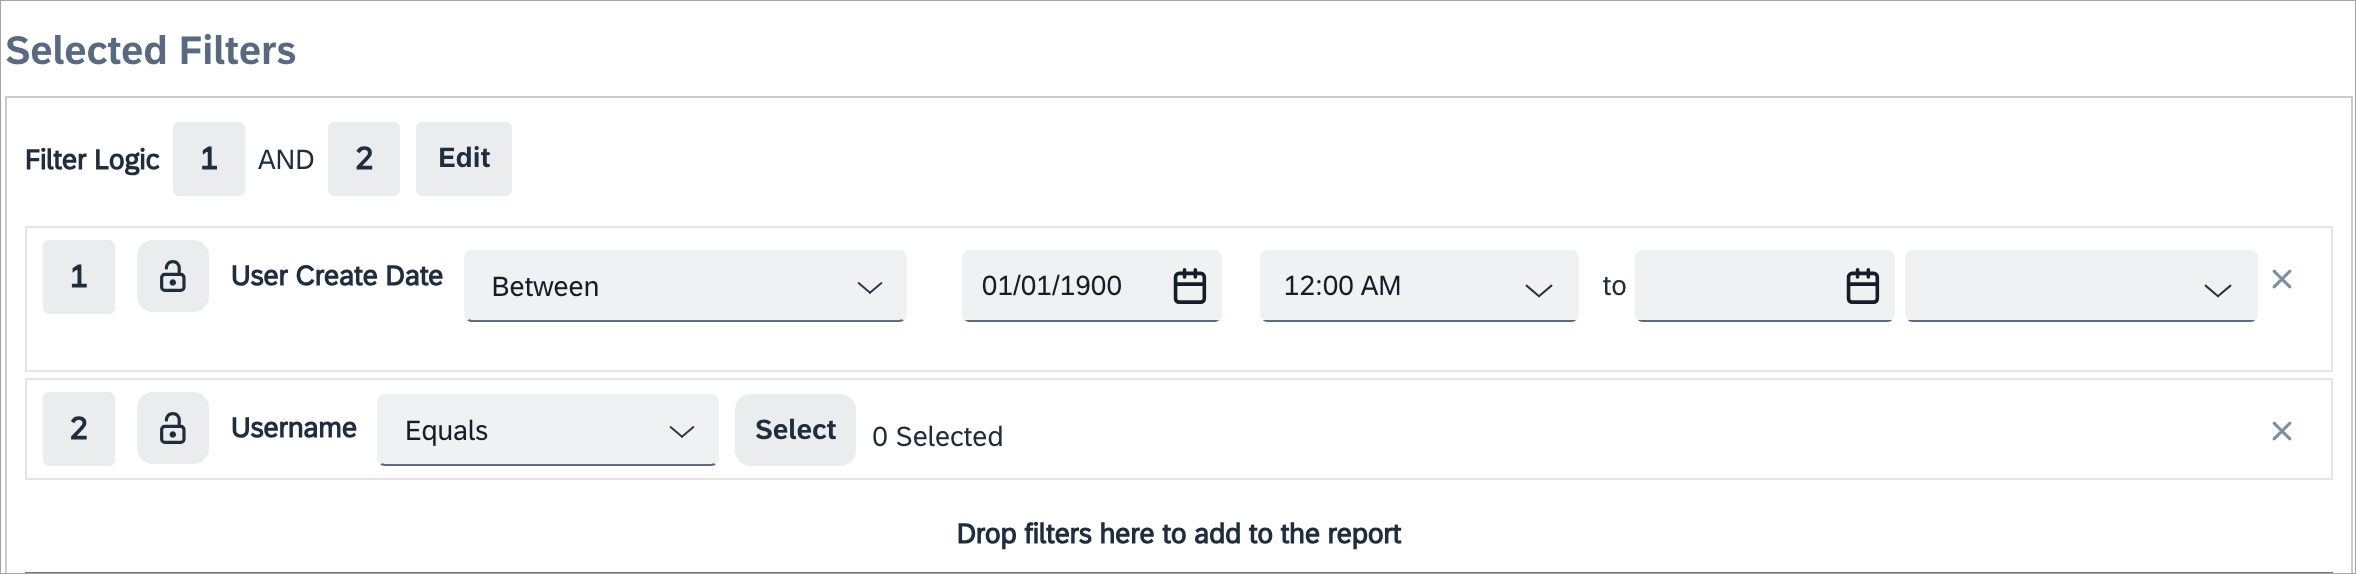
Set the report filters as shown in the following screenshot.
Screenshot
-
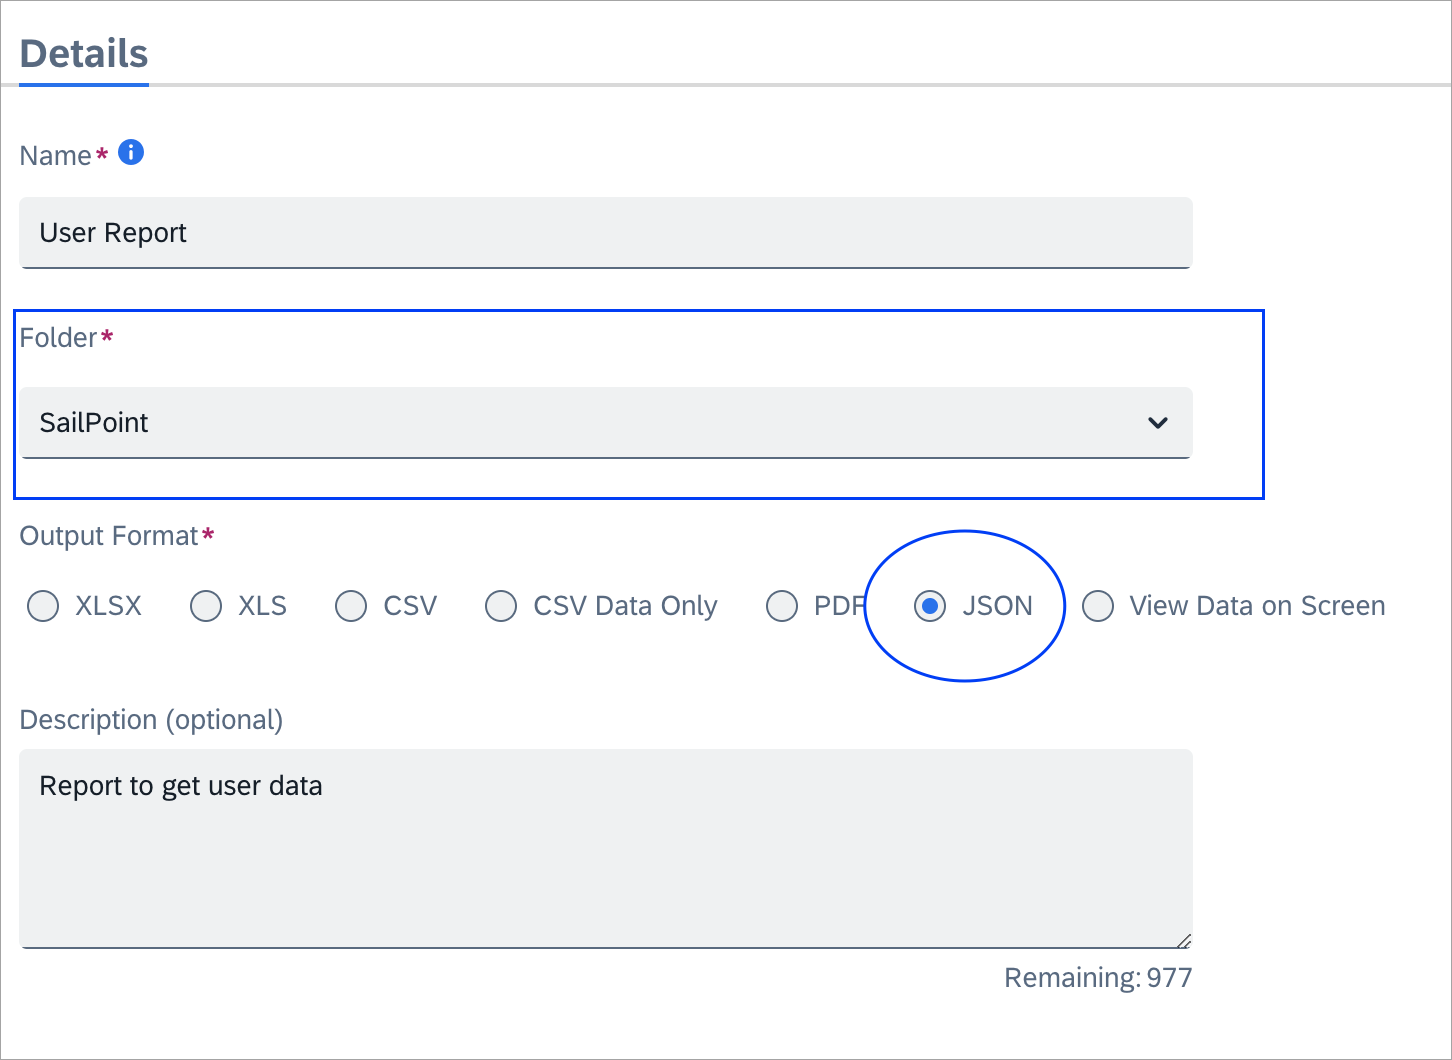
Select Details, and then select the JSON radio button.
Screenshot
-
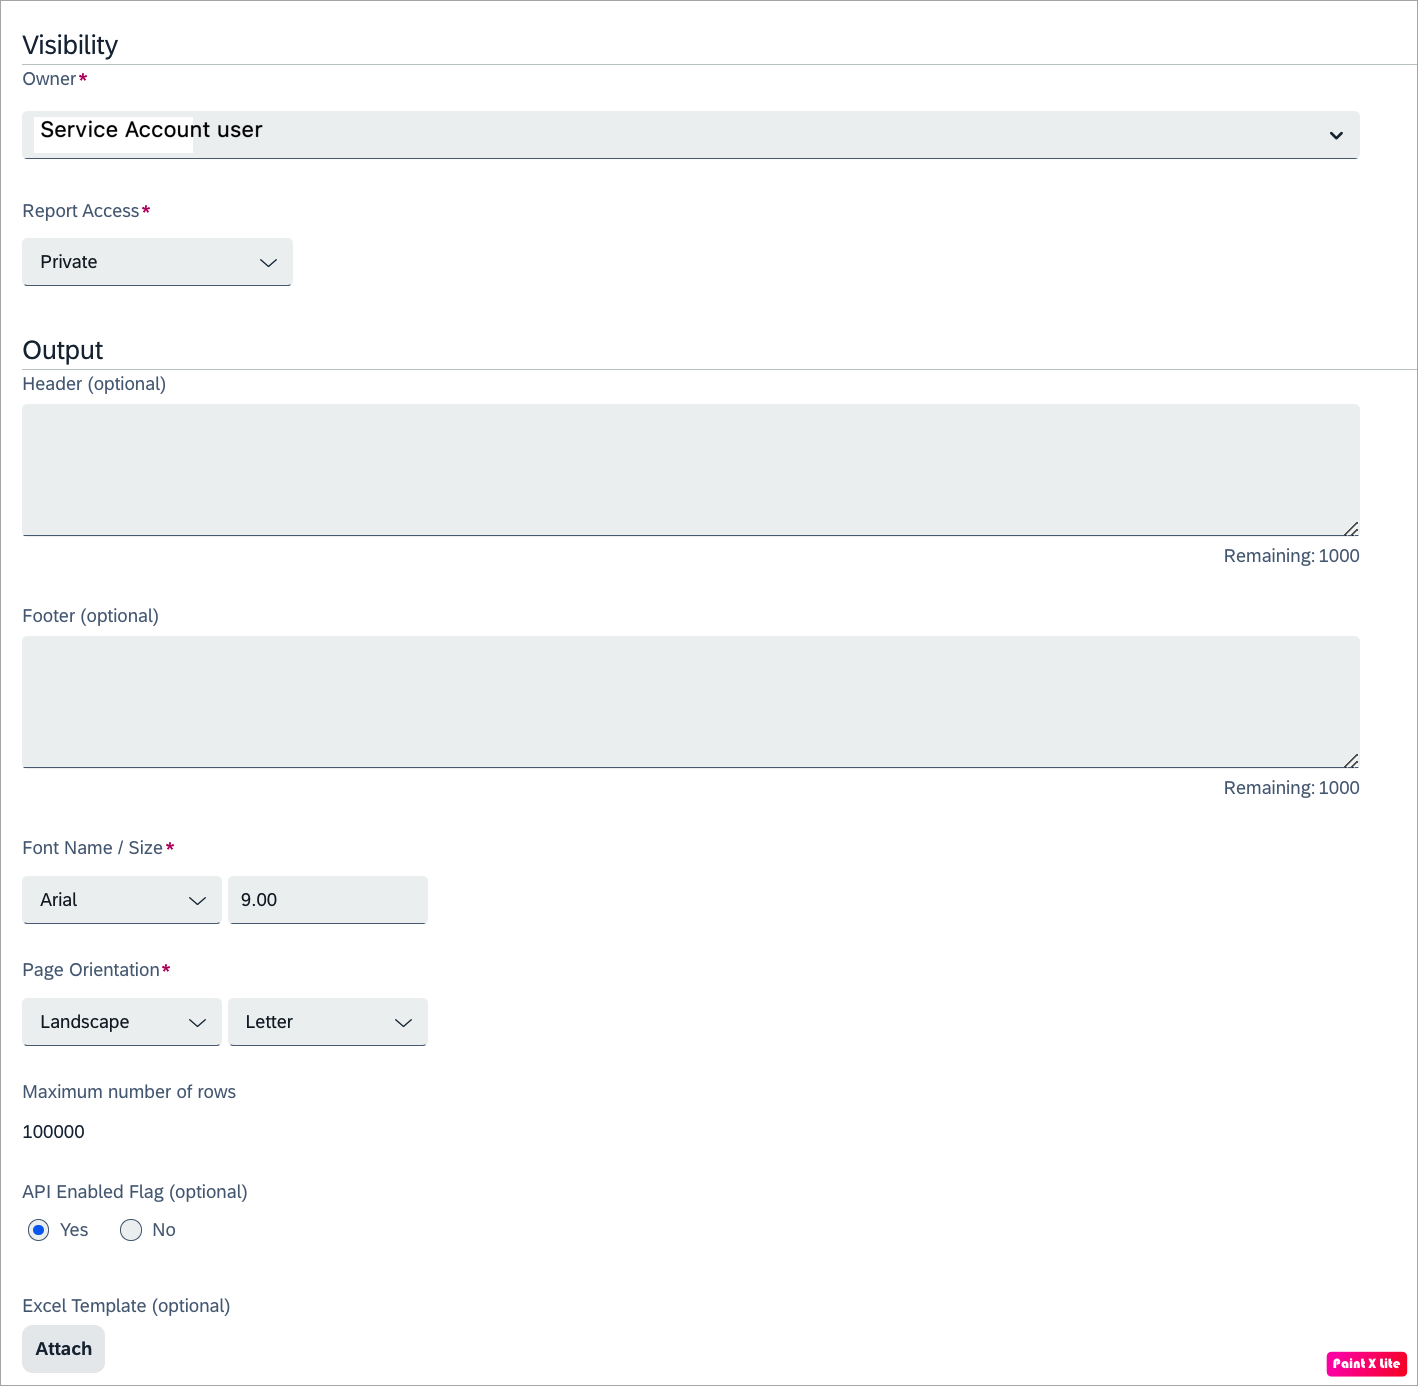
Select the Visibility settings.
Screenshot
Single Worker Report Settings
Note
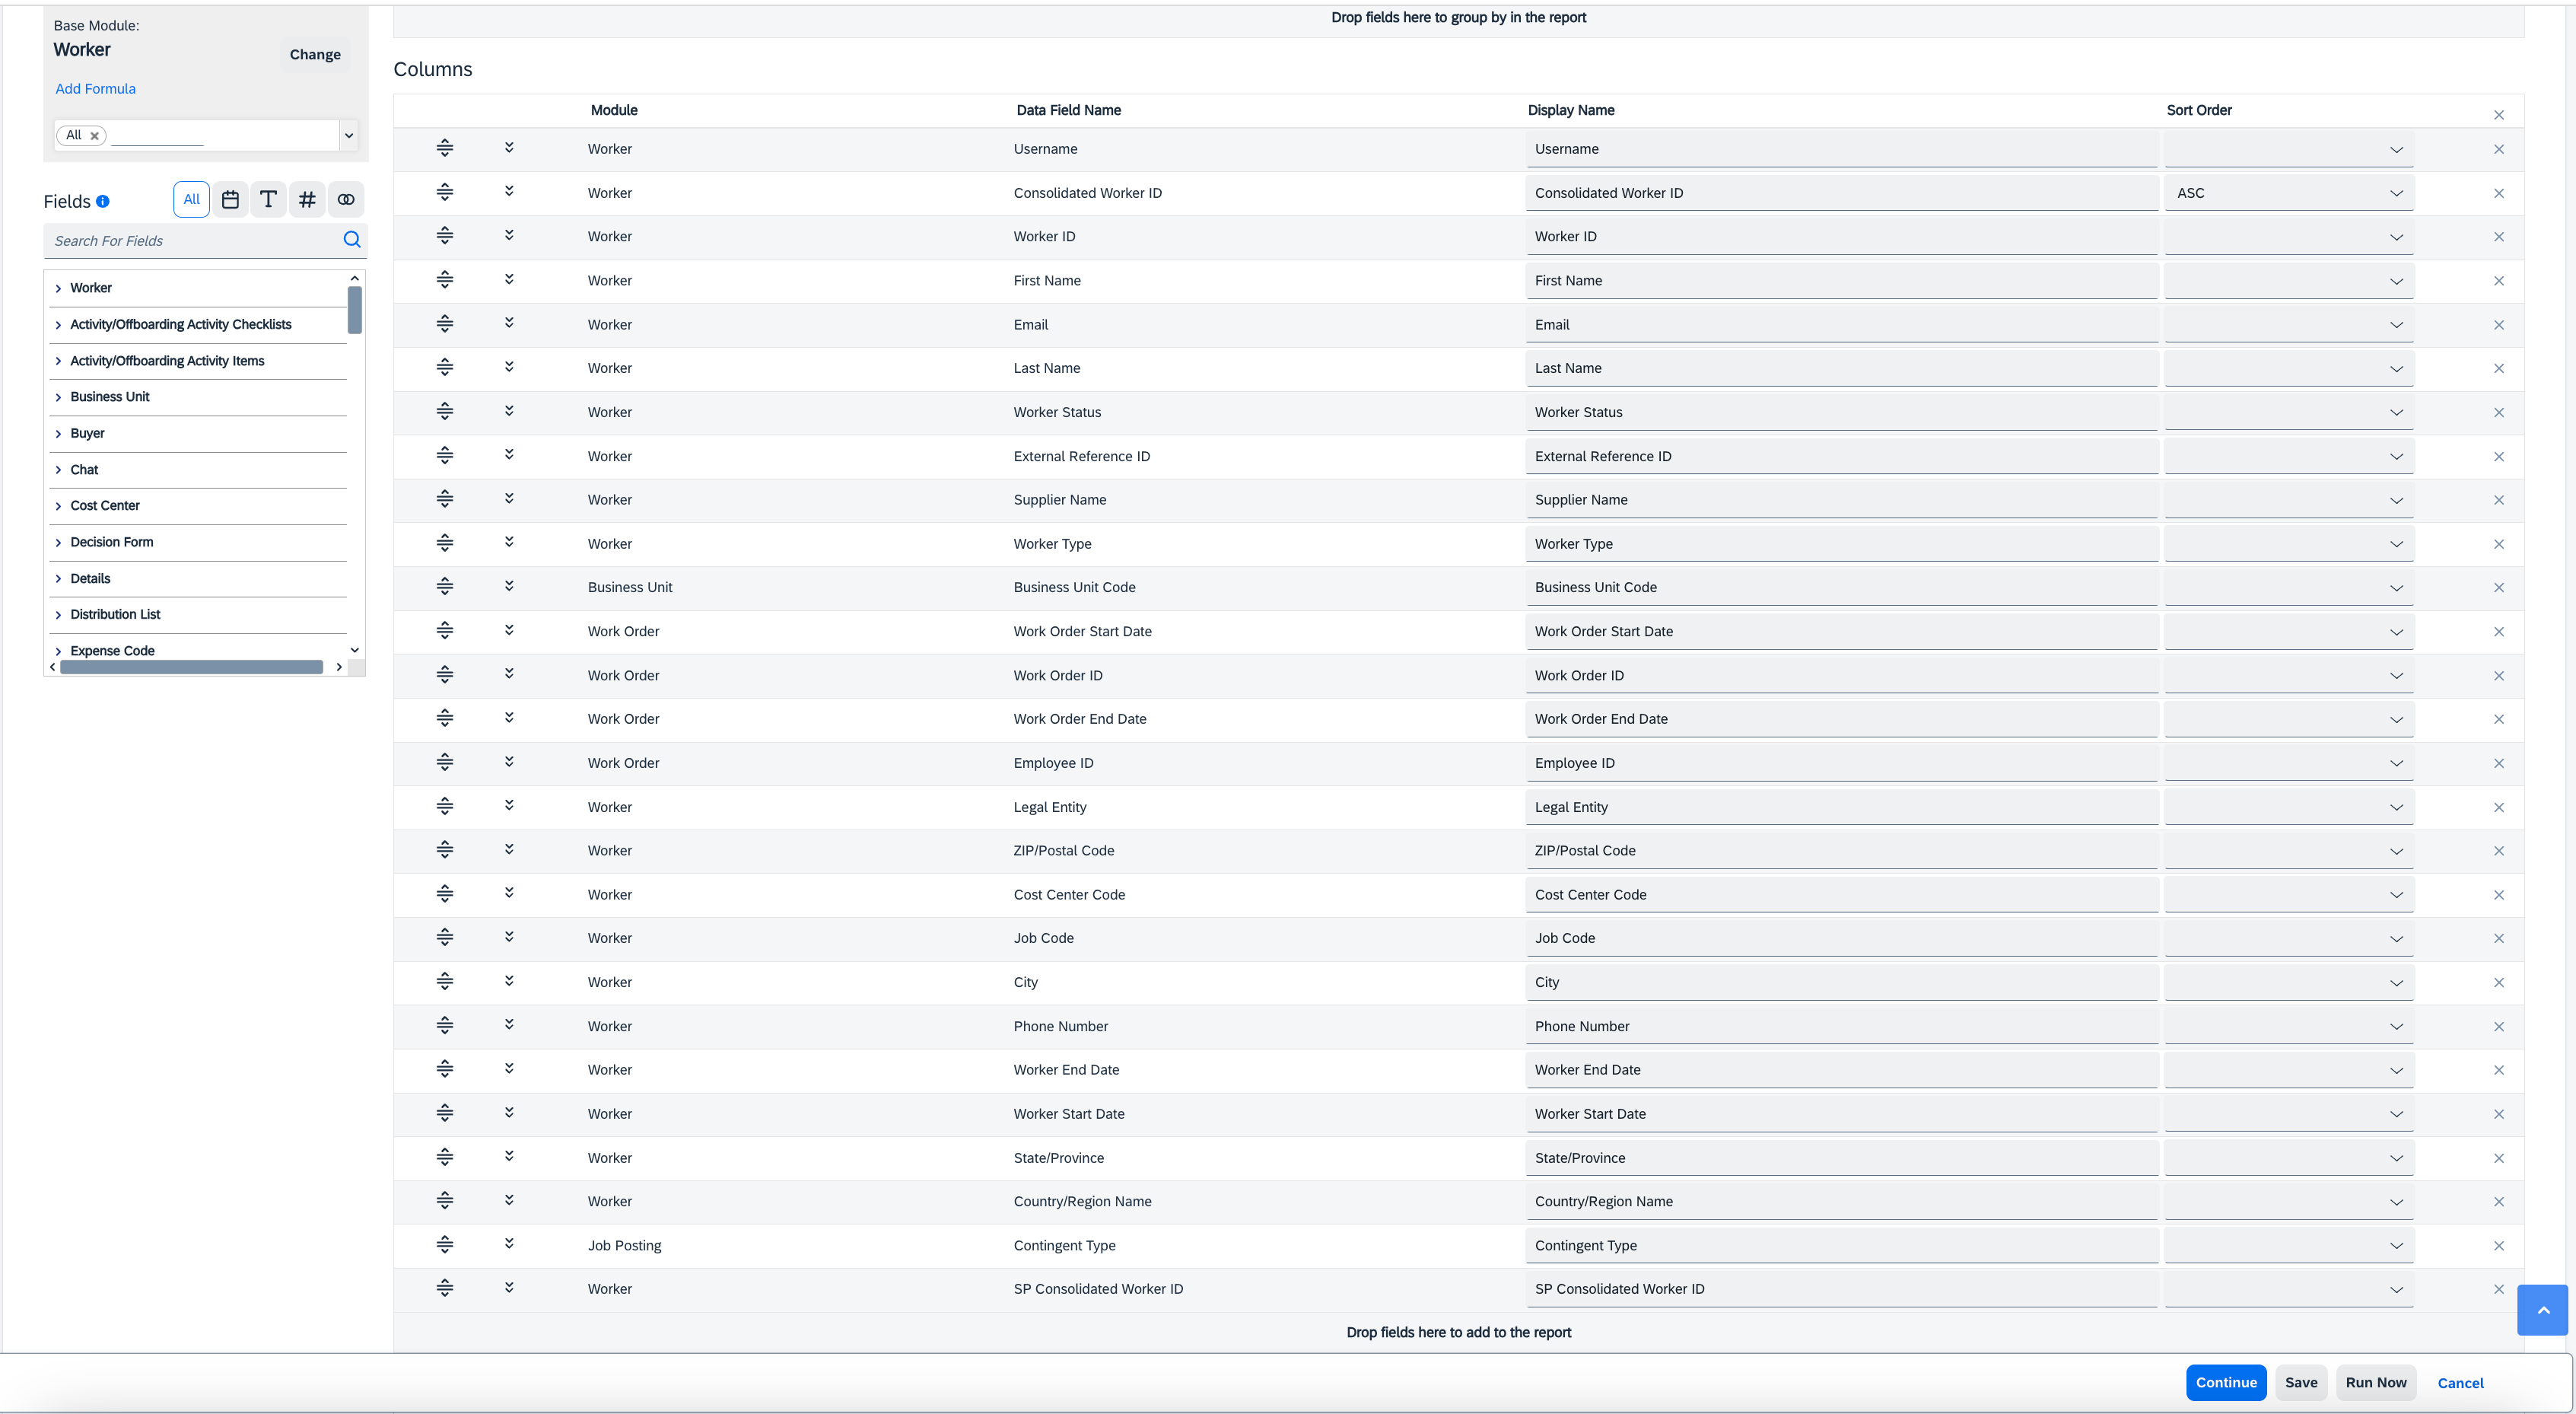
The following fields, filters, and details are required for each report creation of the Worker Report and Single Worker Report. This information is needed for worker data aggregation.
-
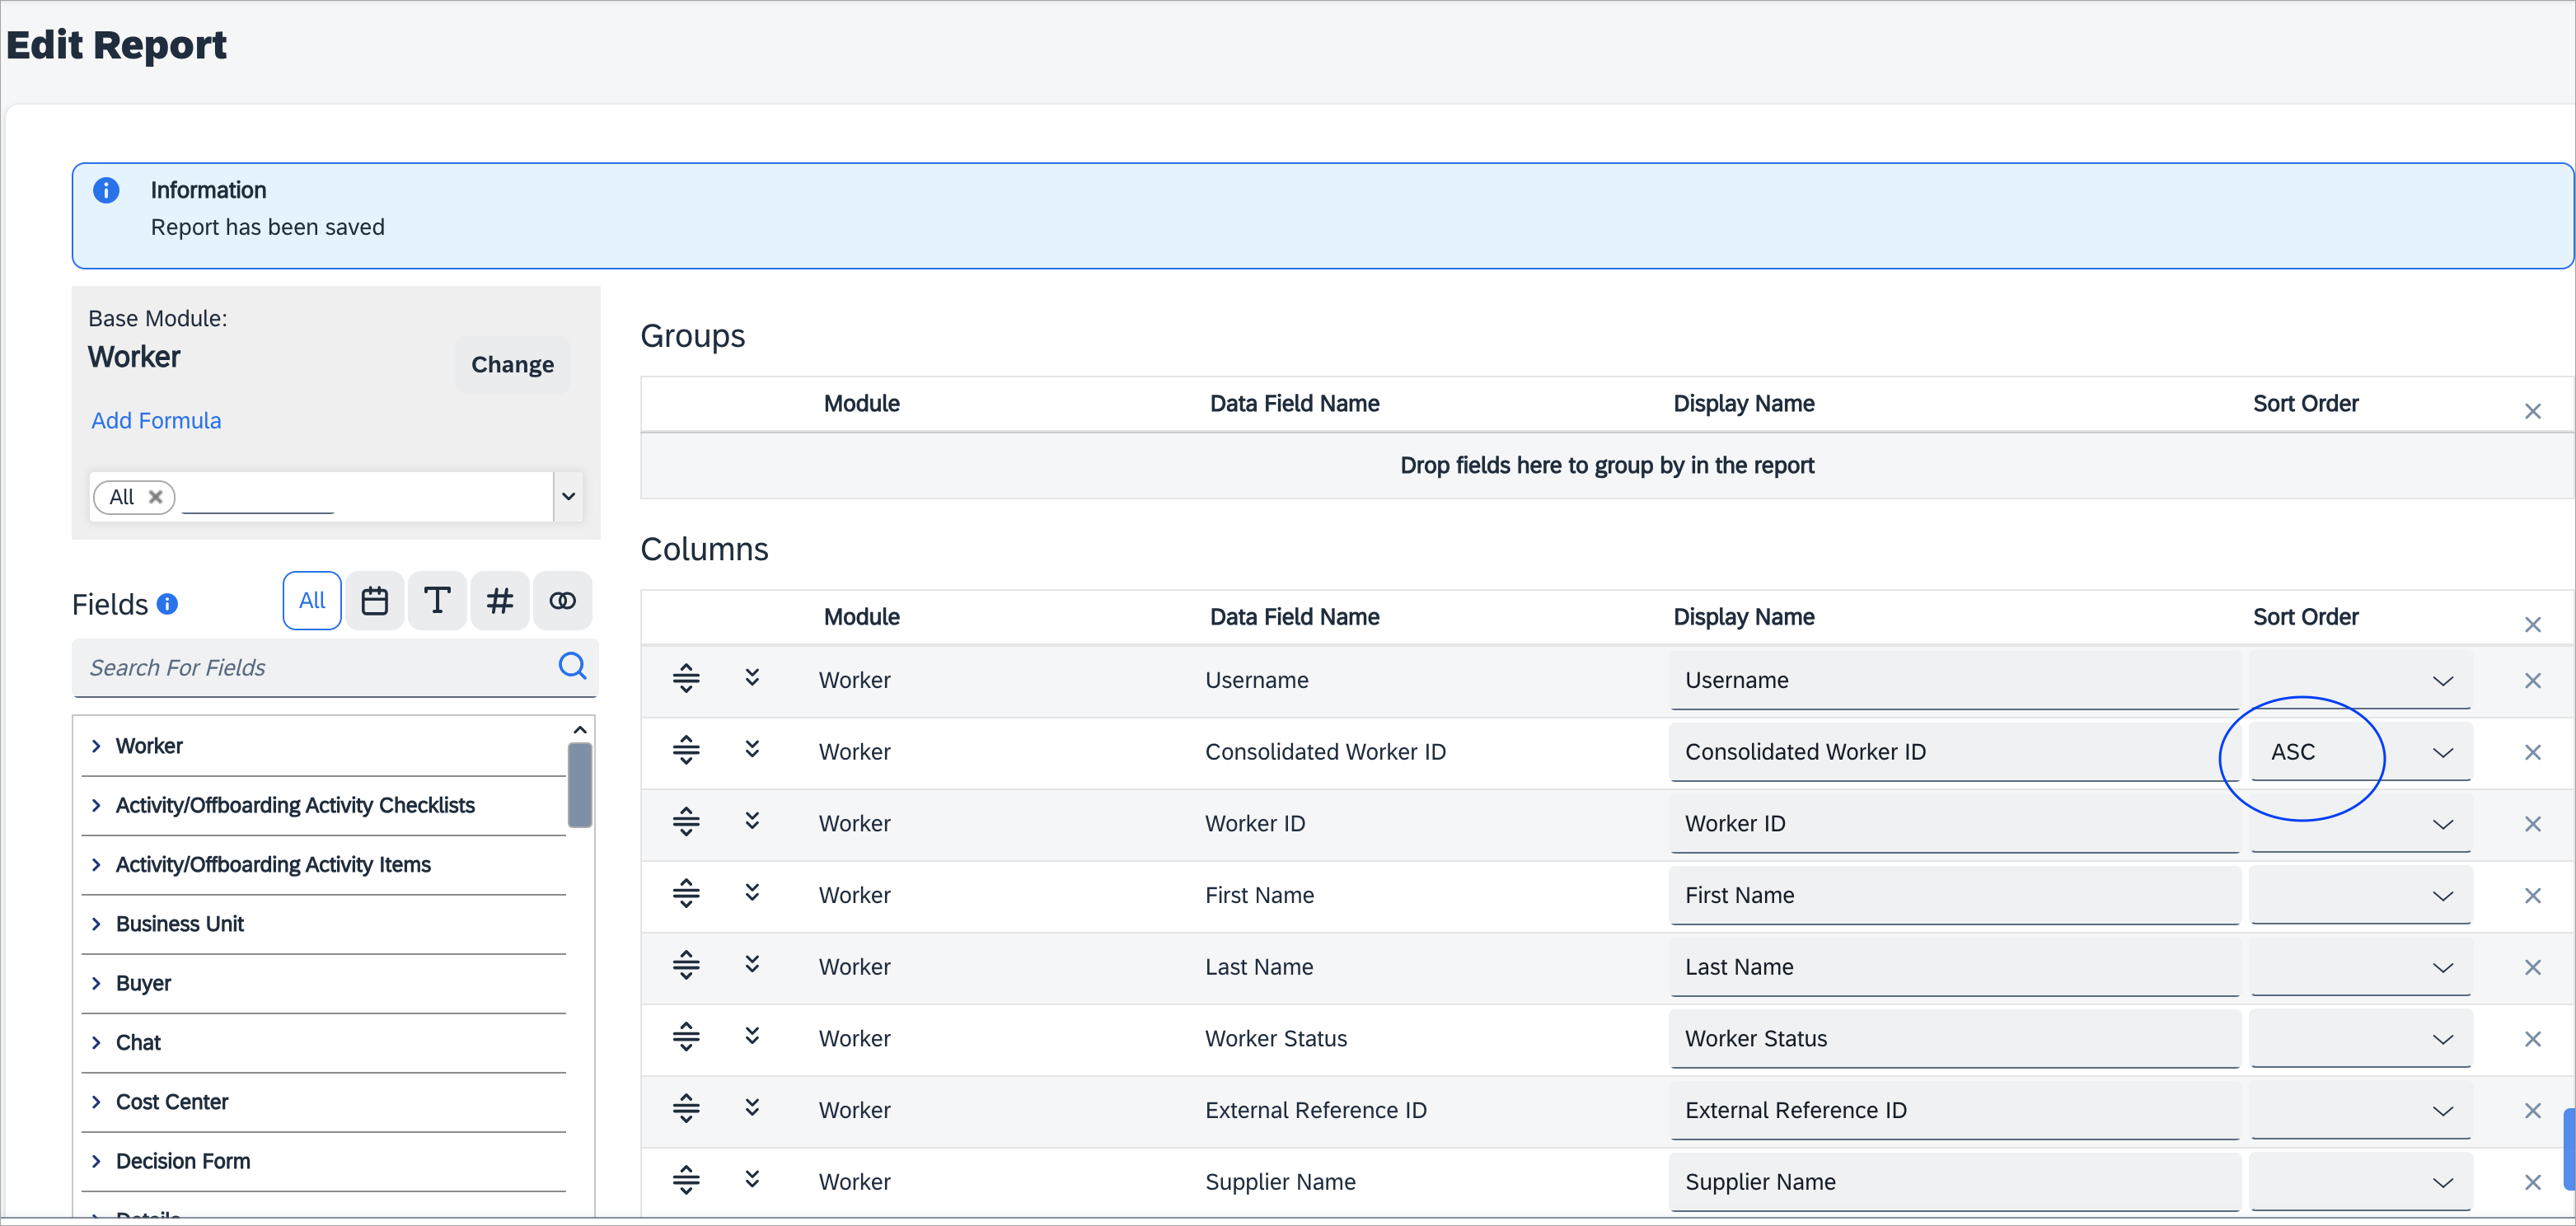
For Worker Report Settings, select Edit Report > ASC.
Screenshot
-
The SP Consolidated Worker ID is a custom field. It must be created using the Add Formula link on the report creation page with the following details.
Screenshot


Worker Report Settings
-
For Worker Report Settings, select Edit Report > ASC.
Screenshot
-
Create two more fields.
-
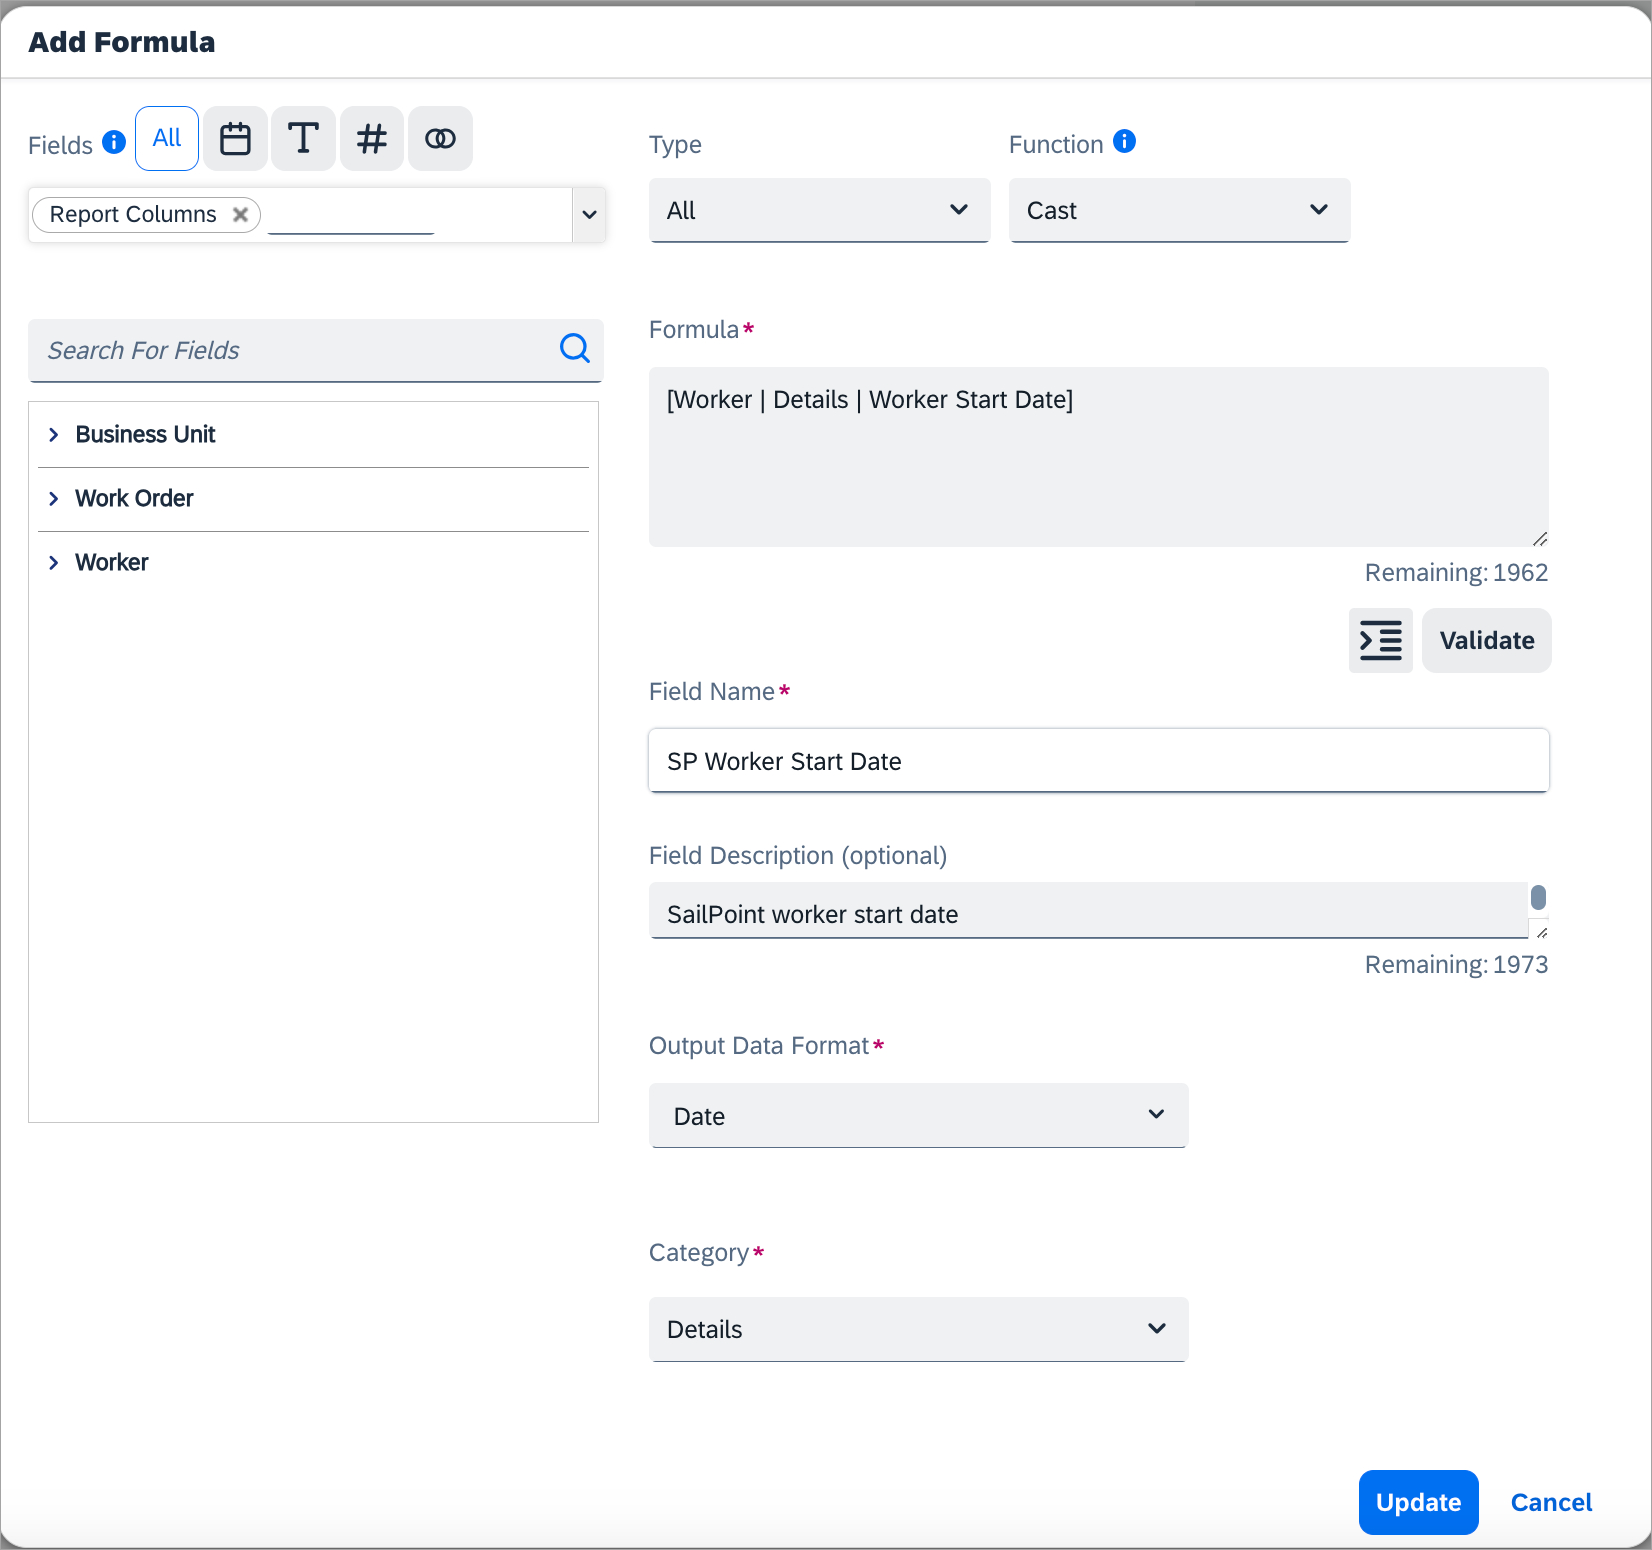
SP Worker Start date.
Formula:
Screenshot
-
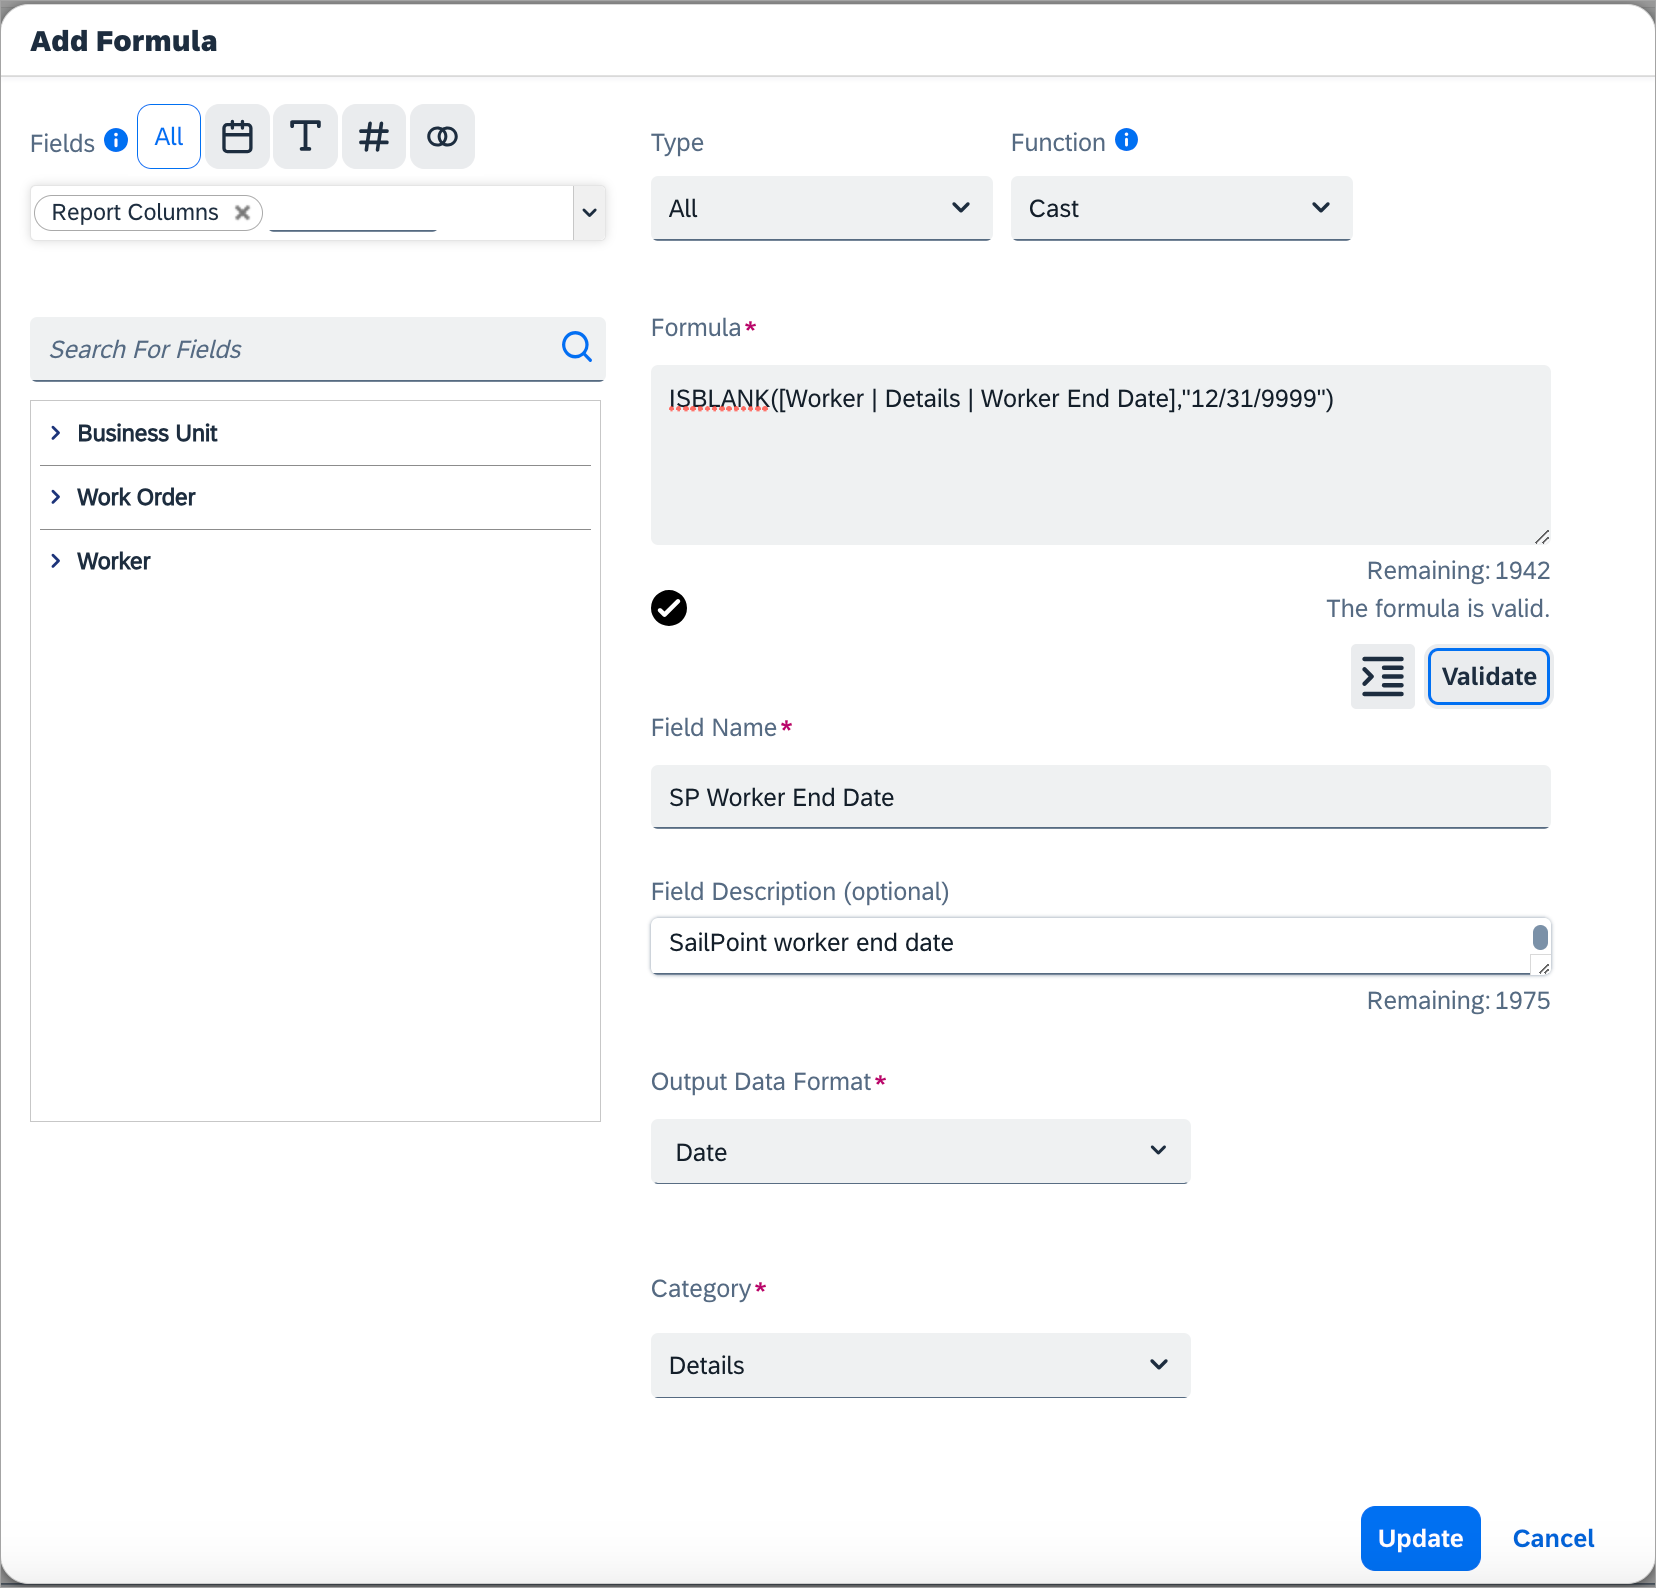
SP Worker End Date
Formula:
Screenshot
-
-
Select Validate to validate the formula.
-
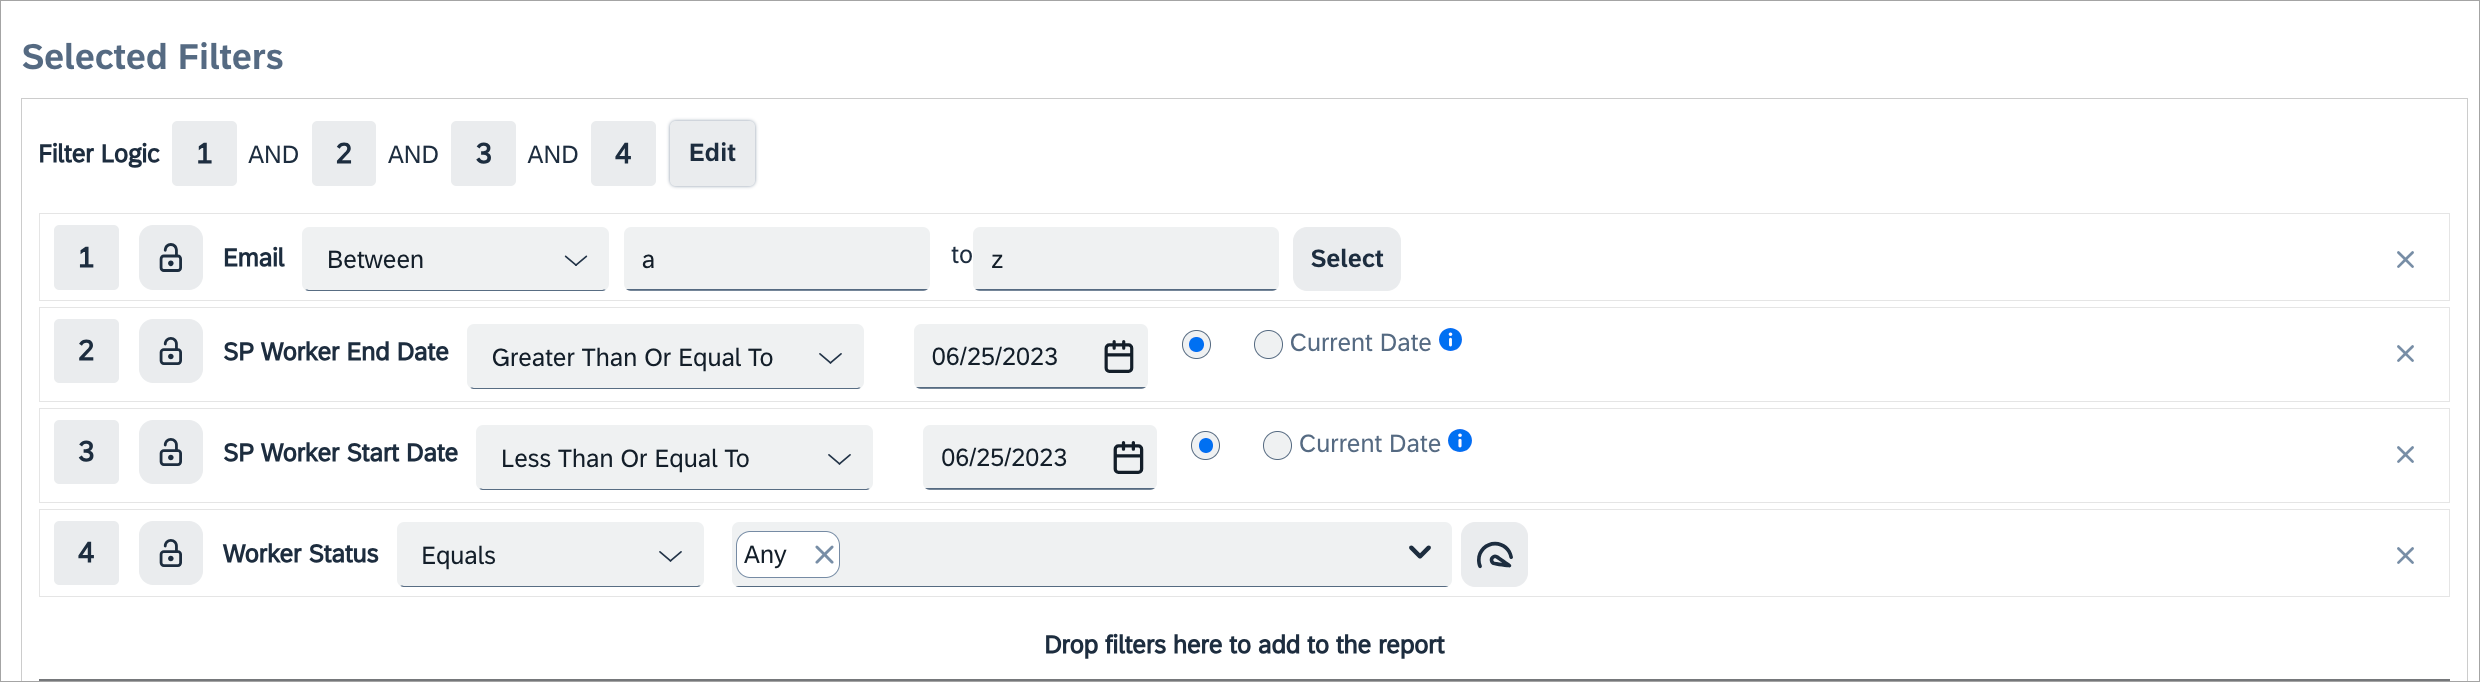
The following filters are mandatory to fetch the workers' report. However, users can change the values of the filters according to their requirements. The date format in User Preferences must be set to MM/DD/YYYY.
Screenshot
-
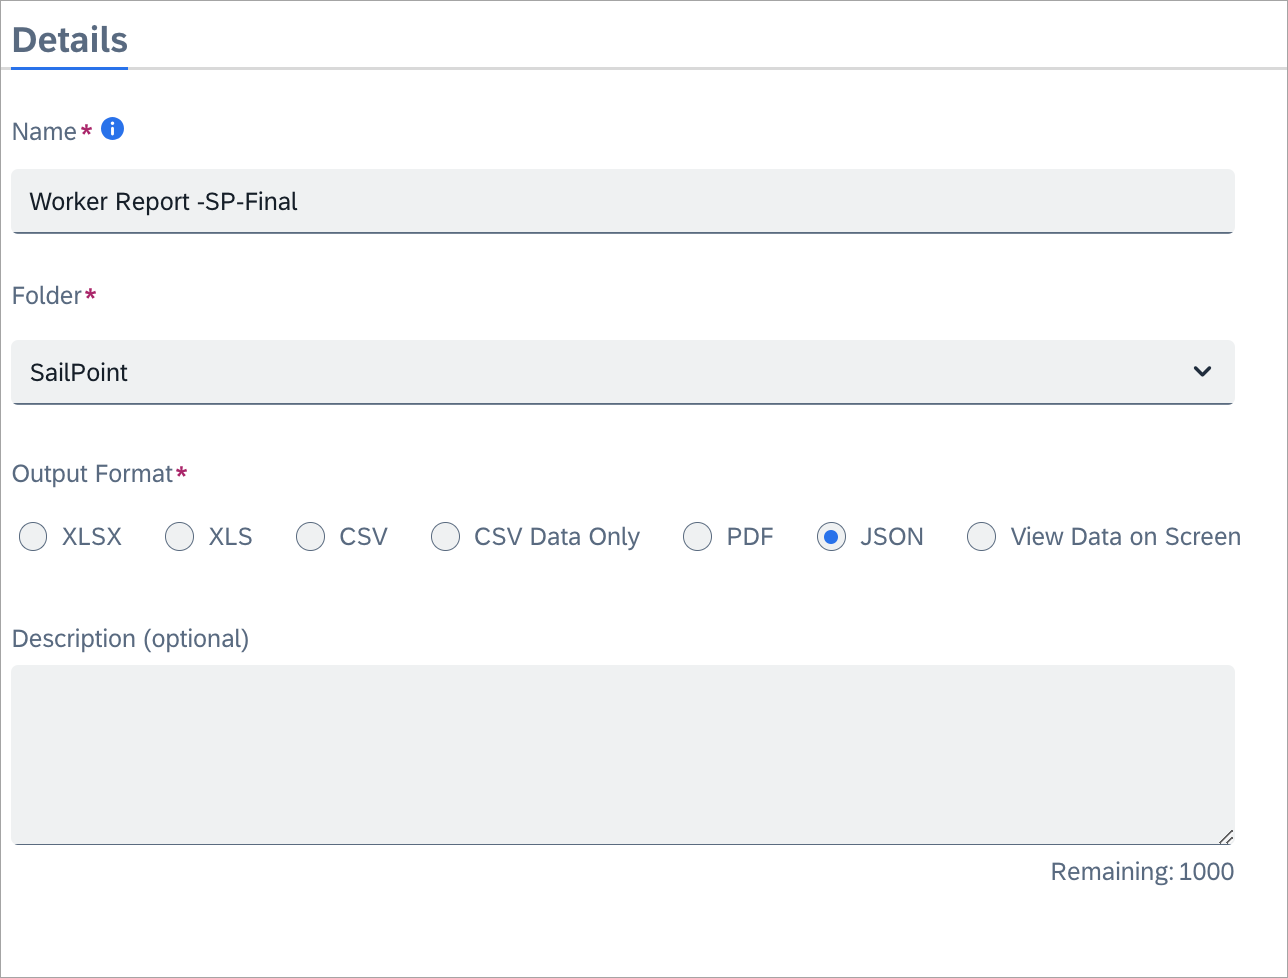
Select Details, and then select the JSON radio button.
Screenshot
-
Select the Visibility settings.
Screenshot
-
Templates can be modified based on the requestors' needs. From the Fields side bar, any field can be added to the current template via the drag and drop method. The columns can be reordered and renamed, and the values can be sorted in ascending or descending order. Filters can be applied regarding time or a specific status on the report.
Note
- Remember that the template filters differ based on the reporting category selected earlier.
- SP Worker End Date and SP Worker Start Date will be overridden with the current date when aggregation executes. Additionally, if the Future or Terminated offset is configured. then it is used along with the current date to fetch the worker records.
-
Once the report has been configured, give it a name and choose the desired output format.
- Select the Show More Configuration link, and set the API Enabled option to Yes.
- Save the report.
How to obtain the ID of the Report
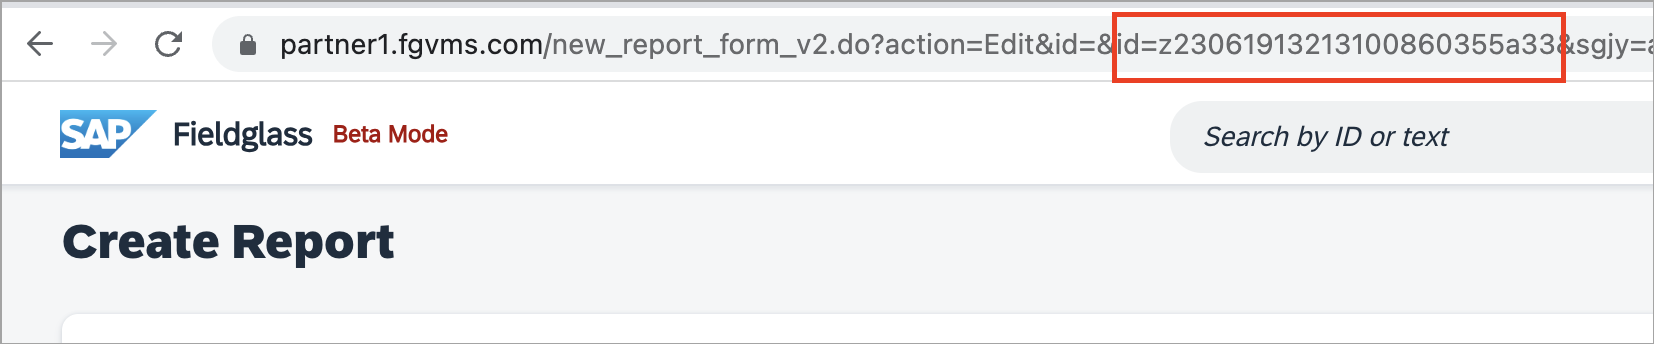
You will need the ID of the created report to provide in Aggregation Settings for the user and worker configurations.
- Select your report name from the list.
- Select the Edit option
-
The link url will contain the ID of the report
Screenshot
Create the Connector Integration
- Sign in with Configuration Manager access to the SAP Fieldglass portal.
- Go to Connectors integration tools.
- Search and open the User Upload connector from the connector list.
- Select Actions and then select the Create Variant option to set the connector integration variant for provisioning.
-
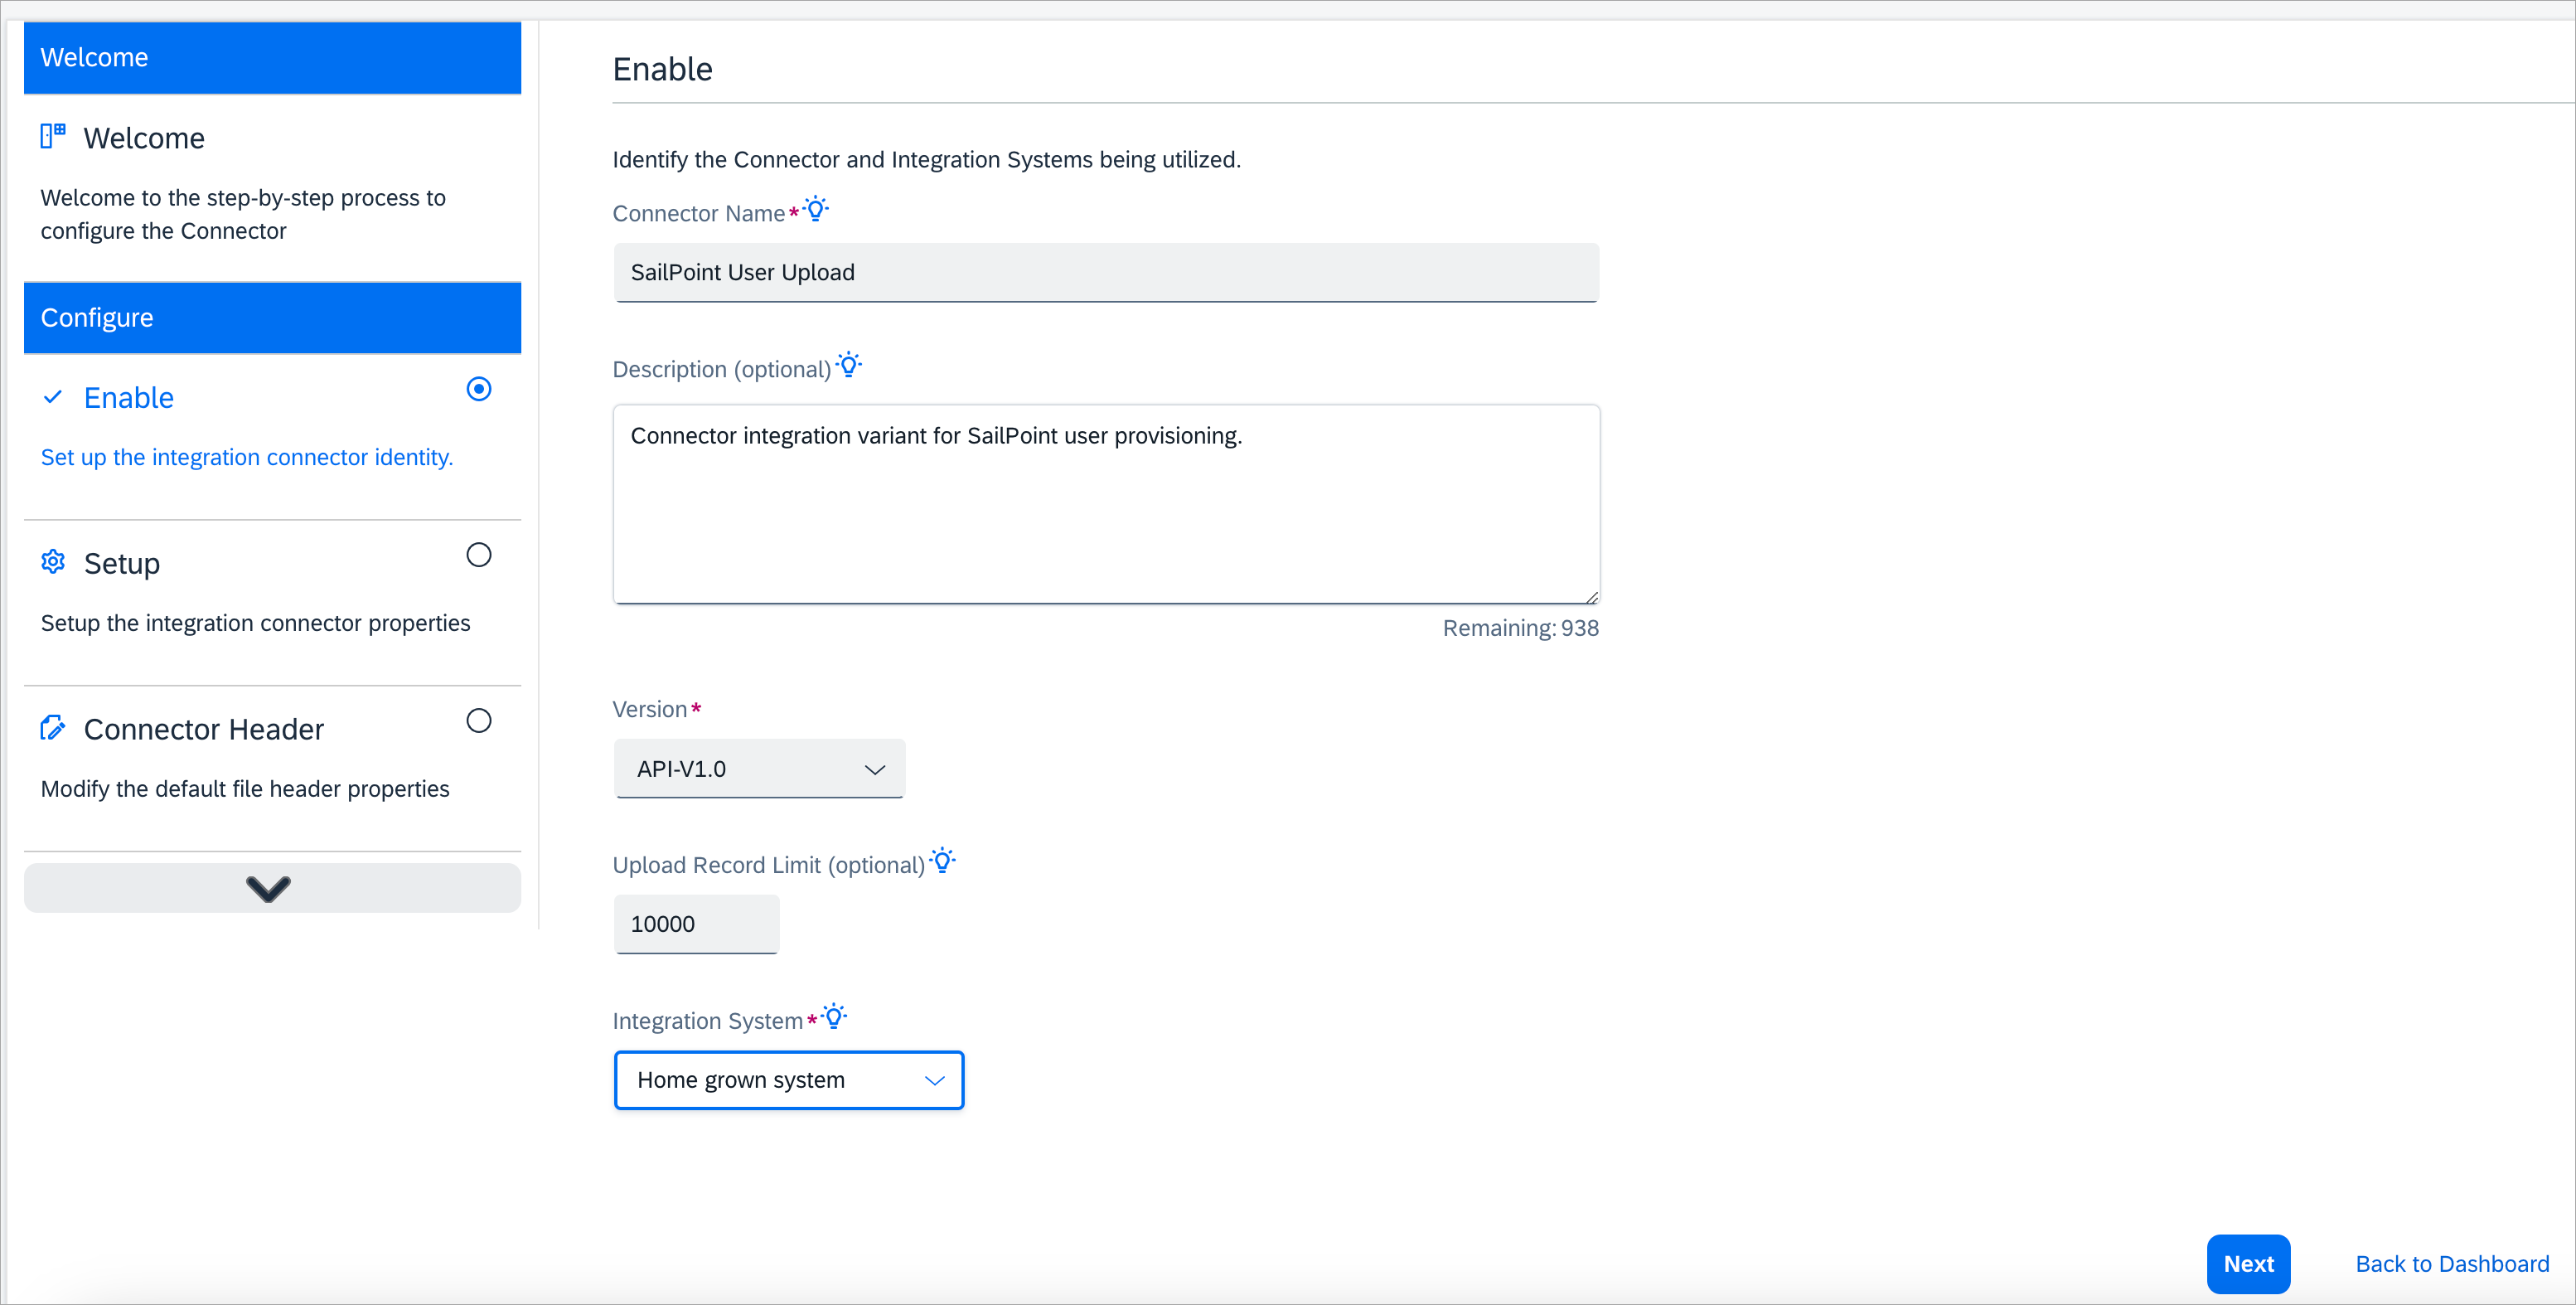
Select Start, and then go to the Enable step. Enter the new connector name and select the values as shown below, then select Next.
Screenshot
-
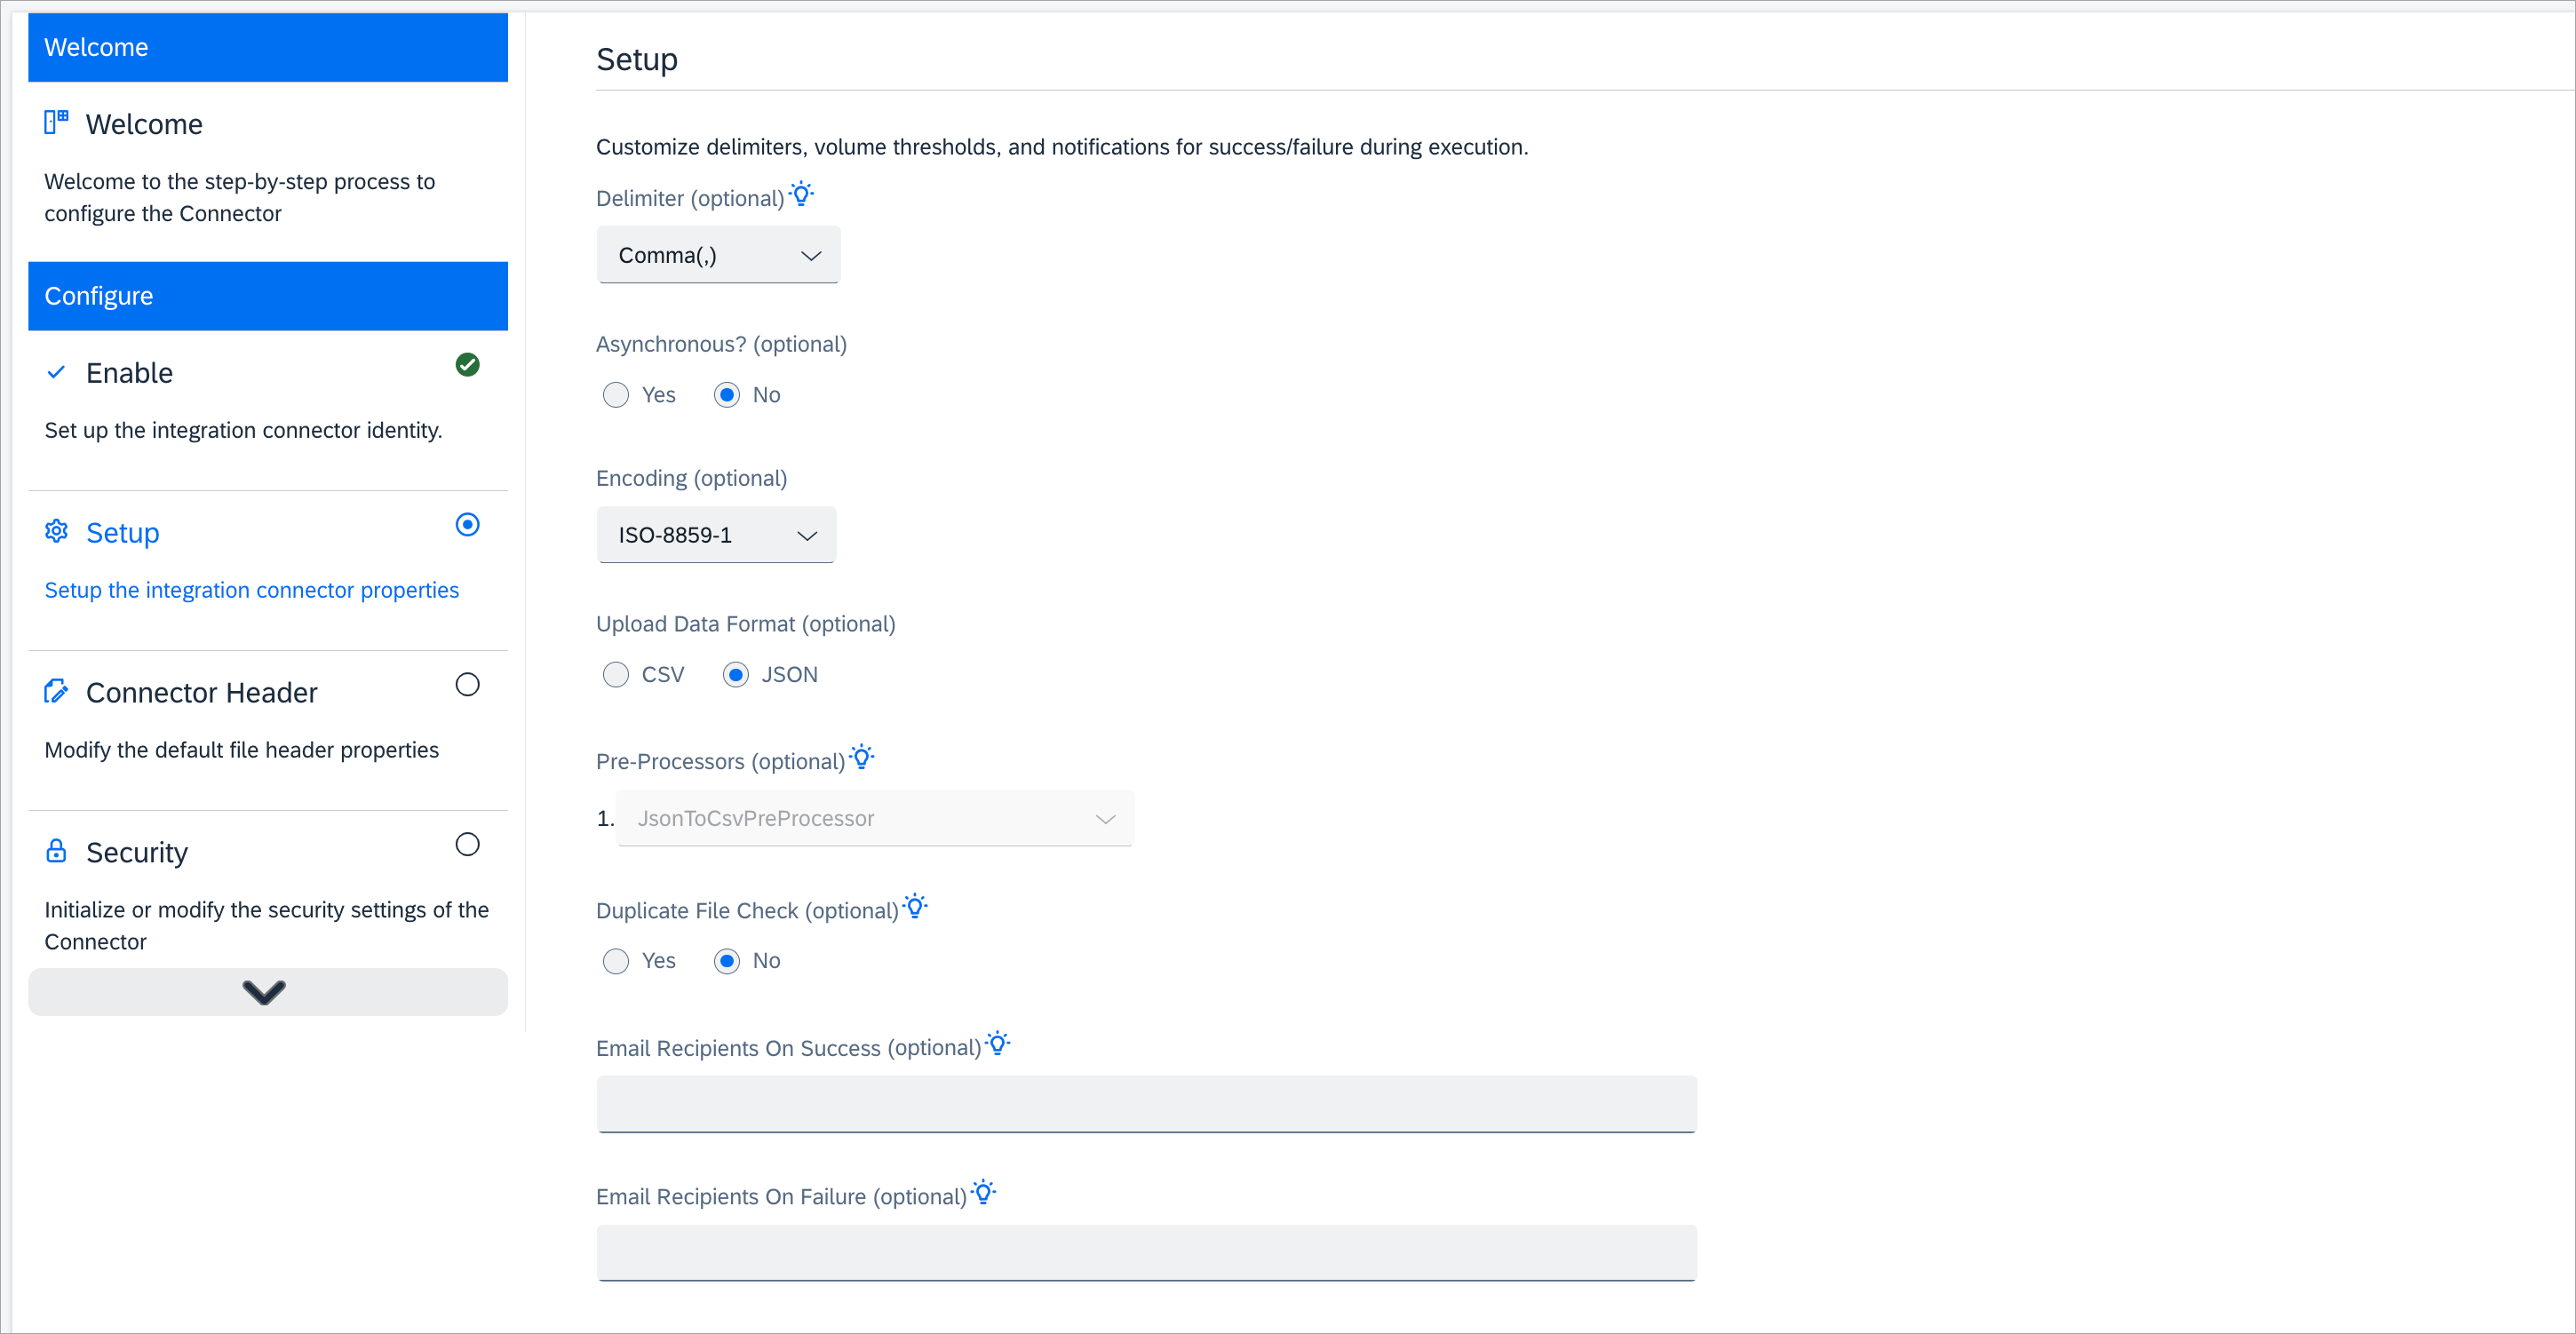
Enter the Setup details as shown below.
Screenshot
-
Keep the default value as-is on the Header Values window.
-
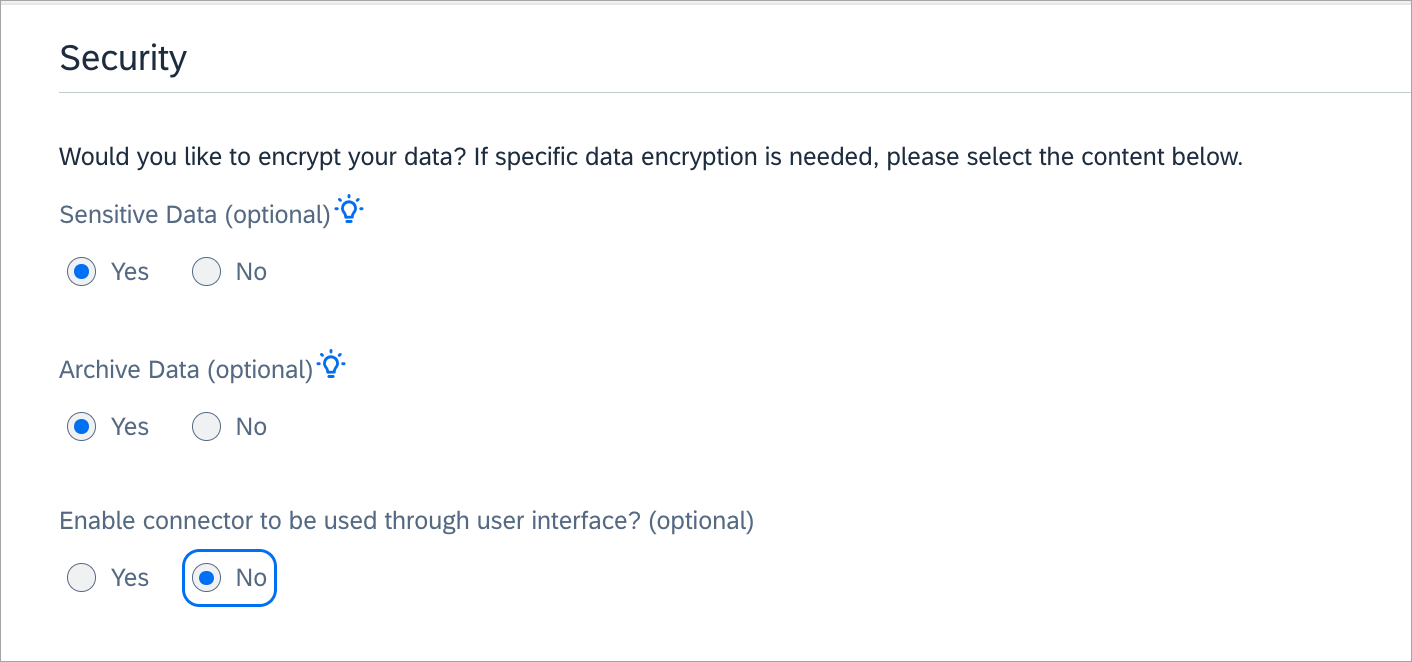
In the Security window, change the value for the Sensitive Data and Enable connector to be used through user interface? (optional) fields.
Screenshot
-
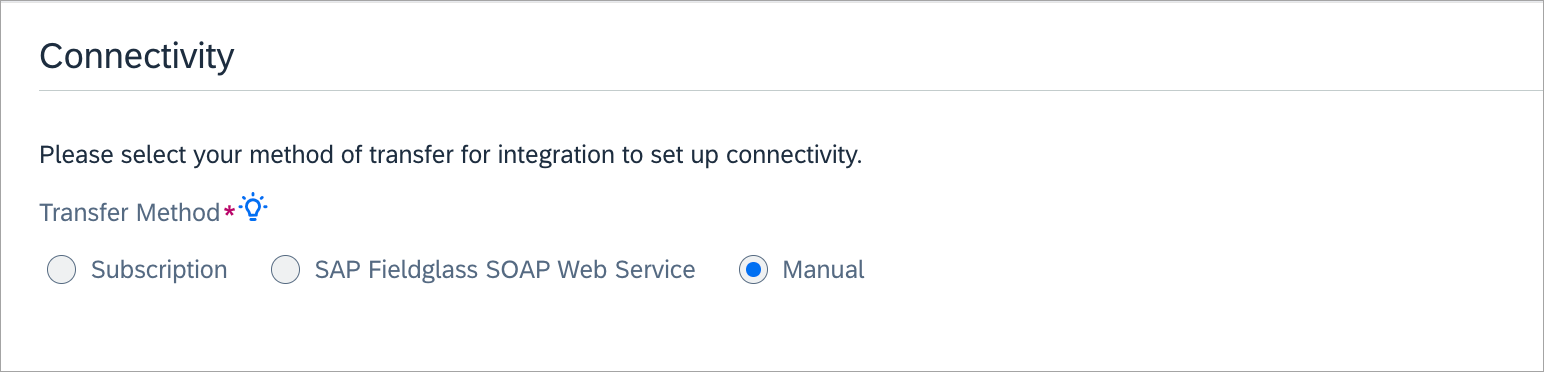
Keep the default settings as-is in the Configure Column Transformation window and the Connectivity window.
Screenshot
-
Select Next to finish.
- Use the variant name created in the Connector Integration Variant field for the source.
Configure Additional Attributes via Report
This configuration is needed when you want to GET or SET the attributes other than those included out-of-the-box.
SAP Fieldglass Configuration
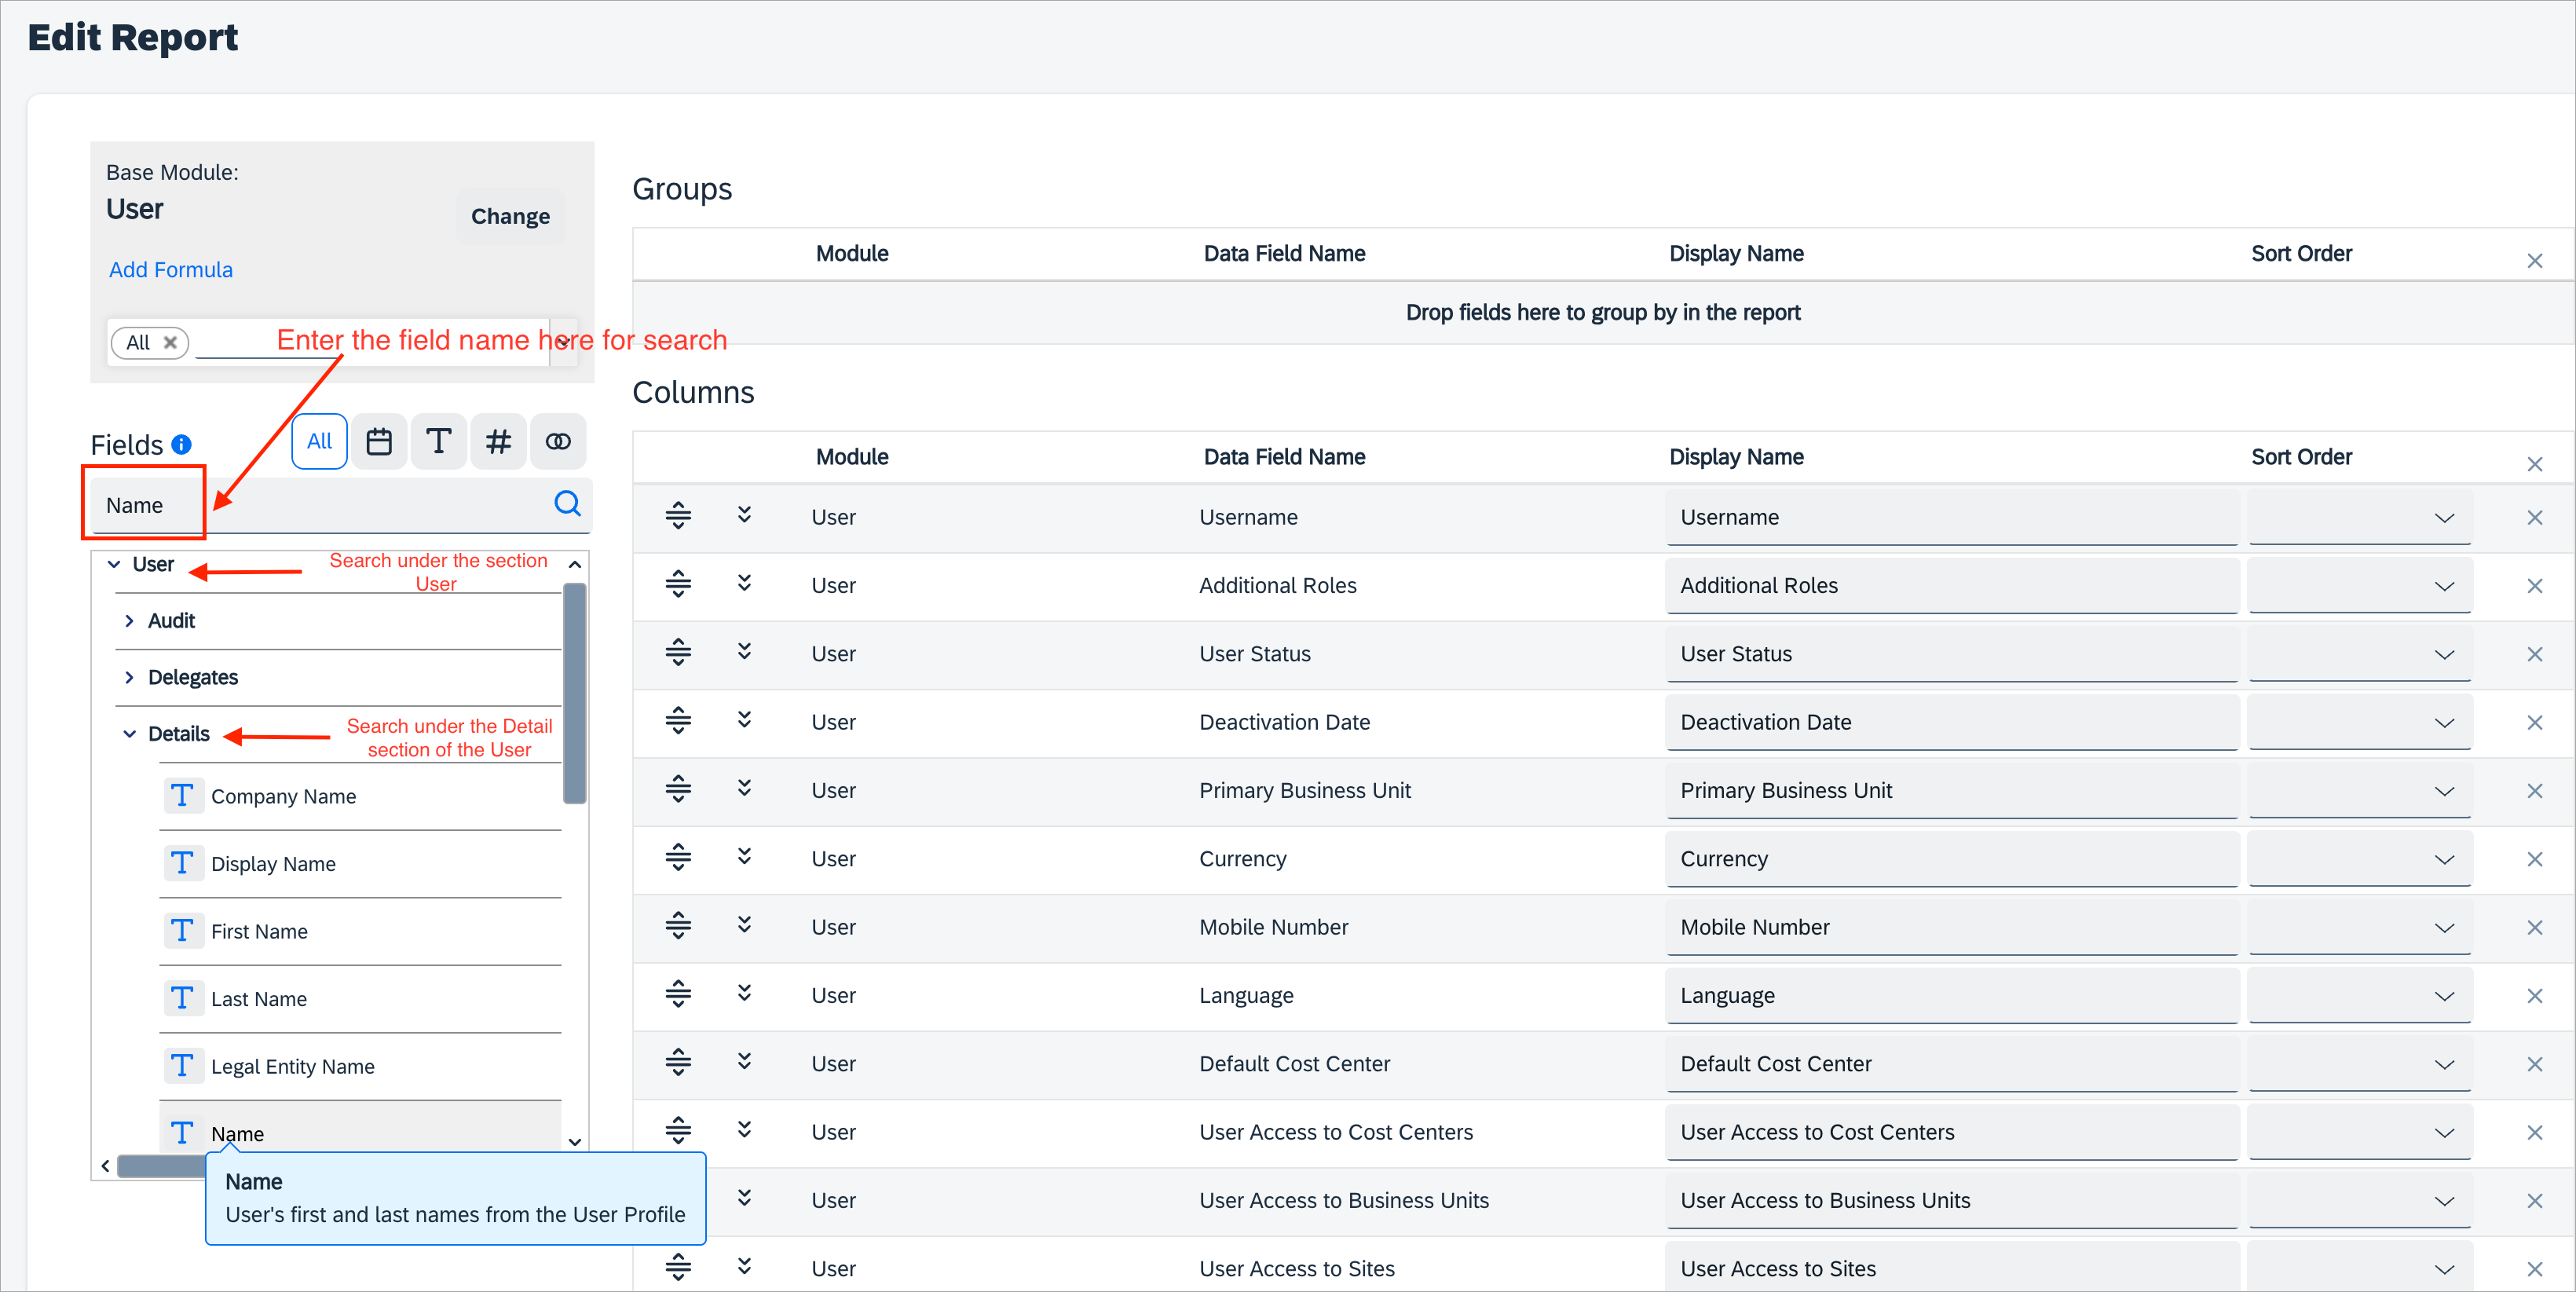
- In SAP Fieldglass, go to the existing User Report and select Edit.
- Go to Fields > Name and enter the name you want to search for.
-
Select the magnifying glass to perform the search.
Screenshot
-
Drag and drop fields from the navigation pane into the Columns area to add it (as a column) to your report.
- Select Save.
Connector Configuration
- Add the new schema attribute by going to the Source > Schema Attribute > New Schema Attribute.
- Add the attribute you need and then select Save.
-
Add the json mapping for the attribute under the <entrykey="jsonPathMappingForReports"> via rest api to the source.
For example,
Configure Additional Attributes with SCIM
SailPoint supports SCIM for some additional attributes. You can configure them by performing the following steps:
- Add the new schema attribute by going to Source > Schemas > Add New Schema Attribute. The attribute must have a complex name. For example, addresses.work.primary.locality
-
Add the json path for the attribute under the key "jsonPathMapping"
For example,
<entry key="addresses.work.primary.locality" value="addresses[*][?(@.primary==true)].locality"/>
Required Permissions
The SAP Fieldglass Service user must have the following two roles assigned to perform connector operations:
- Configuration Manager
- Administrator
Documentation Feedback
Feedback is provided as an informational resource only and does not form part of SailPoint’s official product documentation. SailPoint does not warrant or make any guarantees about the feedback (including without limitation as to its accuracy, relevance, or reliability). All feedback is subject to the terms set forth at https://developer.sailpoint.com/discuss/tos.