Integrating SailPoint with SAP Ariba
Integration
This is an integration and requires additional licensing or subscriptions to utilize it. For more information, contact your customer success manager.
SAP Ariba is a cloud-based procurement solution that enables organizations to streamline their procurement processes. It provides a platform for buying, selling, and managing cash flow for goods and services. SAP Ariba Identity Governance is a new SailPoint SAP Cloud integration that will aggregate and provision users, roles, and groups under parent and child realms of the buyer.
Note
The SAP Ariba Integration has been built using SAP Identity Provisioning Services (IPS). The credentials used to connect to SAP Ariba are SAP Cloud Identity Services Technical User credentials. For more information, refer to Required Permissions.
Note
To view the latest features, enhancements, and fixes for all SaaS connectors, refer to the SaaS Release Notes page.
Supported Features
SailPoint's SAP Ariba connector supports the following features for accounts:
-
Aggregation
- Account
-
Groups
Important
The SailPoint platform supports case-insensitive native identity. It may cause data overwriting in aggregated accounts if the same User ID (irrespective of upper/lower/mixed case) exists for the same type (enterprise or third party) of user.
-
Add/Remove Entitlement
- Groups
-
Account Provisioning
- Create User
- Update User (Attributes)
- Disable (Lock account in Ariba portal)
-
Enable (Unlock account in Ariba portal)
-
Delete
Note
- SAP Ariba doesn’t allow updating the general information of user accounts in the Child Realms synced from Parent Realm.
-
The following are the recommendations by SailPoint to avoid failures in provisioning operations:
- During user creation, use the unique user name (irrespective of upper/lower/mixed case) for all types of users (enterprise or third party) to avoid data overwriting in the SailPoint platform.
- If a duplicate user names exist in SAP Ariba realms, you must update the user names to be unique and avoid overwriting in the SailPoint Platform.
For more information on features, refer to Source Features.
Supported Managed Systems
- SAP Ariba Cloud Solutions (Buyer Module)
Required Permissions
-
SAP Ariba Developer Portal (to configure the OAuth Client)
- The OAuth client must be created to use Ariba APIs. It can be created by the system user using Developer Ariba.
-
The following APIs must be used by two separate OAuth clients.
- SCIM API for User and Group Master Data (for Parent and all Child Realms together)
-
SAP Identity Provisioning Service (to configure the technical user)
- The technical user is required to be created by the tenant administrator. Select the Access Proxy System API permission in Configure Authorizations.
Prerequisites
-
Configure at least one virtual appliance cluster and successfully test the connection. For instructions, refer to the Virtual Appliance Reference Guide.
-
The following set of credentials must be created to configure the IPS Proxy of SAP Ariba and connect to SailPoint to allow it to handle associated identity governance use cases.
- Obtain a Bundle Tenant. To get identity provisioning services, refer to Initial Setup of Bundle Tenants in the SAP Help Portal.
Configure the OAuth Client and APIs
OAuth Client
- Sign in to the SAP Ariba Developer Portal.
-
Create an app for each relevant API. Allow 12 hours for Ariba to auto-approve API access.
- SCIM API for User and Group Master Data for Parent and Child realms in a single application
-
Generate the secret key for the API.
SCIM API for User and Group Master Data
- Sign in to the SAP Ariba Developer Portal, select Data Center, and then select SAP ID Service SSO.
-
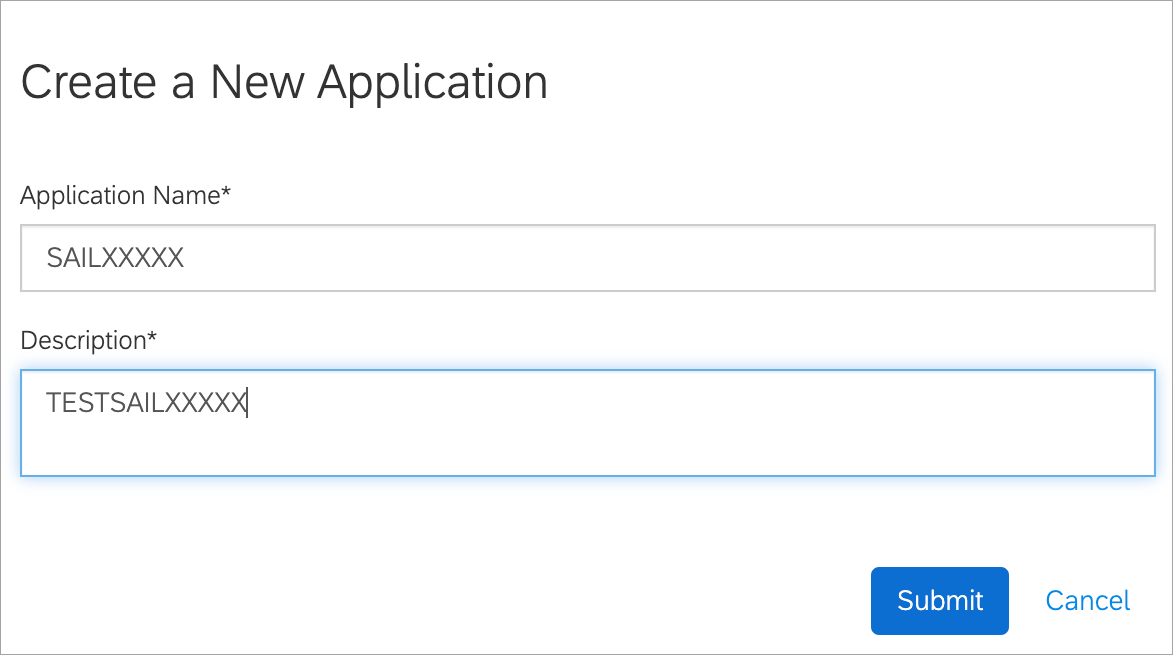
On the Create a New Application page, enter a user friendly Application Name and Description, then select Submit.
Screenshot
-
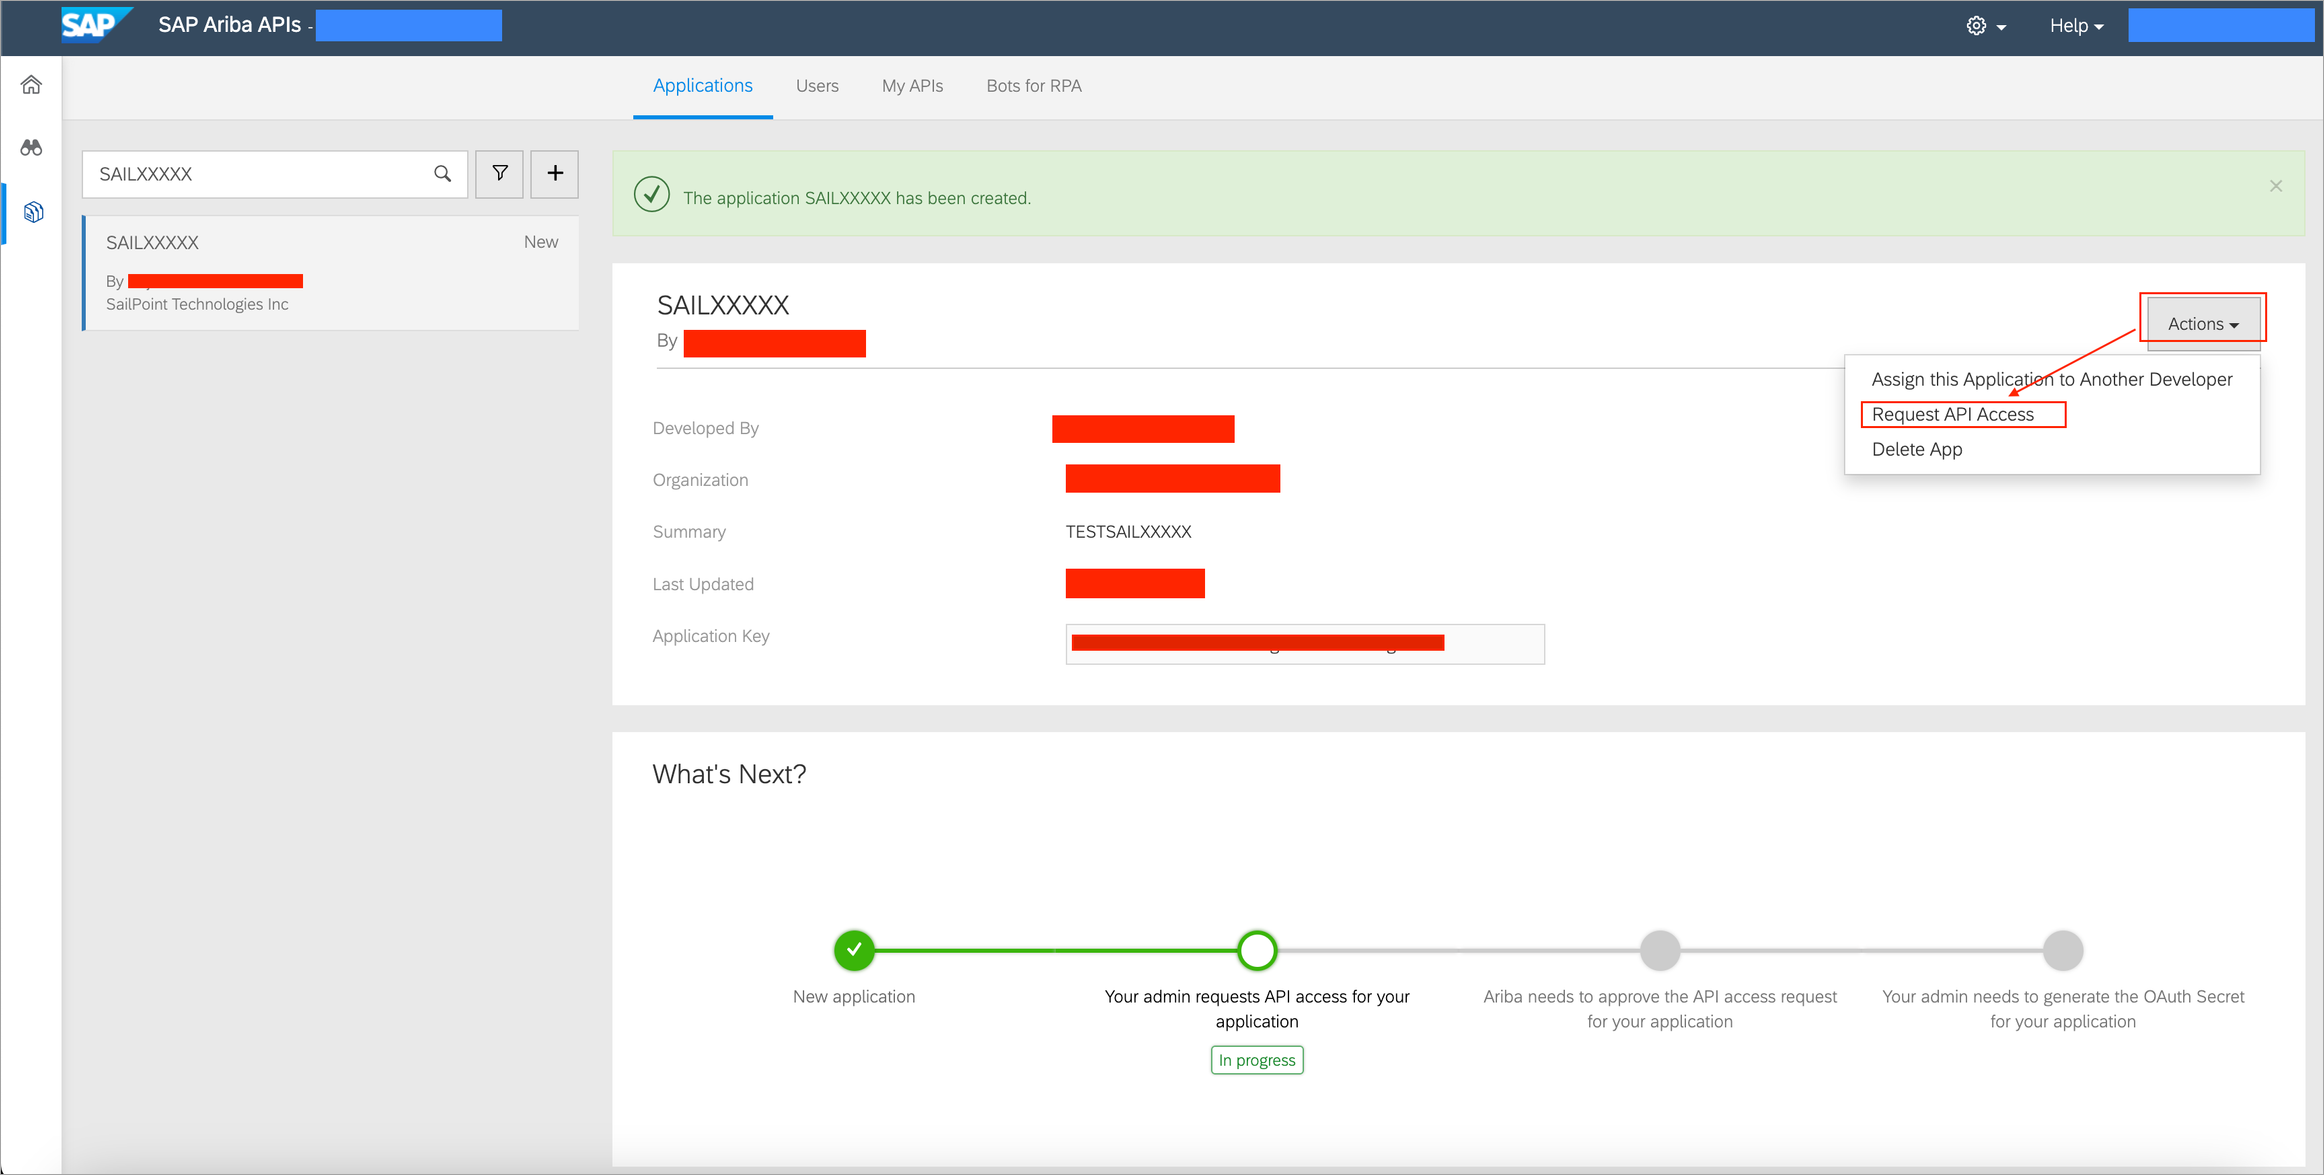
Select Actions > Request API Access > SCIM API for User and Group Master Data.
Screenshot
Note
SCIM API for user and group master data is not made available by SAP directly. After creating the application you must raise an SAP support case to get the API configured for Parent and Child realms in a single application.
-
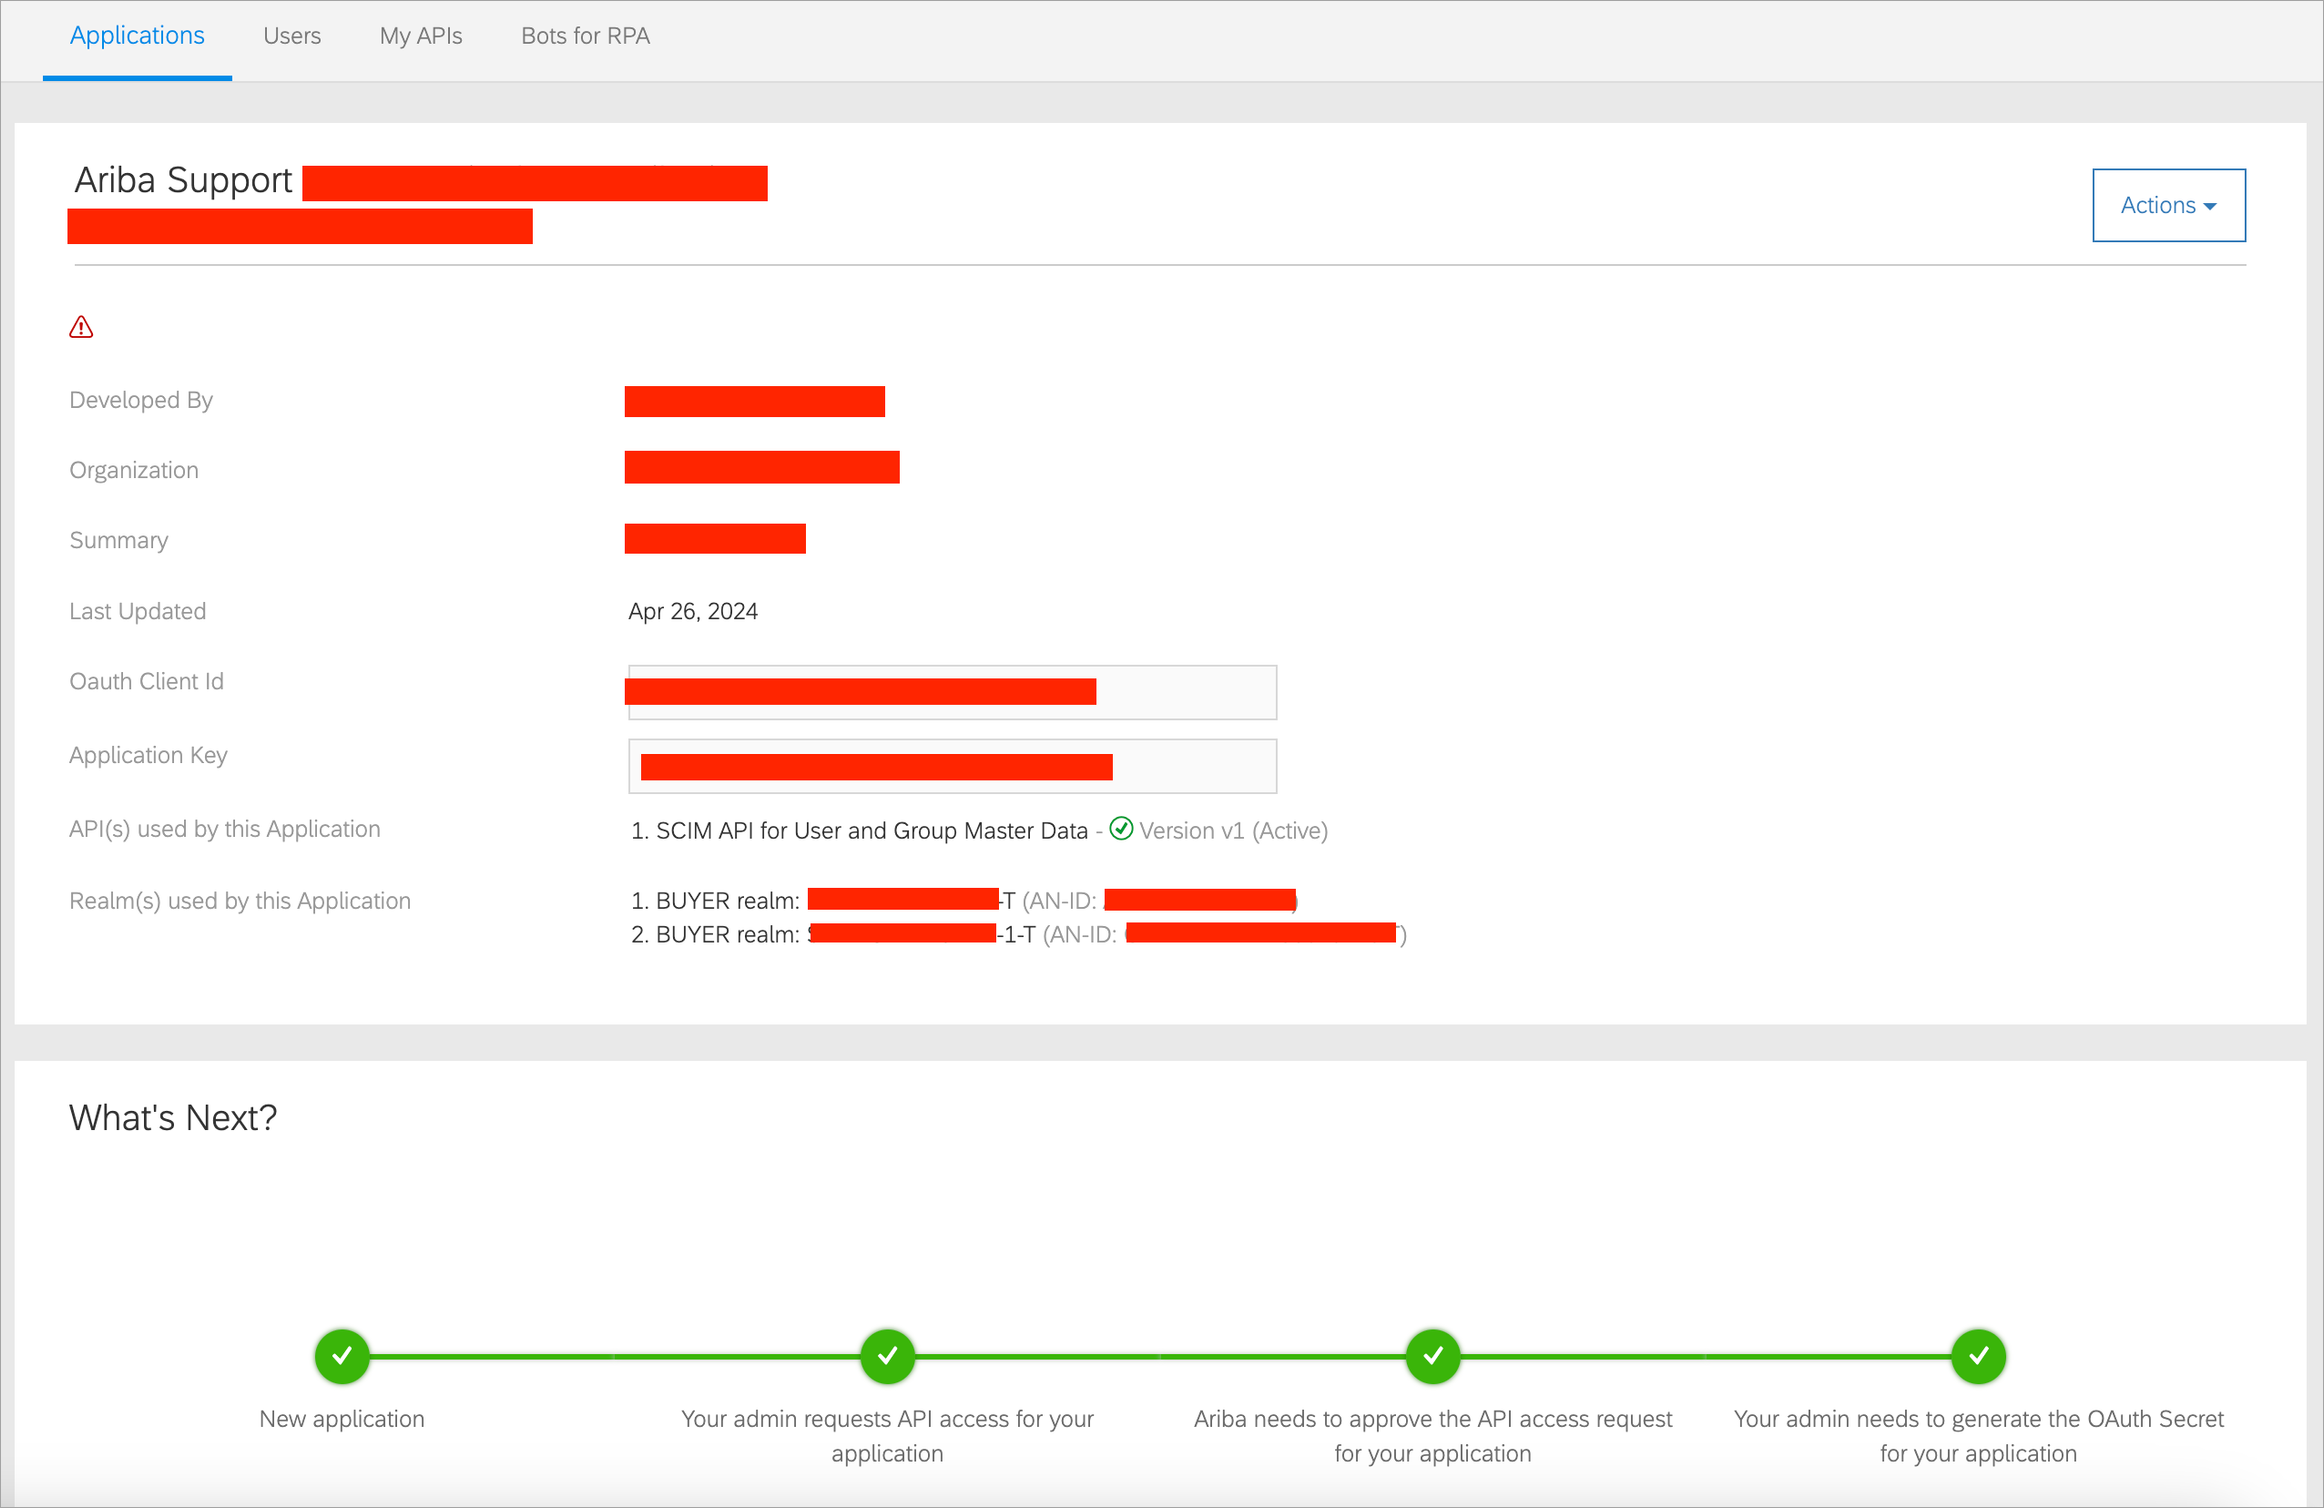
Once created, go to Actions > Generate OAuth Secret, and copy the OAuth Client Secret. Make note of the OAuth Client Id, Application Key, and OAuth Client Secret. You will enter these into the Proxy Properties to create an IPS proxy application.
Next, copy the AN-ID, which is required for configuring the SCIM API for aggregation. This can be found in the Realm(s) used by this Application section.
Screenshot
Note
In the Realms field under an application, add all the Buyers' Realms in the same configuration to enable IPS Proxy set up per realm.
-
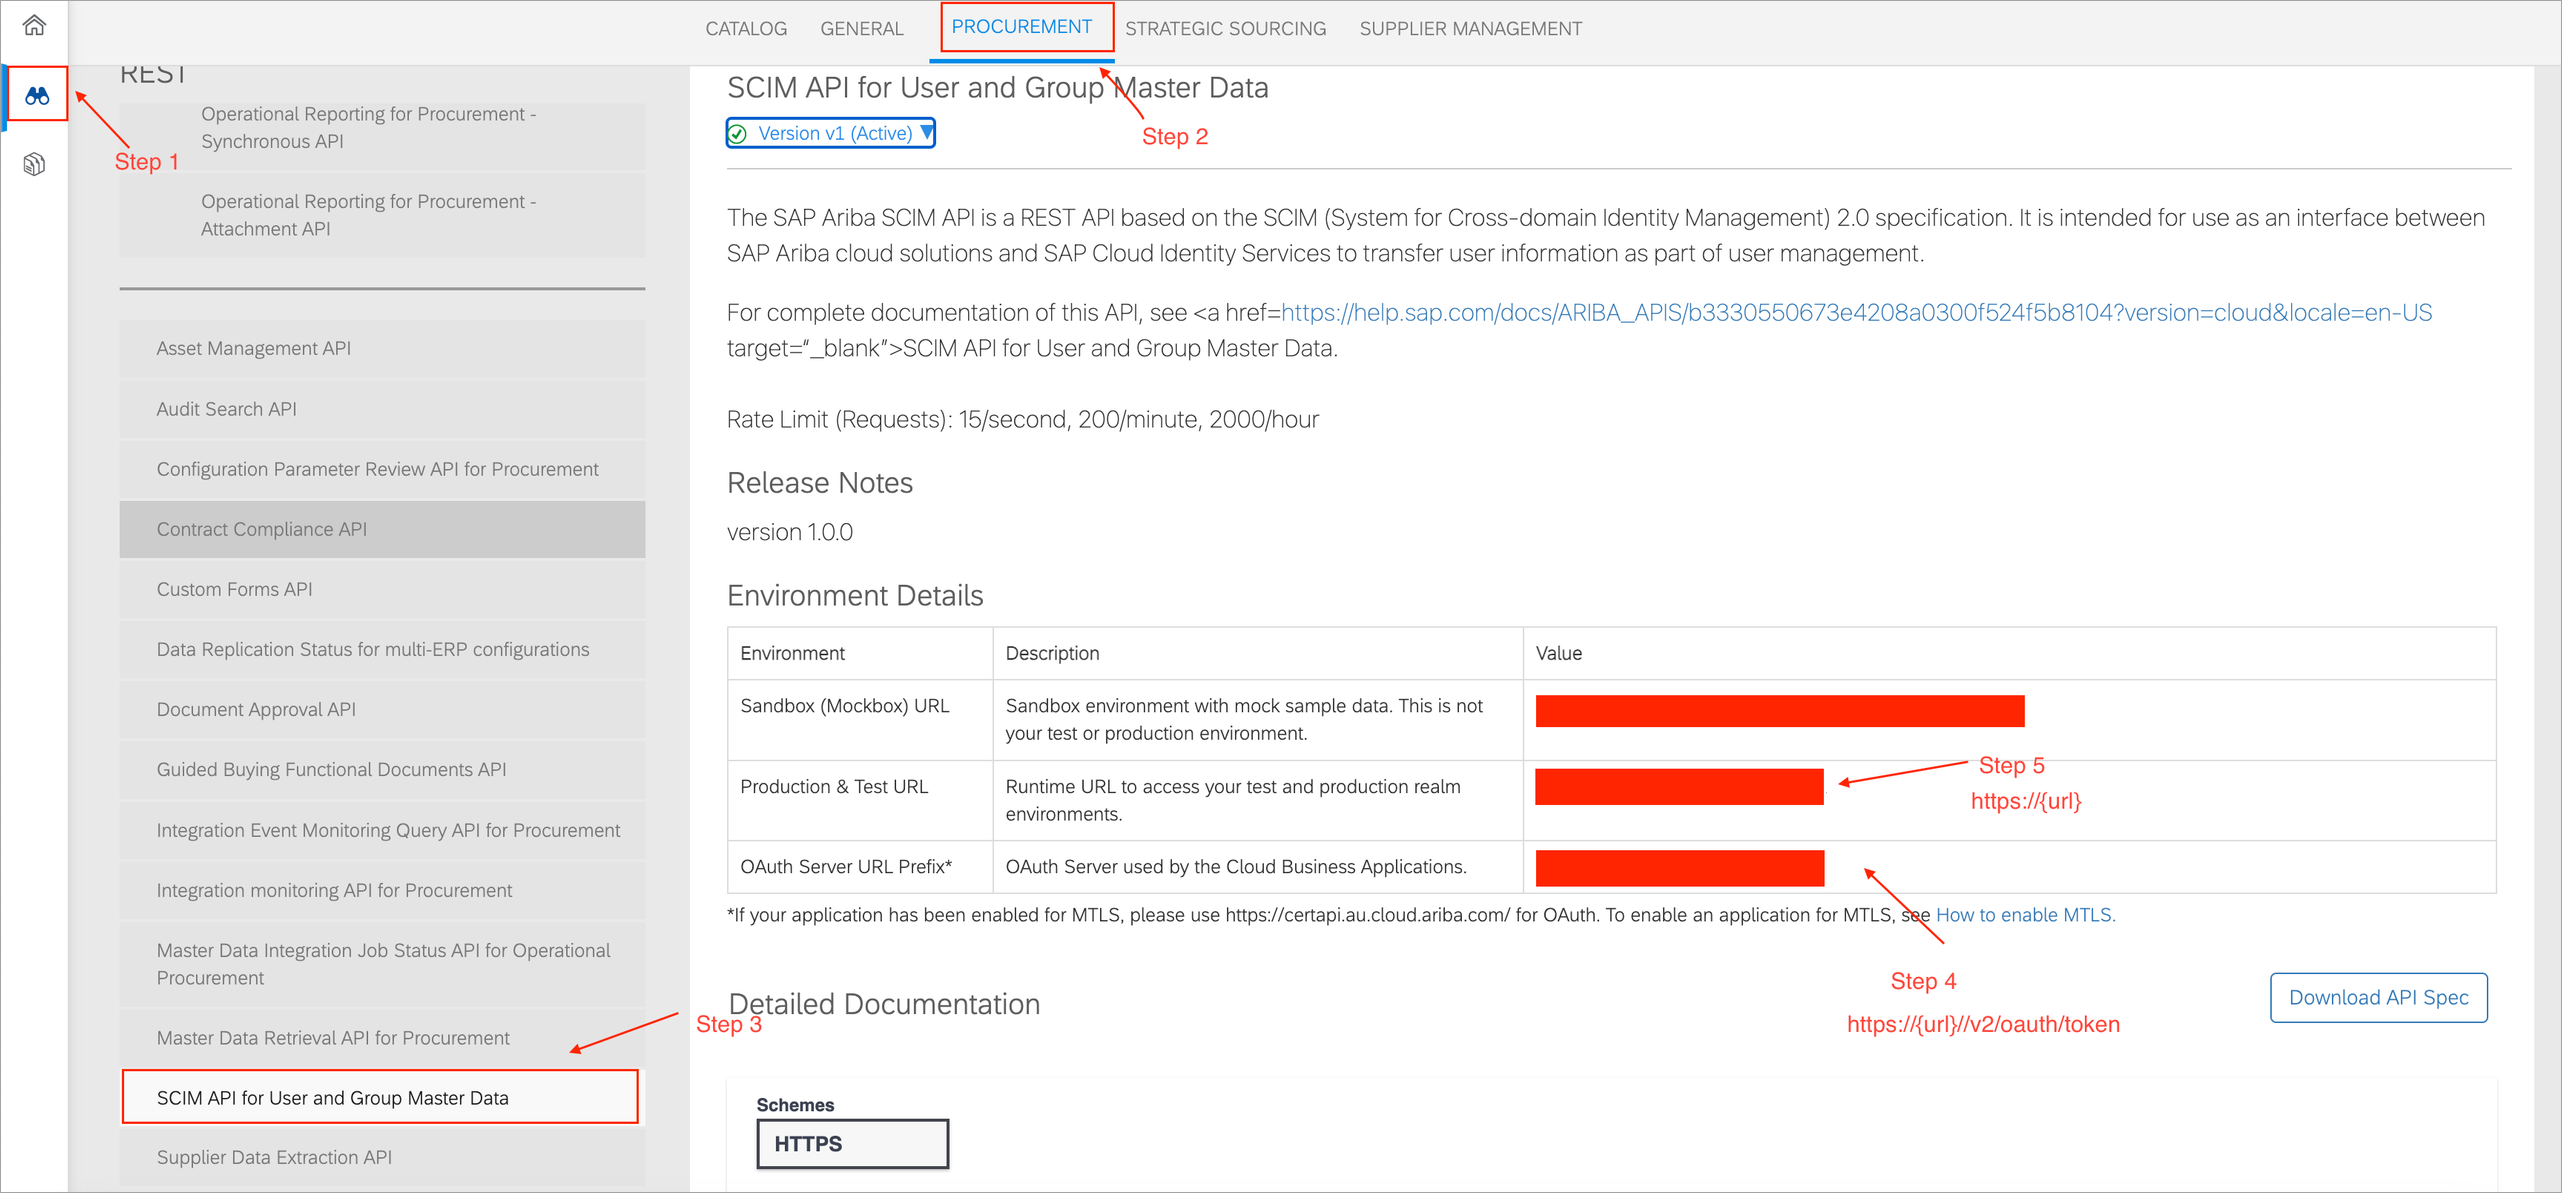
Go to the Discover tab and select Procurement > SCIM API for User and Group Master Data. Copy the value of the OAuth Server URL Prefix and append
v2/oauth/tokento it.The OAuth2TokenServiceURL(IPS) will be:
https://{url}/v2/oauth/tokenThe URL(IPS) will be:
https://{url}Note
Don't include
api/mds/v1/prodin the URL. Make a note of both the OAuth2TokenServiceURL and the URL to use in the IPS configuration.Screenshot
Configure the Technical User in SAP Identity Provisioning Service (IPS)
- To enable basic authentication, sign in to the SAP Cloud Identity Services admin console, and go to Users and Authorizations > Administrators.
- Add an administrator user of the type
System, and then provide the name of the user. - In Configure Authorizations, select the Access Proxy System API permission, and then Save.
- Go to Configure System Authentication > Secrets > Add, and copy the Client Secret and Client ID. These are the technical user credentials that you will use to communicate with SAP Ariba.
Configure the SAP Identity Provisioning Service (IPS) Proxy System
Use one of the following options to configure the proxy system. It is recommended to use the import file template.
Note
Create separate IPS Proxy systems for each of the Buyer Realms. These proxies are required to be used later to setup the connection for target realms.
Option 1 - Use the import file template
- Sign in to the SAP Cloud Identity Services admin console. Go to Identity Provisioning > Proxy Settings, and select the +Add button.
- Download the provided template, edit the placeholders with the appropriate property values, and Save the changes.
- Select Import File, and browse to the downloaded file.
Option 2 - Use the manual process
- Sign in to the SAP Cloud Identity Services admin console. Go to Identity Provisioning > Proxy Settings, and select the +Add button.
-
Enter the following values on the configuration details page.
- Type:
SAP Ariba - System Name:
User defined name - Description:
User defined description
- Type:
-
Select Save.
-
Set the read transform to exchange data with the target system in the SCIM2 compliant format.
Screenshot

- Select Read Transformation, and switch to the JSON editor.
- Select Edit link, and replace the transformation content with the provided data.
- Select Save.
-
Set the write transform to exchange data with the target system in the SCIM2 compliant format.
Screenshot

- Select Write Transformation, and switch to the JSON editor.
- Select Edit link, and replace the transformation content with the provided data.
- Select Save.
-
Select Properties. It is mandatory to set properties to configure the proxy connection to target systems.
Screenshot

-
The following table contains the properties for the SAP Ariba system. Enter the values, and then select Save.
Property Name Description and Value Type Enter HTTPURL Enter the SCIM API URLfor your SAP Ariba application (refer to Configure the OAuth Client and APIs).ProxyType Enter InternetAuthentication Enter BasicAuthenticationUser Enter the OAuth Client ID(refer to Configure the OAuth Client and APIs).Password (Credential) Enter the OAuth Client Secret(refer to Configure the OAuth Client and APIs).OAuth2TokenServiceURL Enter the OAuth 2.0 Token Service URL(refer to Configure the OAuth Client and APIs).ariba.applications.api.key (Credential) Enter your application key (refer to Configure the OAuth Client and APIs). ariba.applications.realm.id Enter your AN-ID (refer to Configure the OAuth Client and APIs). (Optional) ariba.applications.group.flatten This property allows or forbids reading nested groups (group structures) from SAP Ariba applications. If enabled ( true), group members of typegroupwill be ignored during read in order not to be provisioned to target systems that do not support nested groups. Thus, set it tofalseonly if you are sure that the target system supports nested groups.- Default value:
false - Predefined value (during system creation):
true
falseonly if you are sure that the target system supports nested groups.ariba.applications.support.patch.operation This property is automatically added to the system. Default value: true - Default value:
Documentation Feedback
Feedback is provided as an informational resource only and does not form part of SailPoint’s official product documentation. SailPoint does not warrant or make any guarantees about the feedback (including without limitation as to its accuracy, relevance, or reliability). All feedback is subject to the terms set forth at https://developer.sailpoint.com/discuss/tos.