Configuring RACF LDAP for Integration
This section describes the configurations to be performed on RACF LDAP.
TLS Communication Between SailPoint and RACF LDAP Server
Enable TLS communications between SailPoint and the RACF LDAP server to provide the most secure connection.
Note
Install the certificate into the JVM keystore for a Java client to connect using TLS and self-signed certificates.
System Requirements
The following components for z/OS versions must be installed for TLS communication:
| z/OS Version | Cryptographic Services | z/OS Security Level 3 |
|---|---|---|
| z/OS 3.1 | System SSL Base: FMID HCPT510 | System SSL Security Level: FMID JCPT511 |
| z/OS 2.5 | System SSL Base: FMID HCPT450 | System SSL Security Level: FMID JCPT451 |
| z/OS 2.4 | System SSL Base: FMID HCPT440 | System SSL Security Level: FMID JCPT441 |
The CSF started task must be active.
TLS Configuration on Virtual Appliances
Transport Layer Security (TLS) Configuration on Virtual Appliances (VA)
TLS is recommended for encrypted communication between VAs and sources that support it.
To enable TLS for a supported source:
- In your tenant, go to Admin > Connections > Sources, and select your supported source.
- In the Source Setup section, select Use Transport Layer Security (TLS) on the relevant config pages.
- Select Save.
The TLS certificate should be automatically copied to the VA cluster associated with the source.
For example, Active Directory sources include check-boxes to enable TLS support in the following source configuration settings:
- Forest
- Domain
- IQ Service
- Exchange
For more information about TLS configuration and manually adding certificates to VAs, refer to TLS Configuration on Virtual Appliances.
Manually Uploading a Certificate to a Virtual Appliance
This section describes the procedure for importing a certificate and keychain to the virtual applicance.
Importing a Certificate and Keychain to the Virtual Appliance
When adding a certificate to the Virtual Appliance, ensure that:
- You must complete the following steps for every virtual appliance on the virtual appliance cluster that is connected to the source.
- To manually add a new certificate for the source to your virtual appliance's truststore, you need to ensure that the virtual appliance does not connect to the source before you complete the steps listed here. Do not test the connection between the source and virtual appliance. This also might require temporarily suspending scheduled aggregations.
- The source server has been configured for TLS.
-
The
va-config-<va_id>.yamlfile has been configured for your virtual appliance.Note
The certificate you copy must use PEM format.
Note
For information on creating a hosts.yaml file, refer to Configuring a Hosts.yaml File.
Perform the following:
- Copy the PEM-encoded certificates to the
/home/sailpoint/certificatesdirectory. This directory might not be empty because it's where the VA adds any certificates it imports from the source. -
Restart the Connector Gateway using the following command:
sudo systemctl restart ccg -
Watch the
/home/sailpoint/log/ccg-start.log. If this is successful, import should log messages of the following form:{"@timestamp":"2017-04-21 06:57:12 +0000","level":"INFO","type":"ccg","message":"Checking CCG Sources certificates"} {"@timestamp":"2017-04-21 06:57:12 +0000","level":"INFO","type":"ccg","message":"Cert files found: [\"/home/sailpoint/certificates/411818.pem\"]"} 06:57:12 +0000","level":"INFO","type":"ccg","message":"Importing cert /home/sailpoint/certificates/411818.pem"}Note
- If you see an error instead of the log messages above, this is an indication that your certificate is in an invalid format. Verify that a PEM format is used for your certificate and try again.
- Sometimes export of a certificate may not work properly with the Virtual Appliance. Using the
opensslcommand to get the certificate is a good way to get the latest certificate.openssl s_client -connect server.example.com:636 > output < /dev/null- From the above command, grab the output file and the top of the file has the certificate. It starts with
--BEGIN CERTIFICATE--. Copy the contents between that and--END CERTIFICATE--. - Create a new file in the
/home/sailpoint/certificatesdirectory called cert.pem, for example with the contents you copied from step 2. - Restart connector gateway using
sudo systemctl restart ccgcommand.
Using an External Certificate Authority (CA)
If you are using an external certificate authority, you only have to connect to the VA from the source to import the certificate.
Prerequisites
- The ability to use TLS 1.0 to 1.2
- You have created at least one virtual appliance cluster
- CA root and intermediate certificates are in the Java CA certificates keystore
- The certificate is on the source
Perform the following:
-
In the source, ensure that the following are true:
- The hostname for the source matches the hostname in the virtual appliance's configuration.
-
The source is connected to the virtual appliance you configured to use TLS.
Note
If using Active Directory with IQService enabled, the Hostname cannot be an IP Address.
-
Change the Port to 636.
- If available, enable the Use TLS option.
- Test the connection.
The source's certificate is auto-imported to the VA.
Replace an Expired Certificate Issued by an External CA
When your certificate has expired, you can replace it on the source and then reboot your VA.
Prerequisites
Complete the process as described in Adding the Certificate to the Virtual Appliance.
Perform the following:
- Add the new certificate on the source with a new name.
-
Restart the Connector Gateway using the following commands:
sudo systemctl restart ccgThe source's certificate is auto-imported to the VA.
Using an Internal Certificate Authority (CA)
Configure an internal certificate authority on the virtual appliance.
Adding the Certificate to the Virtual Appliance
If you are using your own certificate authority, you need to add the root and intermediate certificates to the VA.
Note
This process might also be required if your source is not automatically uploading the certificate from the VA.
Prerequisites
- You have created at least one virtual appliance cluster
- The certificate is on the source
Perform the following:
- Import the certificate and entire key chain (Root and Intermediate Certificates) to the VA as described in Importing a Certificate and Keychain to the Virtual Appliance.
-
Restart the Connector Gateway using the following command:
sudo systemctl restart ccg -
In the source, ensure that the following are true:
- The hostname for the source matches the hostname in the virtual appliance's configuration.
- The source is connected to the virtual appliance you configured to use TLS.
Note
If using Active Directory with IQService enabled, the Hostname cannot be an IP Address.
-
Change the Port to 636.
- If available, enable the Use TLS option.
- Test the connection.
The source's certificate is auto-imported to the VA.
Replace an Expired Certificate
When your certificate has expired, you need to add the new certificate on both the source and the VA with a new name.
Prerequisites
Complete the process described in Adding the Certificate to the Virtual Appliance.
Perform the following:
- Add the new certificate on the source with a new name.
- Import the certificate and entire key chain (Root and Intermediate Certificates) to VA as described in Importing a Certificate and Keychain to the Virtual Appliance.
-
Restart the Connector Gateway using the following commands:
sudo systemctl restart ccg -
Test the connection.
The source's certificate is auto-imported to the VA.
TLS Configuration Without DNS
If DNS is not configured for your network, you need to edit the hosts.yaml file on the virtual appliance to specify the hostname. This is because the sources that support TLS communication use IQService which cannot connect to TLS over an IP address.
Note
By default, the virtual appliance obtains the TLS certificate automatically from the source the first time it connects to the source. If you want to manually load the certificate to your virtual appliances, you need to do so before the source successfully connects to the virtual appliance.
Prerequisites
At least one virtual appliance cluster has been configured and connected successfully.
Best Practice
The instructions contained in this section are most effective when executed as a virtual appliance is being created, before configuring the proxy.yaml file. For more information, see Virtual Appliance Reference Guide.
Perform the following:
- Open your virtualization platform and start the VA.
-
Log in to the virtual appliance.
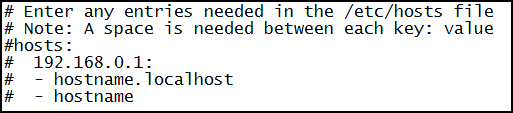
Screenshot
-
Open the attached hosts.yaml file to edit it.
Note
For information on creating a hosts.yaml file, refer to Configuring a Hosts.yaml File.
-
Uncomment lines 3-6 and replace 4-6 with actual values, according to the following requirements:
Screenshot
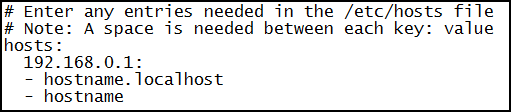
- The spacing and indentation must be precise.
- The fourth line must start with 2 spaces followed by a valid IP address matching the IP address configured for the host.
- The fifth line must start with 2 spaces followed by a dash and 1 additional spaces. It must contain a fully-qualified hostname.
- The sixth line must start with 2 spaces followed by a dash and 1 additional spaces. It must contain a hostname, and must match the hostname configured for the source. Both are required.
Note
If you have IQService configured for your source, you cannot use an IP address for a hostname.
-
Repeat step 4 as needed for multiple entries.
-
Copy the hosts.yaml file to the VM, using SCP, as follows:
- Find the IP address for the VA by running
ifconfig -a. -
Copy the file by running the SCP command on your local workstation, as follows:
scp <download_path>/hosts.yaml sailpoint@<ip_address>:/home/sailpoint/hosts.yamlNote
If you want to manually upload a TLS certificate to your VA, do so now. See Manually Uploading a certificate to a VA for instructions.
- Find the IP address for the VA by running
-
Choose one of the following:
- If you are editing an existing virtual appliance, continue to step 8.
- If you are configuring a new virtual appliance, continue configuring the virtual appliance here Virtual Appliance Administrator's Guide.
-
Enable TLS for the source.
Documentation Feedback
Feedback is provided as an informational resource only and does not form part of SailPoint’s official product documentation. SailPoint does not warrant or make any guarantees about the feedback (including without limitation as to its accuracy, relevance, or reliability). All feedback is subject to the terms set forth at https://developer.sailpoint.com/discuss/tos.