Configuring ServiceNow for IdentityIQ Integration
After you’ve configured SailPoint
IdentityIQ supports multiple instances in ServiceNow. The information on the Setup page applies to your default IdentityIQ instance. When you add an instance, you'll specify the settings that are applied to that instance. By default, the first instance that you add to your ServiceNow integration is your default instance.
Setting up your default integration in ServiceNow:
-
Sign in to the ServiceNow Portal using administrator credentials.
-
Go to System Applications > All Available Applications > All
-
Use the filter criteria and the search bar to find "SailPoint
-
Select Install. For more information, refer to ServiceNow to search their help documents.
-
Go to SailPoint
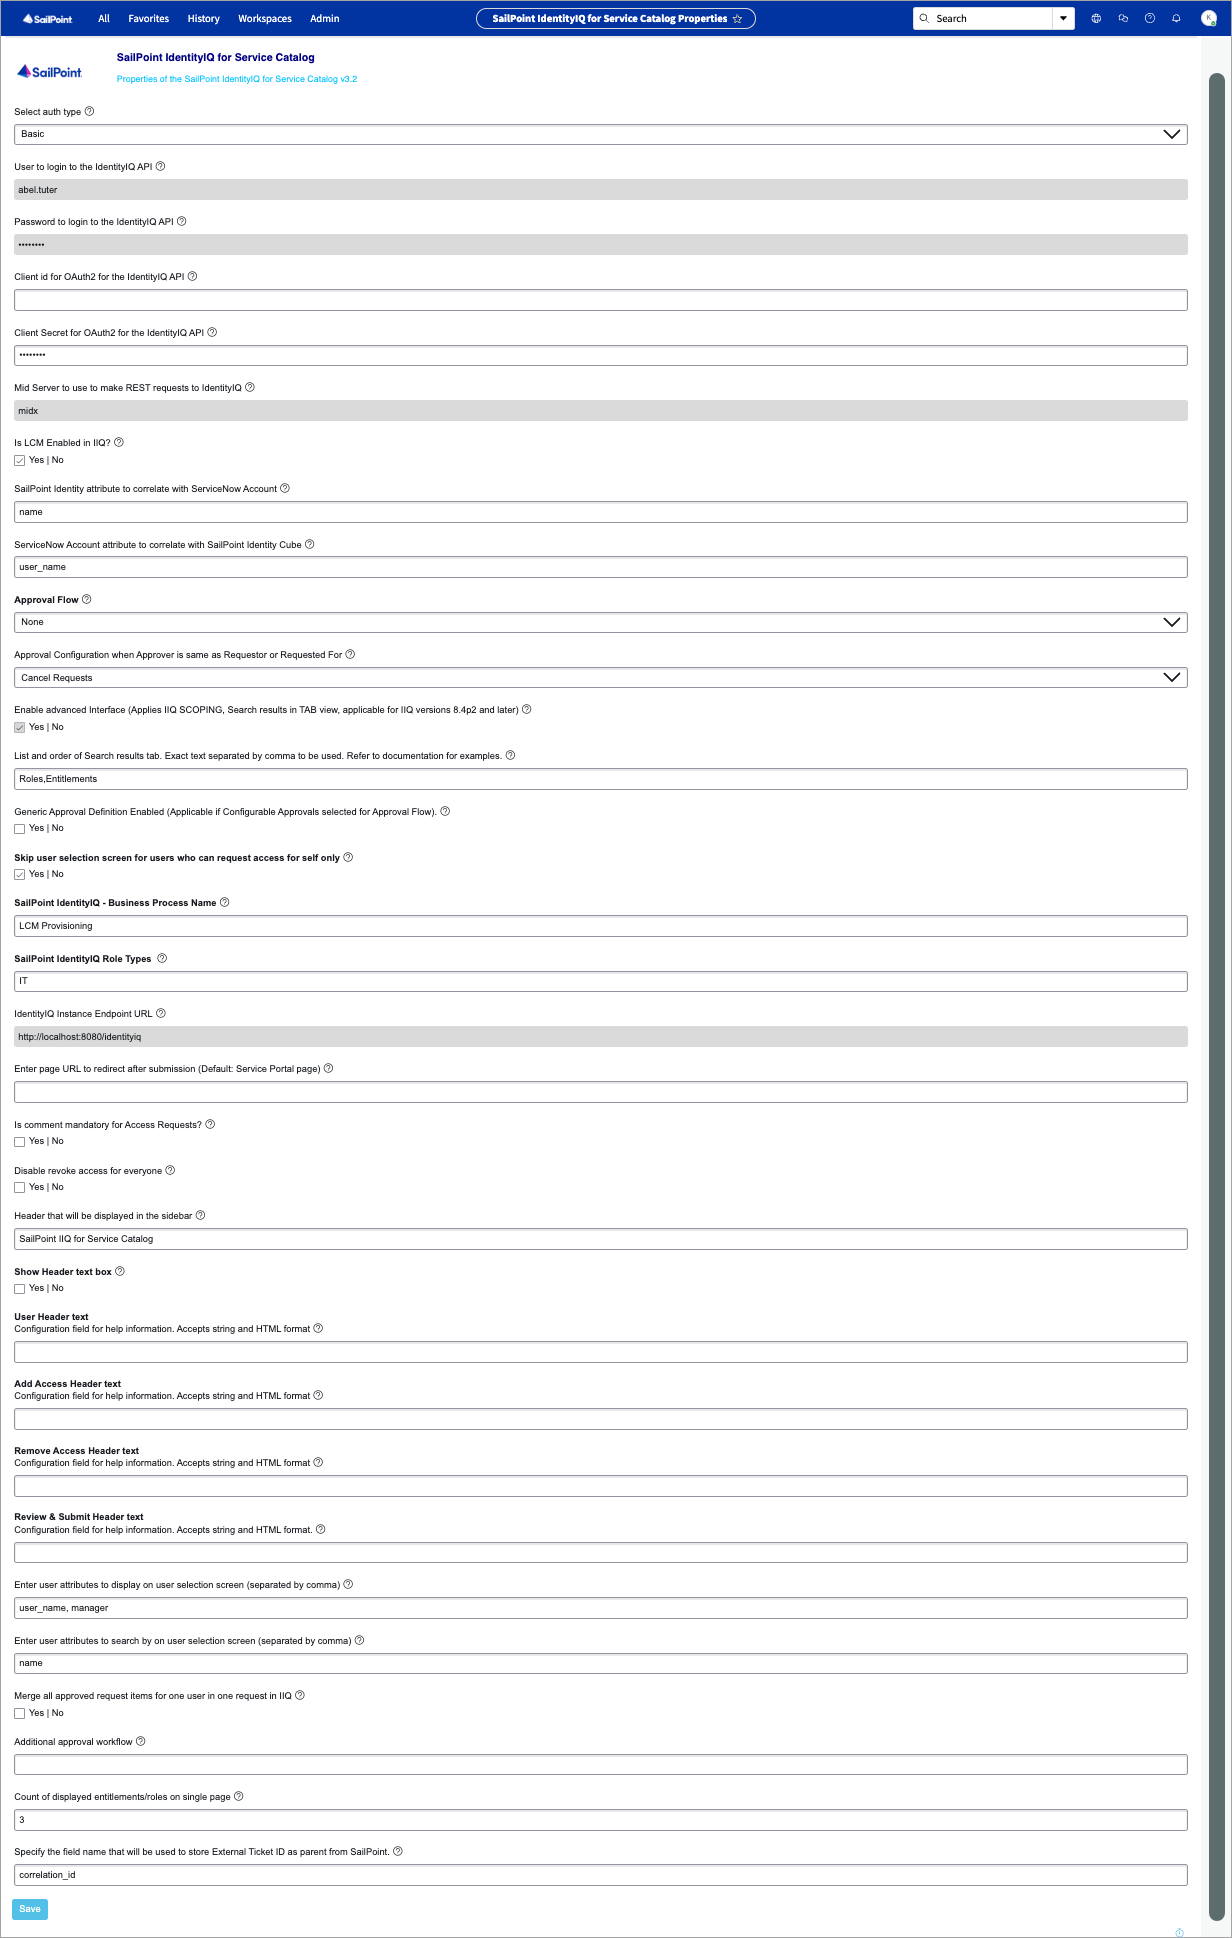
Configure the SailPoint IdentityIQ Setup page for Service Catalog:
-
Select auth type as Basic or OAuth2 from the drop down list.
-
Enter a valid Admin User to login to the IdentityIQ API.
-
Enter the associated Admin users Password to login to the IdentityIQ API.
-
Enter the Client id for OAuth2 for the IdentityIQ API. For more information on generating the values, refer to Authenticating with OAuth2.
-
Enter the Client Secret for OAuth2 for the IdentityIQ API. For more information on generating the values, refer to Authenticating with OAuth2.
-
Enter the Mid Server name from ServiceNow in Mid Server to use to make REST requests to IdentityIQ.
-
Select Yes for Is LCM Enabled in IIQ? to enable Lifecycle Manager in your IdentityIQ instance (required).
-
Enter the SailPoint IdentityIQ attribute to correlate with ServiceNow account. For example,
nameoraccountId).To help ensure successful attribute correlation, you must use the exact name for the attribute as it appears in IdentityIQ in parenthesis (not the "friendly name" that’s displayed for the identity profile) and you must prefix any second level.
-
Enter the ServiceNow Account attribute to correlate with SailPoint Identity Cube. For example,
user_nameNote
The values of attributes being correlated as a result of mapping a SailPoint attribute and a ServiceNow Account attribute are treated as case-insensitive.See the documentation provided by SailPoint and ServiceNow to learn more about attribute schemas, and how they’re configured and being used by your organization.
-
Select the Approval Flow from the dropdown list.
-
Select the Approval Configuration when Approver is same as Requestor or Requested For from the dropdown list.
-
Select Yes to Enable advanced Interface (Applies IIQ SCOPING, Search results in TAB view, applicable for IIQ versions 8.4p2 and later).displays roles and entitlements in separate tabs on the select access page. For more information, refer to Configuring Scoping and Search Results.
-
Set the configuration for List and order of Search results tab. Exact text separated by comma to be used. For more information, refer to Configuring Scoping.
Note
This property is used only when Enable advanced Interface (Applies IIQ SCOPING, Search results in TAB view, applicable for IIQ versions 8.4p2 and later) is set to Yes. -
Select Yes to enable the option for Generic Approval Definition Enabled (Applicable if Configurable Approvals selected for Approval Flow).
-
Select your preference for Skip user selection screen for users who can only request access for self only? The
Yesoption enables skipping the user selection page for users who need to select access only for themselves. If it becomes necessary to make user selection mandatory again, you can change this value toNo. -
Enter the SailPoint IdentityIQ - Business Process Name that will follow access requests initiated within the ServiceNow Portal. In IdentityIQ, select Lifecycle Manager from the gear icon, select Business Process and use the Request Access list to view the available business processes. Be sure that the business process name you provide is suitable for
LCM Provisioning.Important
If you’re unsure, check with your IdentityIQ Administrator to confirm you provide the correct value. -
Enter the name(s) of the SailPoint IdentityIQ Role Types you want to make requestable to users. The role types you specify here will be available to users when they request access and they will be included in search results. For more information, refer to Using the ServiceNow Portal Integration for IdentityIQ, select Global Settings from the gear icon, then select Role Configuration. Under Role Types, select the name of a role type listed to view its details. Role types are case sensitive, so be sure to specify the same value that’s in the Type Name field, not the Display Name. To make multiple role types requestable, use a comma to separate the values. For example,
business,it,custom. -
Enter the fully qualified domain name in IdentityIQ Instance Endpoint URL. For example,
https://<company>.com:8080/identityiq -
Enter page URL to redirect after submission (Default: Service Portal Page). This is where you want your user to be redirected after successfully creating a new ServiceNow Access request. For example,
-
You can leave the field empty to redirect the user to the default Service Portal page.
-
You can specify a relative path that starts with / to redirect the user to that page. For example, to send a user to the Manage Access page use
/sp?id=manage_access. -
You can enter a URL with an absolute path to a page or site. For example,
https://www.sailpoint.com/
-
-
Select Yes for Is comment mandatory for Access Requests?.
-
Select Yes to Disable revoke access for everyone to restrict creating revoke access requests to only users with the
x_sap_integration.sapadminrole. If No is selected, users with any role can create revoke access requests. -
Enter a user-friendly Header that will be displayed in the sidebar. For example,
SailPoint IdentityIQ for Service Catalog -
Select Yes to Show Header text box.
-
Configure the fields for User Header text, Add Access Header text, Remove Access Header text, and Review & Submit Header text.
-
Enter user attributes to display on the user selection screen (separated by comma). Use field names from the
sys_user tableseparated by a comma. For example,user_name,manager. -
Enter user attributes to search by on user selection screen (separated by comma). Use field names from the
sys_user tableseparated by a comma. For example,name. -
Select Yes to Merge all approved request items for one user in one request in IIQ.
-
Enter any Additional approval workflow.
-
Enter the Count of displayed entitlements/roles on single page.
-
Specify the Field Name that will be used to store the access request External Ticket ID as the parent from SailPoint. The default value is
correlation_id. You can change it to another custom field if you are already usingcorrelation_idon a requested item for another integration.Note
This field name is used to link tickets created by SailPoint IdentityIQ for Service Catalog with those created for same request by SailPoint for Service Desk. This property is applicable only if you have both of these store applications installed on the same ServiceNow instance. -
Select Save.