Using the ServiceNow Portal Integration for IdentityIQ
After IdentityIQ has been successfully integrated with the ServiceNow Service Portal, you’ll be able to use it to view and manage access for users.
-
Sign in to the ServiceNow Service Portal using your existing credentials.
-
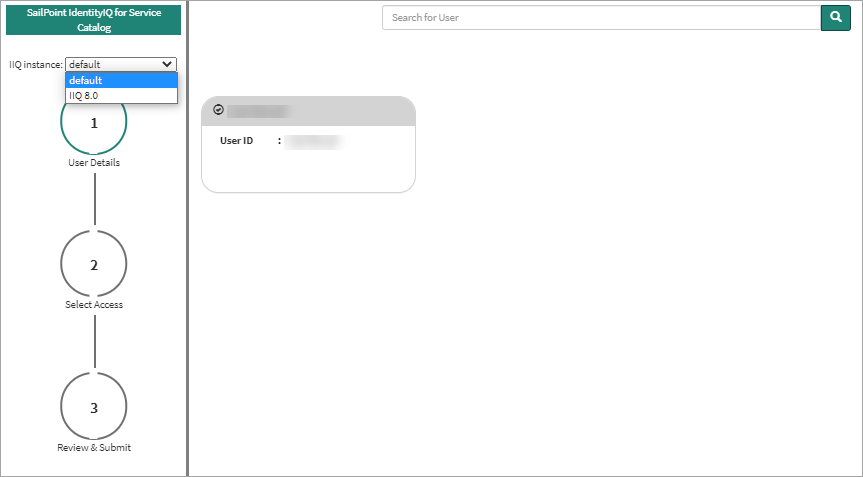
In the ServiceNow Service Portal, select Manage Access to access the app.
Note
This is the default configuration. Your organization may use a different method to access the app from within your ServiceNow Service Portal. -
Select the appropriate IdentityIQ instance from the list. Now that you’re in the app, you can search for a specific user by name or page through the list.
-
To select a user, click the top section of their "card" that contains a check mark and their name.
Note
You can select up to 10 users to request access for them all at once. The initials of each selected user are listed at the top of the page so you can see a summary of them in a glance. Hover over each circle to view their name and the name of their manager, if applicable. -
When you’re finished in the User Details panel, select Next to proceed to Select Access.
-
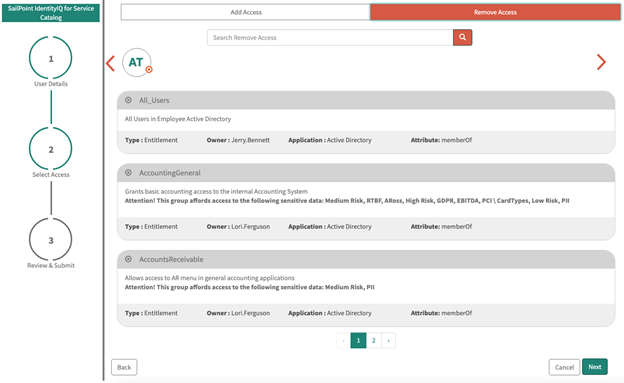
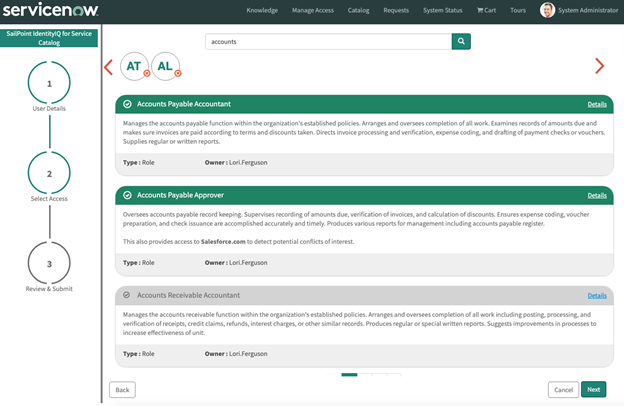
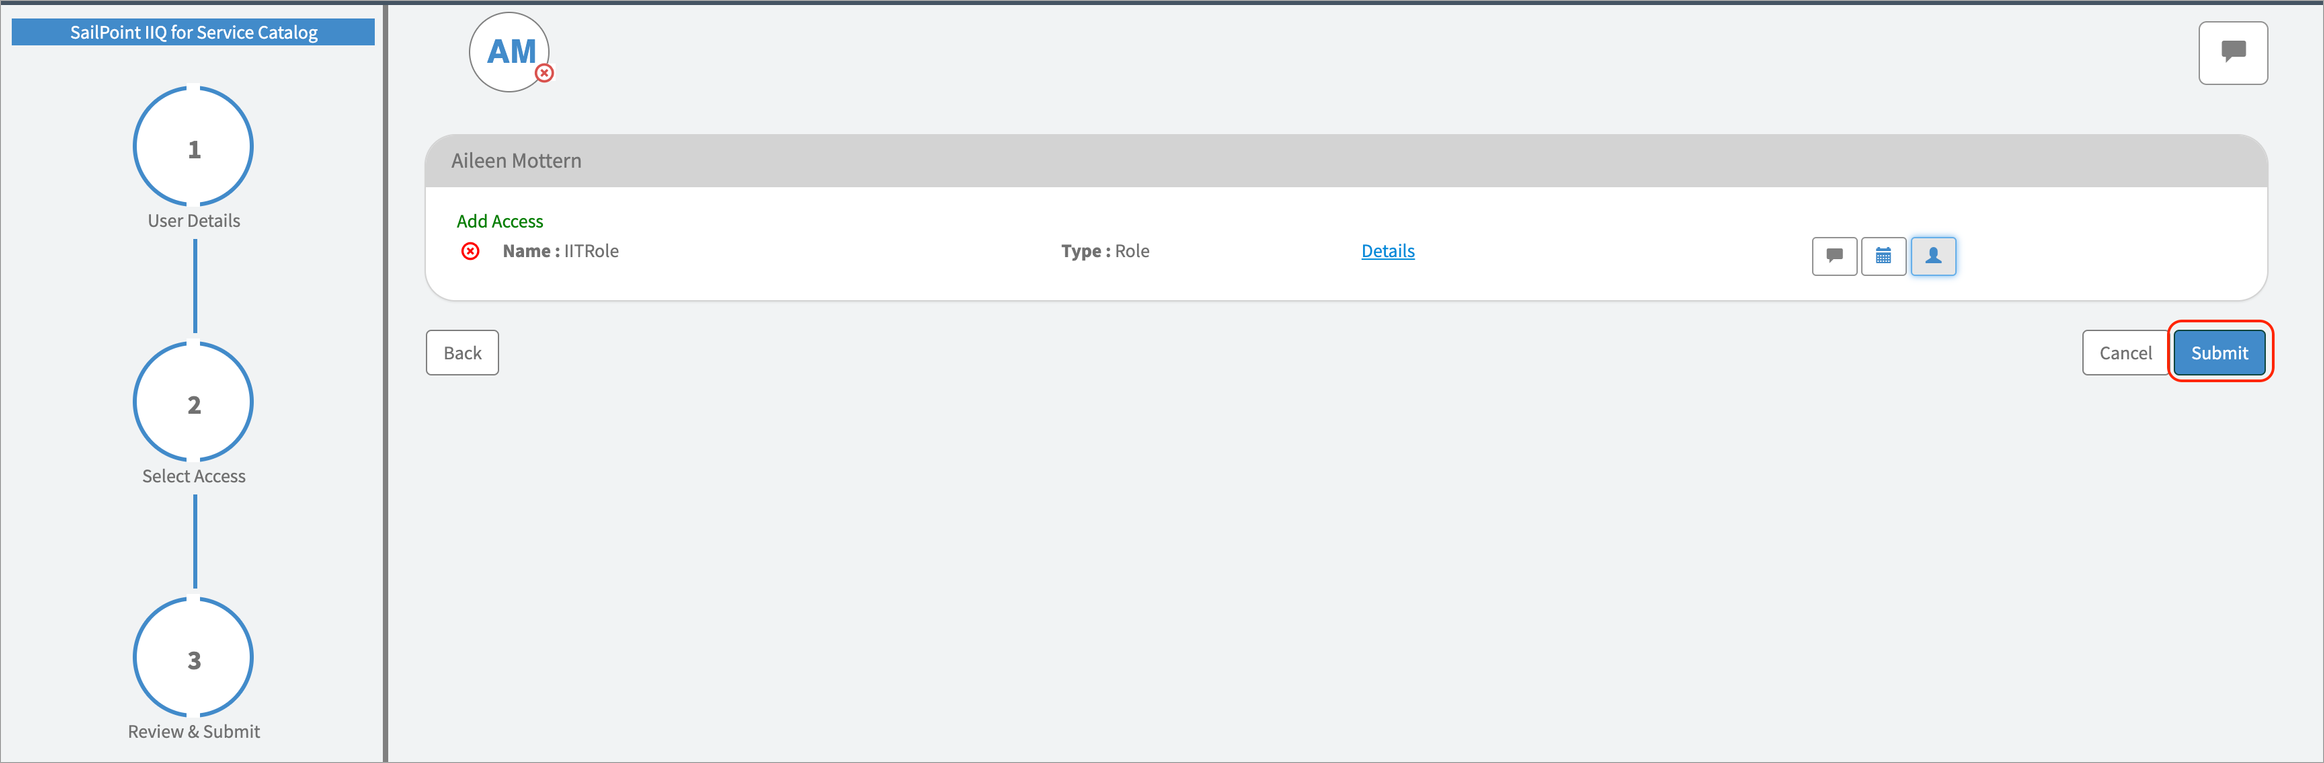
On this page you’ll see options to Add Access and Remove Access. Use these to view the list of roles and entitlements that are currently eligible to be added or removed, and determine the level of access that’s appropriate for the user.
-
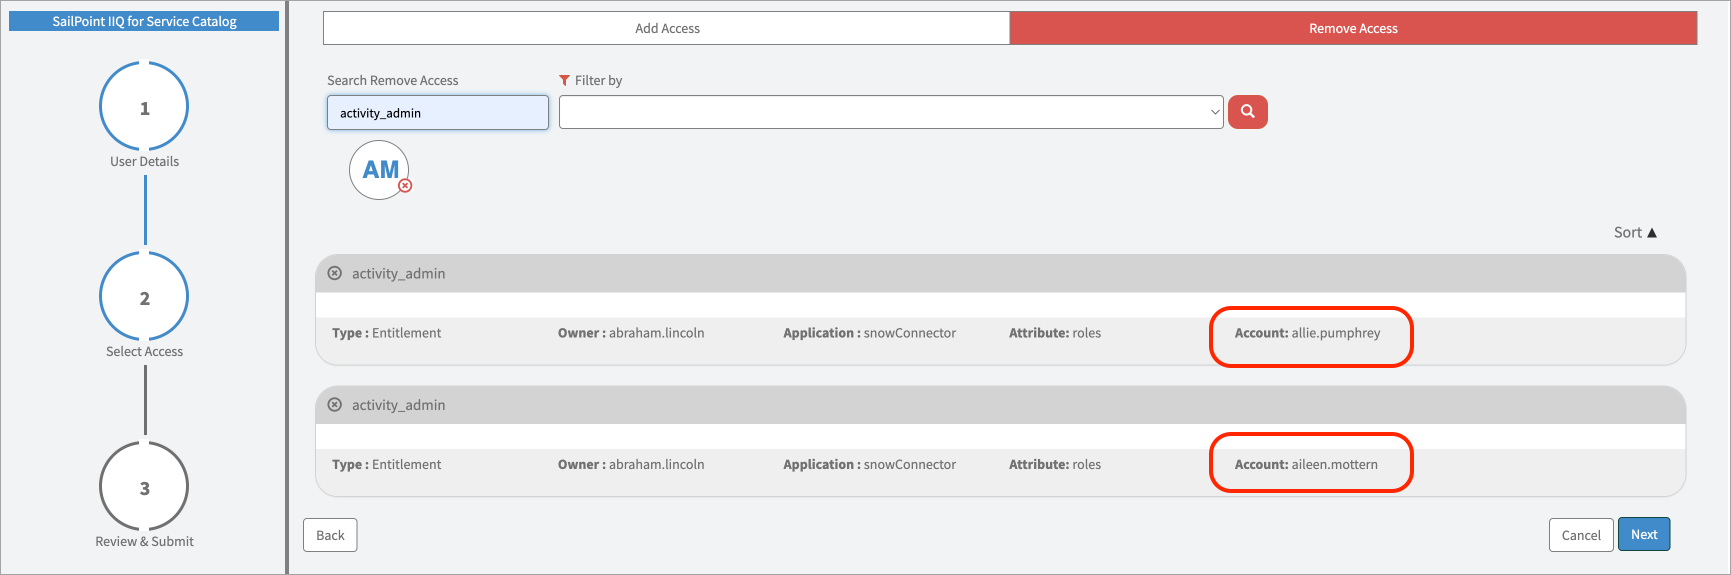
Select Remove Access to view the user’s current roles and entitlements.
-
Select Add Access to search for the roles and entitlements you want to request.
Note
If you’ve selected more than one user, the Add Access and Remove Access options are not available. Instead, search for the roles and entitlements you want to add.-
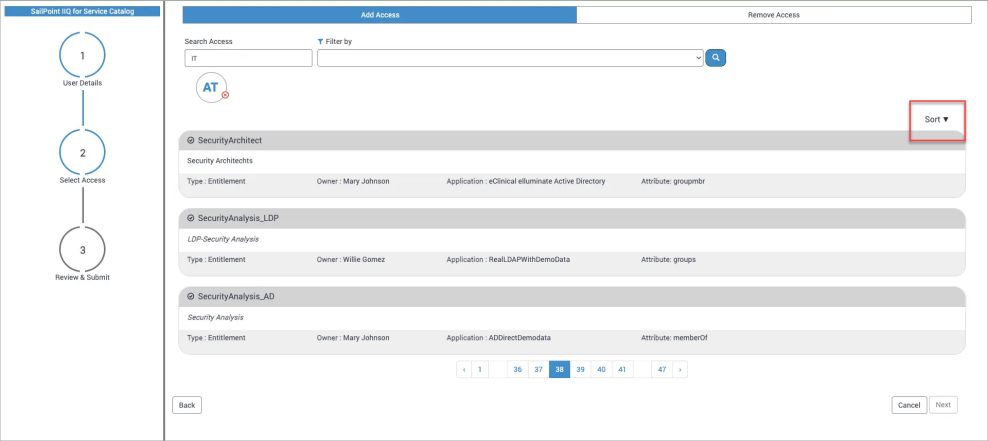
As part of the upgrades made to the IdentityIQ application in its 3.0 version, users have the ability to sort the records in ascending or descending order of the name. This is available in both the “Add Access” and “Remove Access” tabs of the application.
-
Select the little arrow icon next to the Sort label to change the order as needed.
-
If search results list both Roles and Entitlements, both types will be sorted individually. Sorted Roles will be followed by sorted Entitlements. They will not be mixed. For example, Roles [a-z], Entitlements [a-z].
-
-
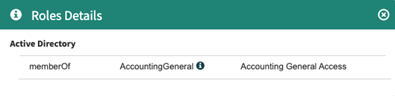
Select the Details link for the role to view the entitlements that comprise that role.
-
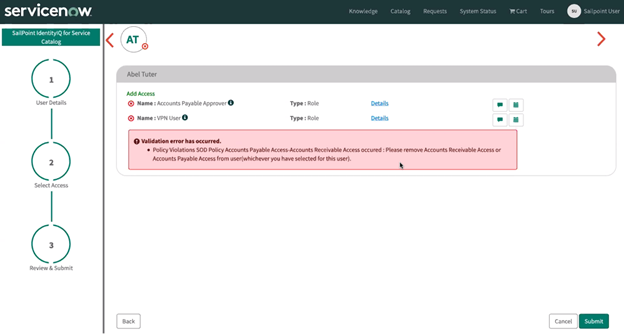
Select the role(s) and / or entitlement(s) that you want to request. Select Next to review the access request and determine whether access should be added or removed.
Note
In this example, the access request violates an existing Separation of Duties (SOD) policy. The validation error includes the step to take to remediate the violation. -
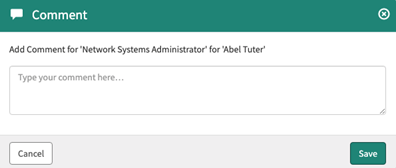
To assist the approver by including additional information they may find useful, select the message icon and add a comment to the request.
-
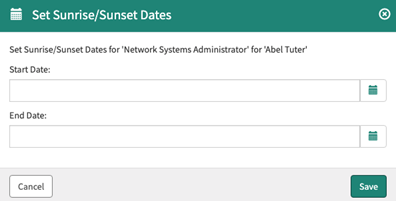
To specify start and end dates for access being requested, select the calendar icon and enter an appropriate timeframe. These dates will be used to trigger events to add (sunrise) and remove (sunset) access for the user.
Note
When removing access, you can only specify the date you want the access removed. This defers the removal until the sunset date is reached. -
When you're finished reviewing the access request and determining the access that’s appropriate for the user(s), select Submit. A single request listing all related items is generated and assigned a unique number for tracking purposes.
If a user has more than one associated account, enable the account selection pop-up in the ServiceNow UI. This allows the user, while requesting for self, to choose the specific account for which access is being requested.
-
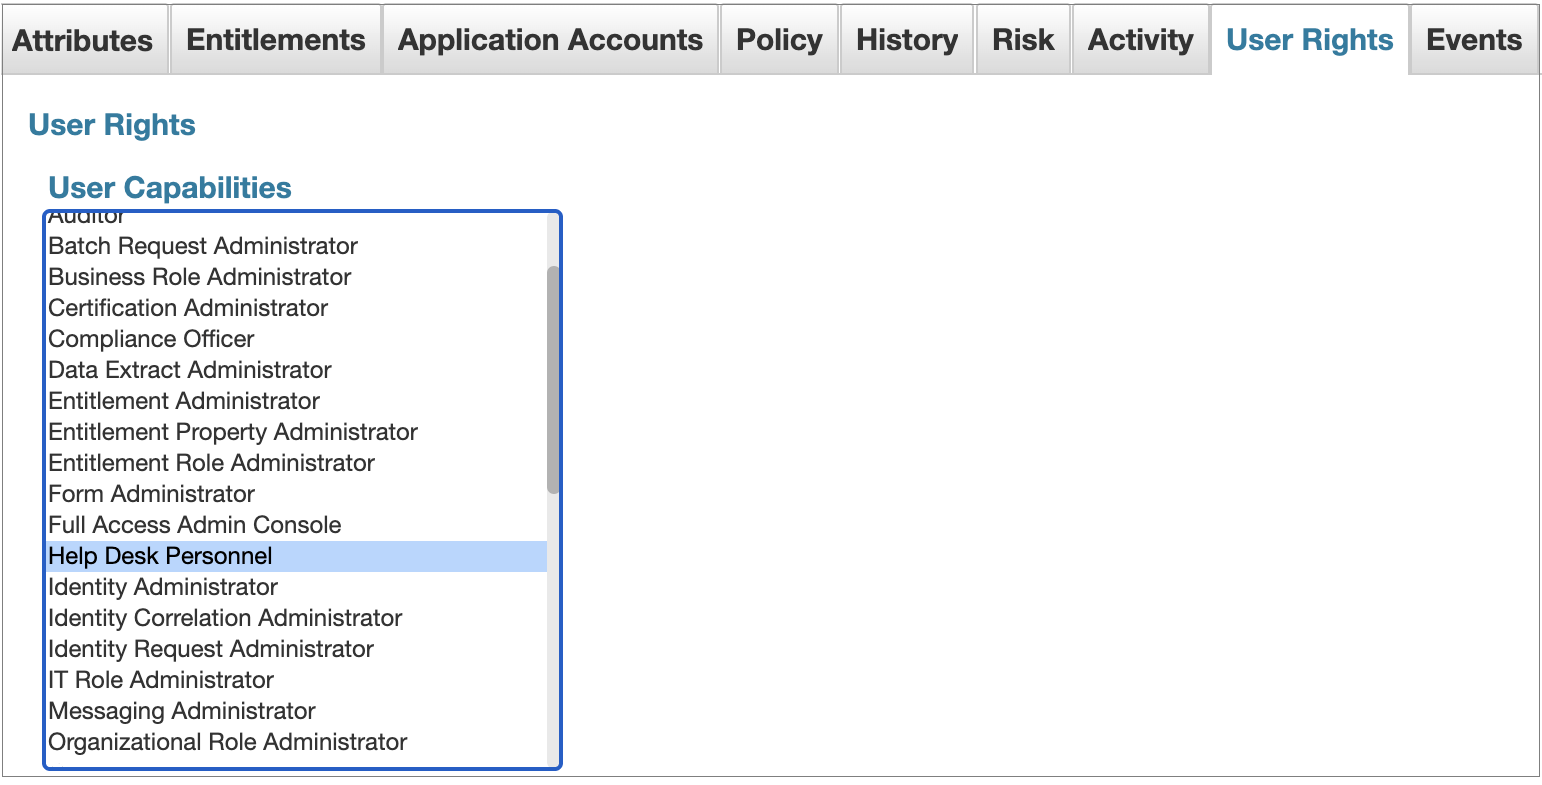
In IdentityIQ, select a user with multiple accounts. Go to User Rights, and add the Help Desk Personnel capability.
-
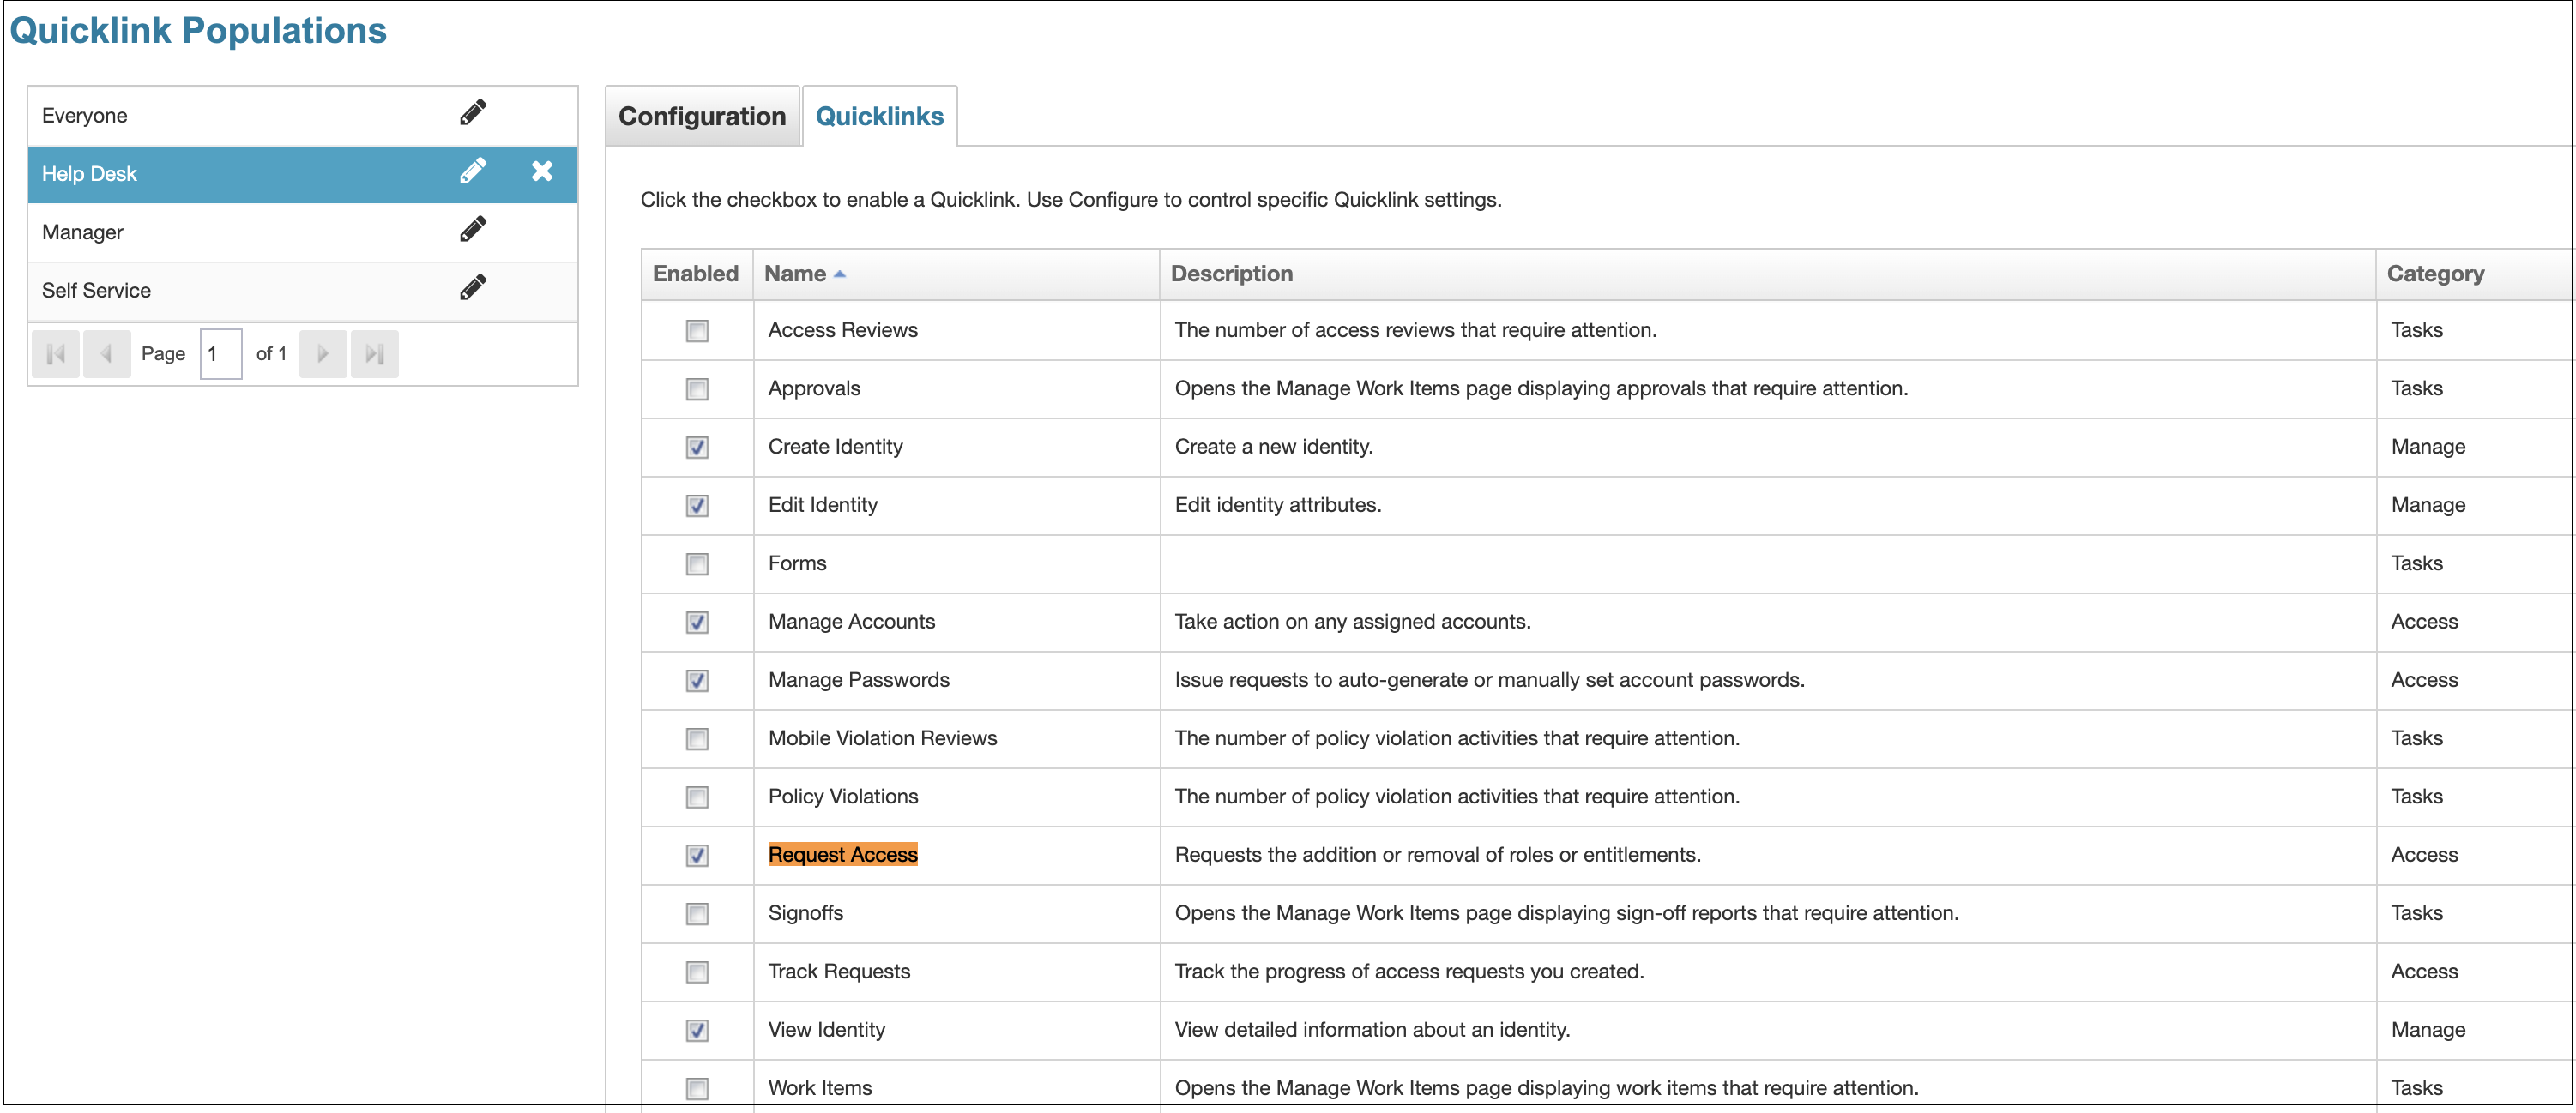
Go to Quicklinks > Quicklink Populations, and select Help Desk.
-
Find the Request Access Name, select the Enabled checkbox to enable it, and Save your changes.
Note
To extend this feature to users capable of requesting for others, provide appropriate additionalUser Capabilitiesunder User Rights to IdentityIQ ServiceNow Service Catalog Admin Setup. -
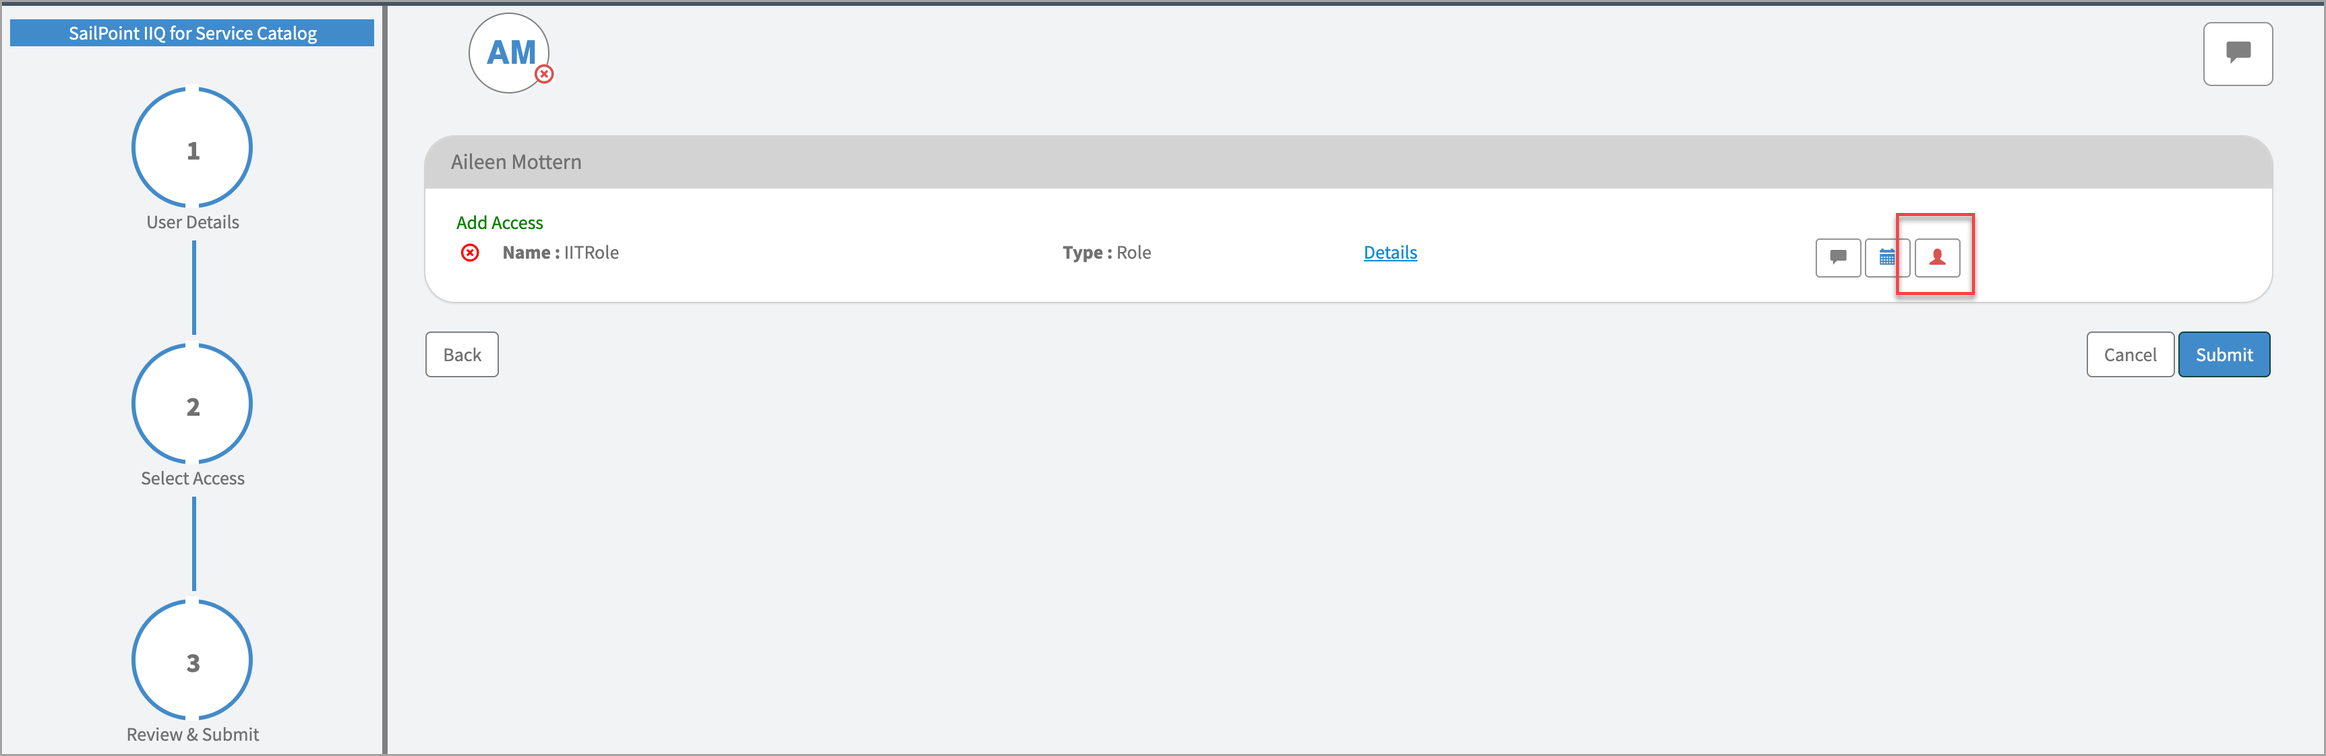
To configure the multi-account capability, select the account icon.
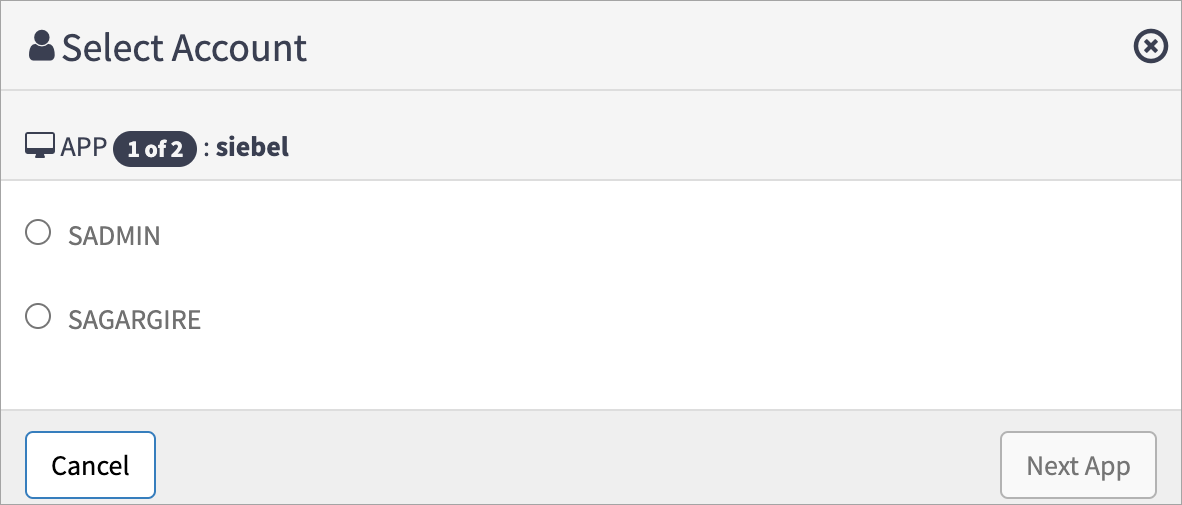
The following window appears:
-
Select the required account , and then select Next APP. When account selection for multiple sources is required, the Apply option will be enabled. Select Apply.
-
Select Submit.
Note
If removing access, the account name will be displayed along with other details on the access tile, where it can be used to select appropriate access for the removal request.

-
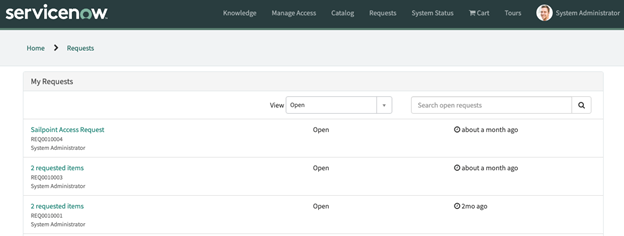
Select Requests in the main Service Portal menu (or use your traditional method for viewing requests).
-
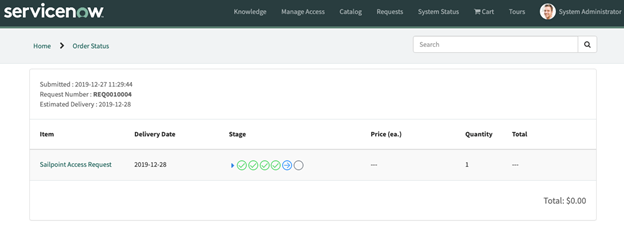
Select the request in the list.
-
Expand the small blue triangle in the Stage column to view addition details related to the workflow for the request.
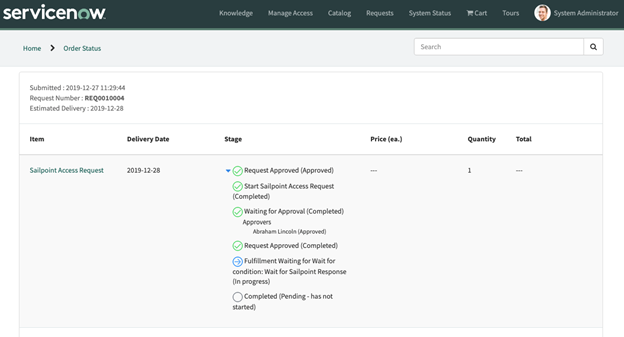
-
Depending on how Access Requests are configured for your site, the request will either be fulfilled automatically, or it will generate a request for manual approval.
-
If you’re a SailPoint IdentityIQ Admin, these requests will be displayed along with other requests in the Access Requests page in IdentityIQ.
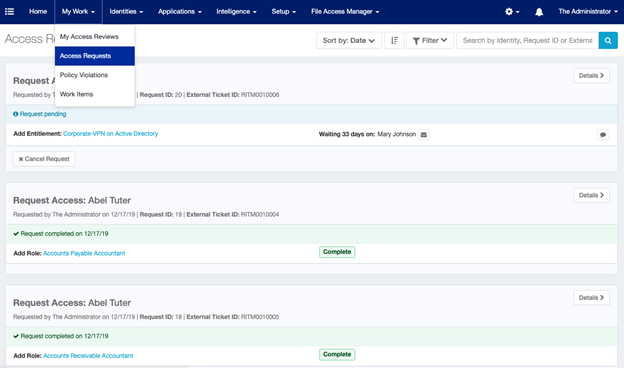
-
In addition to the typical Access Request ID, you’ll notice that each associated ticket also includes an External Ticket ID (in the form of a RITM number).
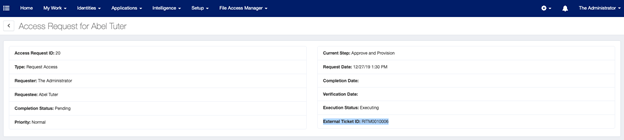
-
Additionally, in the Interactions section of the Access Request view, you’ll see that the Description identifies ServiceNow as the source of access requests initiated within ServiceNow, and provides a timestamped parent REQ number for each associated RITM.
The history of actions that occur in the ServiceNow RITM is sent to IdentityIQ as audit events.
The IdentityIQ administrator can view or create a report for all actions performed in the ServiceNow system.
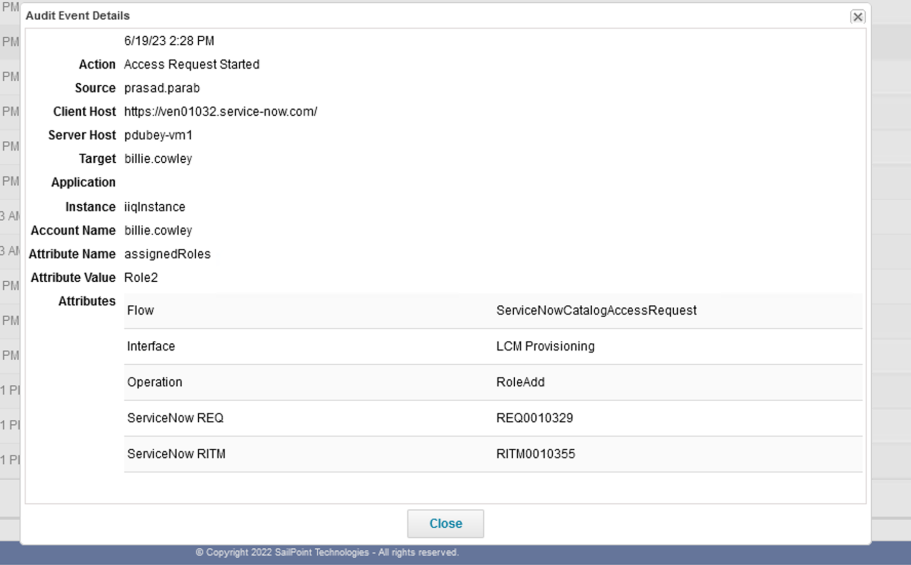
Create Access Request (Access Request Started)
When any access object is requested for the user from the ServiceNow service portal page, ServiceNow creates a Access Request in IdentityIQ. ServiceNow then pushes the Access Request Started audit event to IdentityIQ.
Schema for the Access Request Started audit event:
| Attribute | Value |
|---|---|
|
Action |
Access Request Started. |
|
Source |
The name of the identity who creates the access request. The identity of the requested by. |
|
Target |
The name of the identity for whom the access request is created. The identity of the requested for. |
|
Client Host |
The host name of the ServiceNow instance. |
|
Server Host |
The host name of the IdenityIQ server. |
|
Application |
The name of the application for which the requested entitlement belongs to. Empty in the case of roles. |
|
Account Name |
The name of the Identity for whom the access request is created. The identity of the requested for. |
|
Attribute Name |
The name of the entitlement type in the case of entitlement, or the assigned roles in the case of role. |
|
Attribute value |
The name of the requested access object. |
|
Interface |
ServiceNow Service Catalog. |
|
Attributes |
|
|
Interface |
The name of the LCM workflow configured in ServiceNow. |
|
Flow |
ServiceNowCatalogAccessRequest. |
|
Operation |
RoleAdd / RoleRemove / EntitlementAdd / EntitlementRemove. |
|
ServiceNow REQ |
The ServiceNow REQ number. |
|
ServiceNow RITM |
The ServiceNow RITM number. |
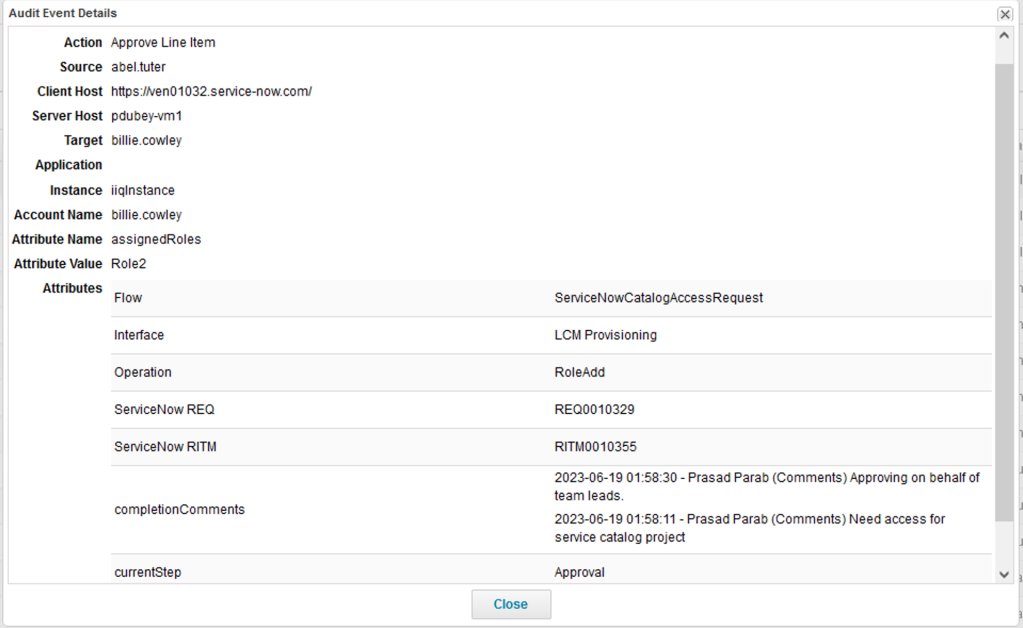
Approvals (Approve Line Item)
When a ServiceNow side approval (configurable approvals) is configured in the ServiceNow catalog application, they are completed first, when the user requests any access object . Once all ServiceNow approvals are completed, only then will theServiceNow Catalog application create an access request in IdenityIQ. After creating an access request in IdentityIQ, ServiceNow publishes all of the approval history that took place in ServiceNow.
There can be multiple approval events if multiple approvers are configured in ServiceNow.
Schema for the Approve Line Item audit event:
|
Attribute |
Value |
|---|---|
|
Action |
Approve the line item. |
|
Source |
The name of the identity who approves the request in ServiceNow. The identity name for the approver. |
|
Target |
The name of the identity for whom the access request is created. The identity of the requested for. |
|
Client Host |
The host name of the ServiceNow instance. |
|
Server Host |
The host name of the IdenityIQ server. |
|
Application |
The name of the application for which the requested entitlement belongs to. Empty in the case of roles. |
|
Account Name |
The name of the identity for whom the access request is created. The identity of the requested for. |
|
Attribute Name |
The name of the entitlement type in the case of entitlement, or the assigned roles in the case of the role. |
|
Attribute value |
The name of the requested access object. |
|
Interface |
ServiceNow Service Catalog. |
|
Attributes |
|
|
Interface |
The name of an LCM workflow configured in ServiceNow. |
|
Flow |
ServiceNowCatalogAccessRequest. |
|
Operation |
RoleAdd / RoleRemove / EntitlementAdd / EntitlementRemove. |
|
ServiceNow REQ |
The ServiceNow REQ Number. |
|
ServiceNow RITM |
The ServiceNow RITM Number. |
|
completionComments |
All comments on the approval item in ServiceNow. |
|
currentStep |
Approval. |
|
requester |
The name of the identity who creates the access request. The identity for the requested by. |
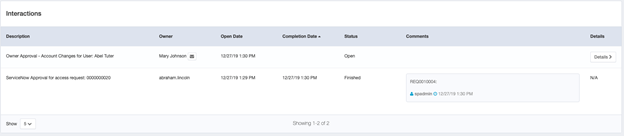
The details of the approvals that took place on the ServiceNow side will be displayed under the interaction section of the access request in the IdentityIQ UI. For example,
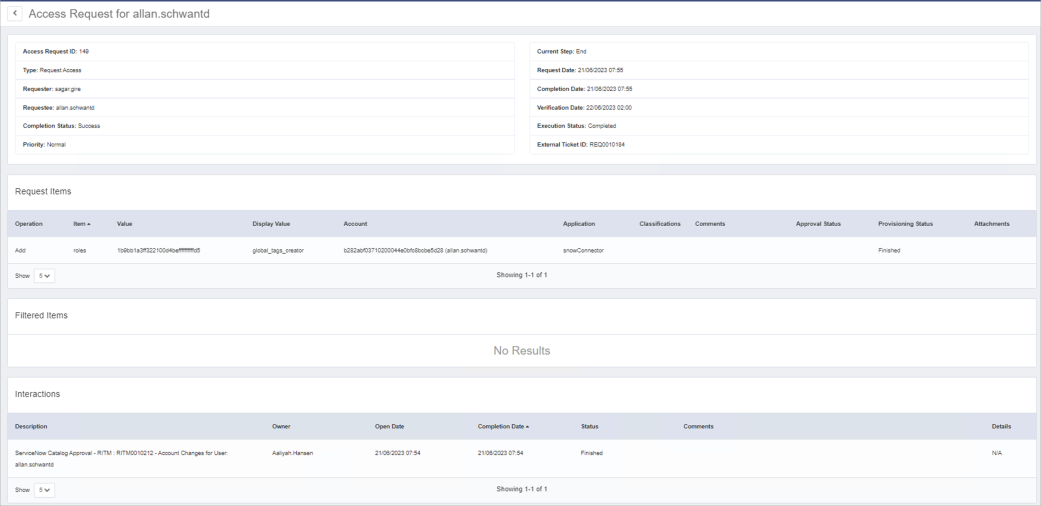
The following details are recorded in the interaction:

Description: The description of the approval with the RITM from ServiceNow.
Owner: The approver of the request
Open Date: The date the approval is opened in ServiceNow
Completion Date: The date the approval is completed in ServiceNow
Status: The status of the approval
Comments: All comments added on the RITM by the approver in ServiceNow. The date and time in the comment text shows when that particular comment was added in ServiceNow. The date and time in the footer of the comment shows the date and time that it was added in IdentityIQ.