Generating OAuth 2.0 Credentials
The following procedures outline how to generate the necessary OAuth 2.0 credentials.
Note
When generating client credentials and service account credentials, use a Google Workspace user who has permission to generate refresh tokens and the required roles or IAM roles to manage Google Workspace and GCP data. Refer to Prerequisites and Required Roles for Google Workspace and GCP Management.
Client Credentials
This section describes the procedures for generating the Client ID, Client Secret, and Refresh Token.
Generating a Client ID and Client Secret
- Go to Google Cloud Platform > APIs & Services > Credentials.
- From the project dropdown list, select an existing project or create a new one.
- On the Credentials page, select Create Credentials > OAuth Client ID.
- If prompted with a Consent page, select the application type as Internal, enter the application name, and save it.
- Under Application type, select Web application.
- Enter an Application Name.
-
Under Authorized redirect URLs, add the following:
-
Select Create.
Note the Client ID and Client Secret displayed, as these are required for generating the refresh token.
Generating a Refresh Token
Note
Before proceeding, ensure you have generated the Client ID and Client Secret.
- Go to the OAuth2 Playground.
-
Select the gear icon in the upper right corner and select the Use your own OAuth credentials checkbox (if it is not already selected).
- Confirm that OAuth Flow is set to Server-side and Access type is set to Offline. This ensures that you get a refresh token and an access token.
- Enter the OAuth2 client ID and OAuth2 client secret you obtained in the previous step.
- In Step 1 - Select & authorize APIs, enter the required scopes in the text box at the bottom. Use a comma as a separator to add more than one scope.
Scope Purpose https://www.googleapis.com/auth/admin.directory.userUser Provisioning https://www.googleapis.com/auth/apps.groups.settingsGroup Settings API https://www.googleapis.com/auth/admin.directory.rolemanagementAll role management operations, including creating roles and role assignments https://www.googleapis.com/auth/admin.directory.rolemanagement.readonlyGetting and listing roles, privileges, and role assignments https://www.googleapis.com/auth/cloud-platformhttps://www.googleapis.com/auth/iamAccessing GCP-related data https://www.googleapis.com/auth/admin.directory.domainManaging a domain as an account type in GCP https://www.googleapis.com/auth/admin.datatransferData transfer before account deletion https://www.googleapis.com/auth/admin.directory.groupGroup Provisioning https://www.googleapis.com/auth/admin.reports.audit.readonlyAccount and Group Delta Aggregation -
When prompted, sign in to the account that you want to grant access to and select Allow.
Note
If a
redirect_uri_mismatcherror states that your changes might not have propagated, select Back and try selecting Authorize APIs again. -
On Step 2 - Exchange authorization code for tokens, verify that the Authorization code is displayed.
-
Select Exchange authorization code for tokens.
The Refresh token and Access token fields are displayed.
-
Copy the Refresh token into the configuration file for the client library with the Client ID and Client Secret.
Service Account
Note
SailPoint's Cloud Infrastructure Entitlement Management (CIEM) only supports Service Account as a grant type.
A Service Account belongs to the application. Create a service account for the project in the API Console, delegate domain-wide access to the service account, and add the required scopes in the admin console against the service account Client ID.
Creating a Service Account and Generating a Private Key
- Sign in to the Google Cloud Platform Console using a user who has the permissions required to generate the private key and manage Google Workspace and GCP data.
- Go to Service Accounts.
- Select an existing project or create a new project.
- Select Create service account.
- Enter a name and description for the service account. For example, enter
Project-Service Account. - Select Done.
- Select the email address of the newly created service account.
- Go to Keys.
- Select Add key > Create new key.
- Select JSON.
- Select Create. The private key downloads to the computer in JSON format.
- Select Close.
Adding Scopes to the Service Account
- Sign in to the Google Admin Console as a Super Admin user.
- Go to Menu > Security > Access and data control > API controls.
- Select Manage Domain Wide Delegation.
- Select Add new.
- Enter the service account client ID. The client ID, also called the Unique ID, is the
client_idin the downloaded JSON file, for example,"client_id":"102996919678308170059". You can also find it under IAM & Admin > Service accounts > [your service account]. -
In OAuth scopes, enter the required scopes. Use a comma as a separator to add more than one scope.
Scope Purpose https://www.googleapis.com/auth/admin.directory.groupGroup Provisioning https://www.googleapis.com/auth/admin.directory.userUser Provisioning https://www.googleapis.com/auth/apps.groups.settingsGroup Settings API https://www.googleapis.com/auth/admin.directory.rolemanagementAll role management operations, including creating roles and role assignments https://www.googleapis.com/auth/admin.directory.rolemanagement.readonlyGetting and listing roles, privileges, and role assignments https://www.googleapis.com/auth/gmail.settings.sharingGmail API provisioning https://www.googleapis.com/auth/cloud-platformhttps://www.googleapis.com/auth/iamAccessing GCP-related data https://www.googleapis.com/auth/gmail.settings.basichttps://mail.google.com/https://www.googleapis.com/auth/gmail.modifyhttps://www.googleapis.com/auth/gmail.readonlyGmail API aggregation https://www.googleapis.com/auth/admin.directory.domainManaging a domain as an account type in GCP https://www.googleapis.com/auth/admin.datatransferData transfer before account deletion https://www.googleapis.com/auth/admin.reports.audit.readonlyAccount and Group Delta Aggregation -
Select Authorize.
Note
If an error displays, the client ID might not be registered with Google or the scopes might contain duplicates or unsupported values.
-
Select the new Client ID.
- Select View details and verify that each scope is listed.
- If a scope is missing, select Edit, enter the missing scope, and select Authorize. You can't edit the client ID.
The application should be available within minutes, but availability can take up to 24 hours.
Assigning Scopes to the Service Account
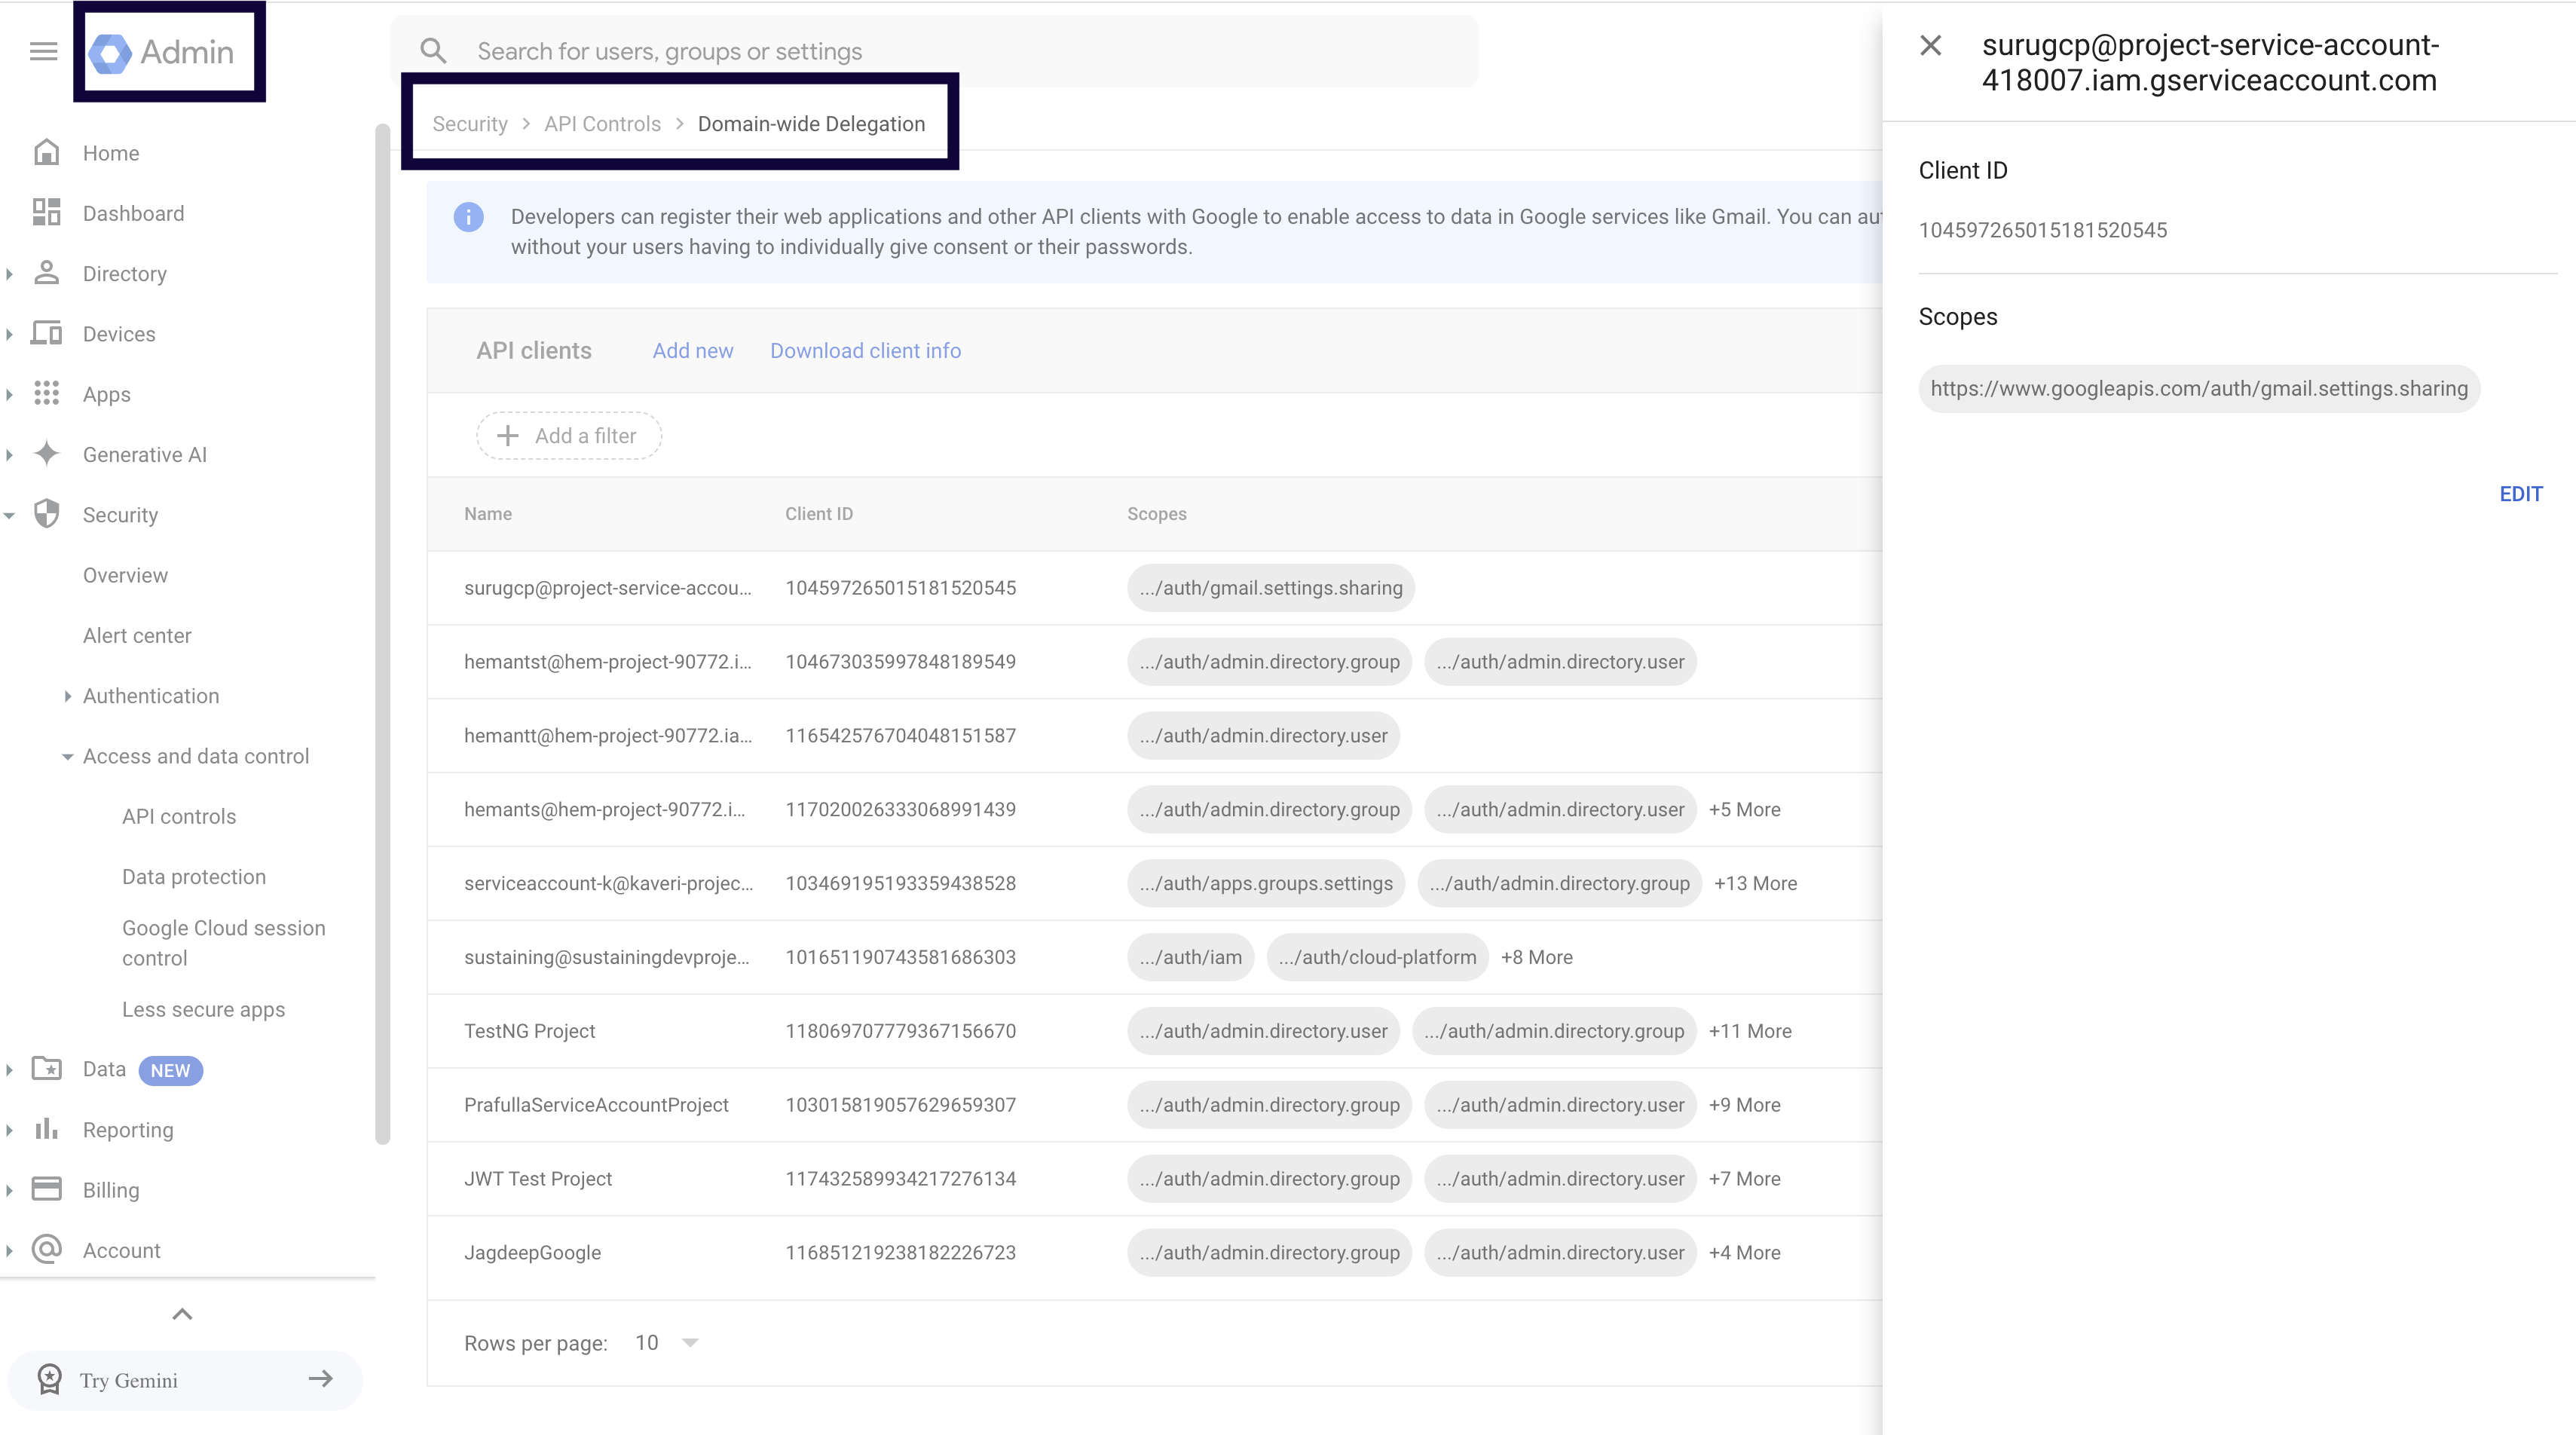
- Go to Google Admin.
- Go to Security > Access and Data Control > API controls.
- Select Manage Domain Wide Delegation.
- Select the service account and assign the applicable scopes documented in this guide.
Converting a Service Account Private Key to RSA Format
- Open the downloaded JSON file.
-
Copy the private key value into a new file.
For example:
-----BEGIN PRIVATE KEY-----\nMIIEvQIBADANBgkqhkiG9w0BAQEFAASCBKcwggSjAgEAAoIBAQDVAm/9T1/yBO2Z\nCCUn9xJbaoFloMUQcQyc7Xd2snXeKSWXGNMmHFPOMTXT4KNCMsxfGPXeHixYcgpu\nPGok/bqJjY9rWncYh8/UUy3gox4fr+J21rj4qCZ5gvOItF7oVKfjk/E4SQrSRvAp\nAc08W3u8vjNAmFoTBeUyEoKuHqCp48N5Gg3pM6htLXMrf2+q+wcv8IwtWAhopoG3\n8XpjAh4+/bff/gkfFoDdIFYwo3IJ5qlU9xawmbZzy3R+8eZTM2WFAkG75lWfX7id\nj87J32EiSe9etCyER9EtaKbxIKC/bww/JKcz3nIWweyXOAX4/tMDs8ThcsztBTa/\npseo4PI1AgMBAAECggEAEsdo+55OkV3lW4c4DV6vH9+TIlRK41DwIXqe/Fgt44Th\no0FFRjgbnFNC0Vfd1MV5No4TCP7EfpSpPkA1xGaZFizkfrymQMOiay/dHM+MpZMC\nRmNWQdfDMpW8pinurxFdjsb5bnKkEVc/L4JQ53gSP9jN2G1GDaTIqMIwgqzBEdER\nHpgrRv1l+MUrJRpyMyh5ZYApihEmFX4XDR2IYa3ZSMkBT4L6MdIcPURBrvVYdV+I\nXGvGWDhPvz/KcjfY7JD8JqVLqSIwgU851gewJJXKpekUS47aYo9Re91+0DB91ZnU\nWhmDmgorVCz90PM7WpKcW/0XkI45yPLWP3elBwsFKQKBgQD7XqKKGf0PChMNlWYV\n1SKEwiFzLipAHzEOJvhXD6v6vskbwqr/xS5j5SvWqpydow9pd2ExCcxmNtlwmpPX\nDXyRu8dmnaXUYCeYBFWheQ+NzlKd2N6wqE5aXrHdwW9xZRcHbyY+dKOv+gFAOQX+\nkakI4bvOcOernhnI6Fnhd94mCQKBgQDY7ukU6/6bVEahhdssakT+trcMOdhiHiPe\nGHaKYy1r3FpmdPmMLeJlECAOFfWqAB0DUiR9hGPXBSB2oIIICCQraQSFV1lu2R+k\nCaV7rFUrvx1b1yeOQDv34/MR6NdjbsjfhPmxSahWaBsvAyx88GRhh0ULgzesEqqk\nZ19PMV/VzQKBgQDrjkU2sR/pRgGQyx28+9u7GMiLzQkeyZwIrRAvVapN8Rc4gnYH\n9NmCFzG7mmnldvZsWMilUY9PgbrFwLUl46eGUbeMO9M4b1rrI7Sy+mVO97eH38Df\nPvkdyntXWXt7gcXQ26G1CUyTDe66JjWt1wXWIuMBk+AlfKShFsuTc+ajMQKBgFNB\nXbLp3409it3ywWsKXfBjr1zB1onRh3J1cQkrhwMeTpOD0UI7WefviF3fj6ju4jOk\nEt0ZMjgTf6IHd+AdP8RpSZLjMy+XpM0P5rLQMN/ZOStGJ6gwftNkaKU293Lx0aX3\nIt0np7OBwO0KCsjoeZ30jEse0P75KwRtp+Z8zIsBAoGAN47TexfJtaEK+ZQBoIn0\nh0mqV1si1QkPfMHSDvriKQ5d5tG8kF0vPVKAQV5kgytBeI+3bEO1iZC8i2FJzL7x\neN8ifRCcNXDRXjRdR0oPVIHImQ0XXwTB6JQmzVIFLWgxddDhZKpCQlA8GSRsbqEe\njtbTjDN0f5sX9llpKxd9xXw=\n-----END PRIVATE KEY-----\n -
Replace each literal
\nwith a line break. In private key syntax,\ndenotes a new line. You can make this change in most text editors.For example, in Notepad++, replace each
\\nwith\n.The following is an example of the converted key:
-----BEGIN PRIVATE KEY----- MIIEvQIBADANBgkqhkiG9w0BAQEFAASCBKcwggSjAgEAAoIBAQDVAm/9T1/yBO2ZCCUn9xJbaoFloMUQcQyc7Xd2snXeKSWXGNMmHFPOMTXT4KNCMsxfGPXeHixYcgpuPGok/bqJjY9rWncYh8/UUy3gox4fr+J21rj4qCZ5gvOItF7oVKfjk/E4SQrSRvApAc08W3u8vjNAmFoTBeUyEoKuHqCp48N5Gg3pM6htLXMrf2+q+wcv8IwtWAhopoG38XpjAh4+/bff/gkfFoDdIFYwo3IJ5qlU9xawmbZzy3R+8eZTM2WFAkG75lWfX7idj87J32EiSe9etCyER9EtaKbxIKC/bww/JKcz3nIWweyXOAX4/tMDs8ThcsztBTa/pseo4PI1AgMBAAECggEAEsdo+55OkV3lW4c4DV6vH9+TIlRK41DwIXqe/Fgt44Tho0FFRjgbnFNC0Vfd1MV5No4TCP7EfpSpPkA1xGaZFizkfrymQMOiay/dHM+MpZMCRmNWQdfDMpW8pinurxFdjsb5bnKkEVc/L4JQ53gSP9jN2G1GDaTIqMIwgqzBEdERHpgrRv1l+MUrJRpyMyh5ZYApihEmFX4XDR2IYa3ZSMkBT4L6MdIcPURBrvVYdV+IXGvGWDhPvz/KcjfY7JD8JqVLqSIwgU851gewJJXKpekUS47aYo9Re91+0DB91ZnUWhmDmgorVCz90PM7WpKcW/0XkI45yPLWP3elBwsFKQKBgQD7XqKKGf0PChMNlWYV1SKEwiFzLipAHzEOJvhXD6v6vskbwqr/xS5j5SvWqpydow9pd2ExCcxmNtlwmpPXDXyRu8dmnaXUYCeYBFWheQ+NzlKd2N6wqE5aXrHdwW9xZRcHbyY+dKOv+gFAOQX+kakI4bvOcOernhnI6Fnhd94mCQKBgQDY7ukU6/6bVEahhdssakT+trcMOdhiHiPeGHaKYy1r3FpmdPmMLeJlECAOFfWqAB0DUiR9hGPXBSB2oIIICCQraQSFV1lu2R+kCaV7rFUrvx1b1yeOQDv34/MR6NdjbsjfhPmxSahWaBsvAyx88GRhh0ULgzesEqqkZ19PMV/VzQKBgQDrjkU2sR/pRgGQyx28+9u7GMiLzQkeyZwIrRAvVapN8Rc4gnYH9NmCFzG7mmnldvZsWMilUY9PgbrFwLUl46eGUbeMO9M4b1rrI7Sy+mVO97eH38DfPvkdyntXWXt7gcXQ26G1CUyTDe66JjWt1wXWIuMBk+AlfKShFsuTc+ajMQKBgFNB XbLp3409it3ywWsKXfBjr1zB1onRh3J1cQkrhwMeTpOD0UI7WefviF3fj6ju4jOkEt0ZMjgTf6IHd+AdP8RpSZLjMy+XpM0P5rLQMN/ZOStGJ6gwftNkaKU293Lx0aX3It0np7OBwO0KCsjoeZ30jEse0P75KwRtp+Z8zIsBAoGAN47TexfJtaEK+ZQBoIn0h0mqV1si1QkPfMHSDvriKQ5d5tG8kF0vPVKAQV5kgytBeI+3bEO1iZC8i2FJzL7xeN8ifRCcNXDRXjRdR0oPVIHImQ0XXwTB6JQmzVIFLWgxddDhZKpCQlA8GSRsbqEejtbTjDN0f5sX9llpKxd9xXw= -----END PRIVATE KEY----- -
Save the converted private key in a new file.
- Download and extract the latest version of OpenSSL.
-
From the OpenSSL
binfolder, run one of the following commands:For example:
Or:
For example:
-
Enter the PEM passphrase.
- Confirm the passphrase.
Note
Use the generated RSA-format private key and the passphrase as the private key and private key password in the connector configuration.
Documentation Feedback
Feedback is provided as an informational resource only and does not form part of SailPoint’s official product documentation. SailPoint does not warrant or make any guarantees about the feedback (including without limitation as to its accuracy, relevance, or reliability). All feedback is subject to the terms set forth at https://developer.sailpoint.com/discuss/tos.