Configuring HashiCorp Vault (On-Premise)
Base Configuration
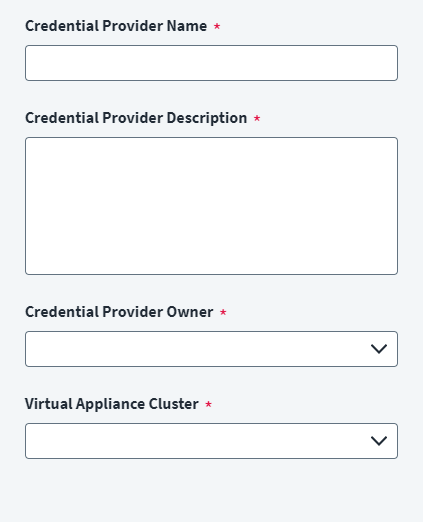
Provide the base configuration parameters. Information you entered during the initial creation of the credential provider is automatically entered into the fields in the Base Configuration page. You can edit this information if necessary.
Screenshot
Note
Ensure that the name and description of each credential provider is unique.
- Go to Admin > Connections > Credential Providers.
- Search for the credential provider you want to edit.
- Enter a unique Credential Provider Name.
- Enter a Credential Provider Description that provides details necessary to distinguish it from similar credential providers.
- Select a Credential Provider Owner by typing the owner's name into the field provided. Matches display after you type at least two letters. Select the credential provider owner as required.
- Select a Virtual Appliance Cluster with connectivity to the credential provider. For more information about configuring and deploying virtual appliances, refer to the Virtual Appliance Reference Guide.
- Select Save.
Connection Settings
Configure the authentication parameters to connect to and authenticate with the HashiCorp Vault (On-Premise) host.
Screenshot
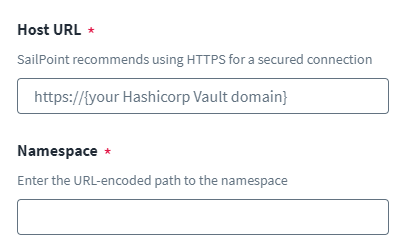
- Enter the Host URL for the HashiCorp Vault (On-Premise) secret server.
-
Enter the URL-encoded Namespace path to use for the HashiCorp Vault (On-Premise) secret server.
Important
Don't encode the last slash (
/) in your Namespace. For example, if your Namespace isxyz/pqr abcd/, then encode onlyxyz/pqr abcd.Tip
Use urlencoder.org to encode your URL attributes.
-
Under Authentication Type, select either Userpass, AppRole, or JWT. Then, enter the supporting information required to complete the authentication. Select one of the following to complete the authentication setup:
Userpass
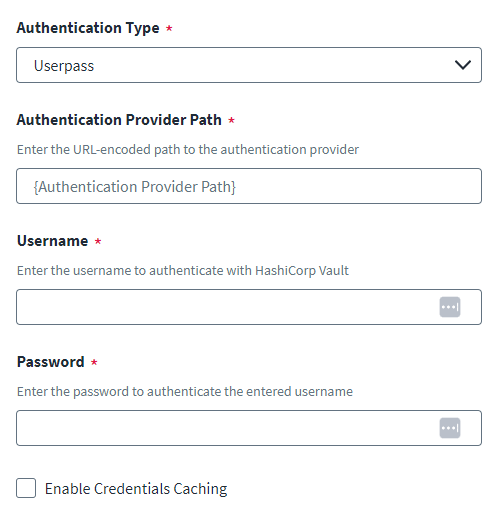
Configure userpass authentication to complete the connection setup.
Screenshot
- In the HashiCorp Vault (On-Premise) server, enable the Userpass authentication method and add the required users in it. The users should have permission to fetch the secrets.
-
In SailPoint, enter the configuration parameters to use the HashiCorp Userpass authentication.
-
Enter the URL-encoded Authentication Provider Path used to authenticate with the HashiCorp Vault (On-Premise) secret server.
Important
Don't encode the last slash (
/) in your Authentication Provider path. For example, if your Authentication Provider path isxyz/pqr abcd/, then encode onlyxyz/pqr abcd.Tip
Use urlencoder.org to encode your URL attributes.
-
Enter the Username and Password to authenticate with HashiCorp Vault (On-Premise).
- (Optional) Enable credential caching. For more information, refer to Caching Credentials.
- Select Save.
-
AppRole
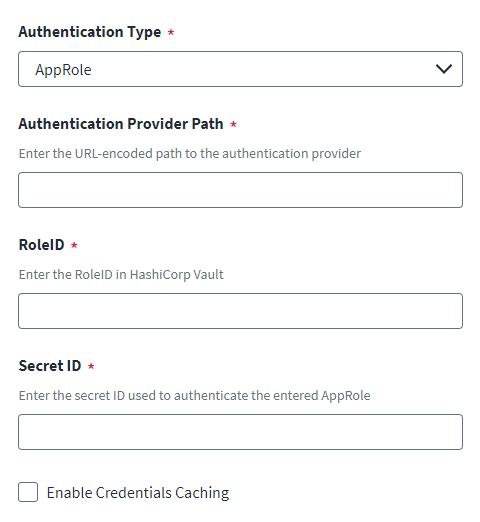
Configure AppRole authentication to complete the connection setup.
Note
The linked documents on this page are not maintained by SailPoint and are subject to change without notice.
Screenshot
-
Do the following in the HashiCorp Vault (On-Premise) server to configure the authentication role:
-
Enable the AppRole authentication using the following command:
-
Create a new role for the AppRole authentication method using the HashiCorp API. Be sure to add the required policies for AppRole to access the secrets. For more information, refer to Create/Update AppRole in the HashiCorp documentation.
- Read the role ID for the new role using the HashiCorp API. For more information, refer to Read AppRole role ID in the HashiCorp documentation.
-
Create a secret ID for the new role using the HashiCorp API. For more information, refer to Generate new secret ID in the HashiCorp documentation.
Important
While creating the secret ID, keep the values for
num_usesandttlset to0.
-
-
In SailPoint, enter the configuration parameters to use the HashiCorp AppRole authentication.
-
Enter the URL-encoded Authentication Provider Path used to authenticate with the HashiCorp Vault (On-Premise) secret server.
Important
Don't encode the last slash (
/) in your Authentication Provider path. For example, if your Authentication Provider path isxyz/pqr abcd/, then encode onlyxyz/pqr abcd.Tip
Use urlencoder.org to encode your URL attributes.
-
Enter the Role ID and its Secret ID created in the HashiCorp Vault (On-Premise) server.
- (Optional) Enable credential caching. For more information, refer to Caching Credentials.
- Select Save.
-
JWT
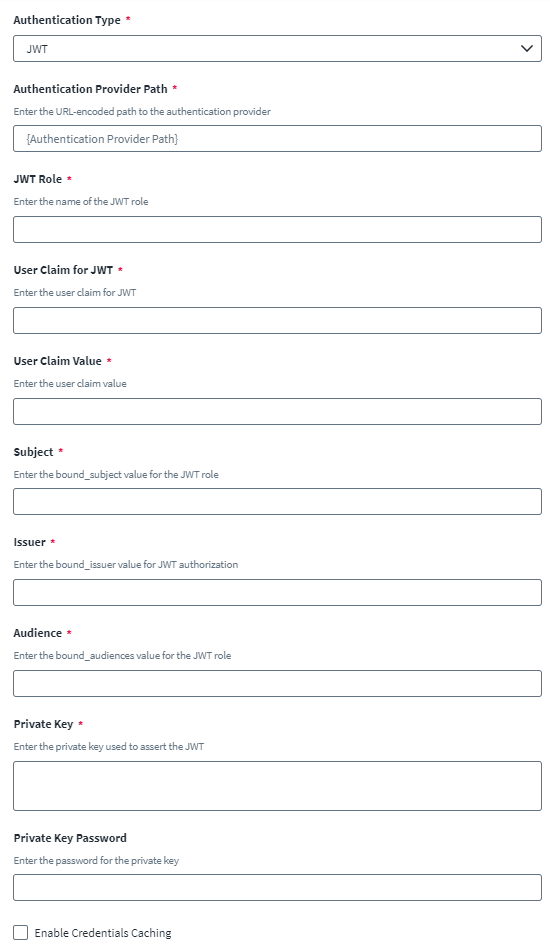
Configure JWT authentication to complete the connection setup.
Note
The linked documents on this page are not maintained by SailPoint and are subject to change without notice.
Screenshot
-
Do the following in the HashiCorp Vault (On-Premise) server to configure JWT authentication:
-
Enable JWT authentication using the HashiCorp API. For more information, refer to JWT/OIDC auth method (API) in the HashiCorp documentation. Provide the following while enabling JWT:
jwt_validation_pubkeys- Public key required for JWT.bound_issuer- Required issuer value.-
jwt_supported_algs-RS256.Note
RS256 is the only supported algorithm.
-
Create a role for JWT authentication using the HashiCorp API. For more information, refer to Create/Update role in the HashiCorp documentation. Provide the following values while configuring the role:
bound_subject- Required subject value for authentication.user_claim- Requireduserclaim.bound_audiences- Required value for theaudclaim.role_type-JWT.policies- Provide required policies to fetch the secrets.
- In SailPoint, enter the configuration parameters to use HashiCorp JWT authentication.
-
Enter the URL-encoded Authentication Provider Path used to authenticate with the HashiCorp Vault (On-Premise) secret server.
Important
Don't encode the last slash (
/) in your Authentication Provider path. For example, if your Authentication Provider path isxyz/pqr abcd/, then encode onlyxyz/pqr abcd.Tip
Use urlencoder.org to encode your URL attributes.
-
Enter the name of the JWT Role.
- Enter the User Claim for JWT.
- Enter the User Claim Value.
- In the Subject field, enter the
bound_subjectvalue for the JWT role. - In the Issuer field, enter the
bound_issuervalue for JWT authorization. - In the Audience field, enter the
bound_audiencesvalue for the JWT role. -
Enter the Private Key used to assert the JWT.
Note
The private key should be in standard PKCS #1 format. Currently, SailPoint doesn't support private keys in PKCS #8 format.
-
Enter the Private Key Password.
Note
This is only required if the private key is encrypted with a passphrase.
- (Optional) Enable credential caching. For more information, refer to Caching Credentials.
- Select Save.
-
Additional Settings
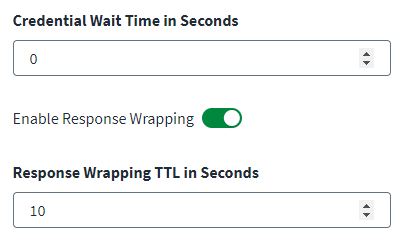
Configure settings related to how the connector handles dynamic secrets, as well as additional encryption for secrets while in transport.
Screenshot
Credential Wait Time
Some generated dynamic secrets may require additional time to activate at endpoint systems. These endpoint systems may include Microsoft Azure or Amazon Web Services, among others. To compensate for this additional time requirement, configure an additional wait time:
- In the Credential Wait Time in Seconds field, enter the duration the credential provider should wait in seconds. The default is 10 seconds and the maximum is 90 seconds. The recommended value should be greater than 10 seconds, though the value may vary for end system configurations.
- Select Save.
Response Wrapping
Response wrapping adds an extra layer of security to the secret information during transport processes. To use response wrapping:
- Select Enable Response Wrapping. The Response Wrapping TTL in Seconds field displays.
- In the Response Wrapping TTL in Seconds field, define the response wrapping time-to-live in seconds. The default value is 10 seconds. The minimum value is 10 seconds and the maximum value is 30 seconds.
- Select Save.
Documentation Feedback
Feedback is provided as an informational resource only and does not form part of SailPoint’s official product documentation. SailPoint does not warrant or make any guarantees about the feedback (including without limitation as to its accuracy, relevance, or reliability). All feedback is subject to the terms set forth at https://developer.sailpoint.com/discuss/tos.