Connection Settings
Configure authentication settings used to connect to the SQL server source.
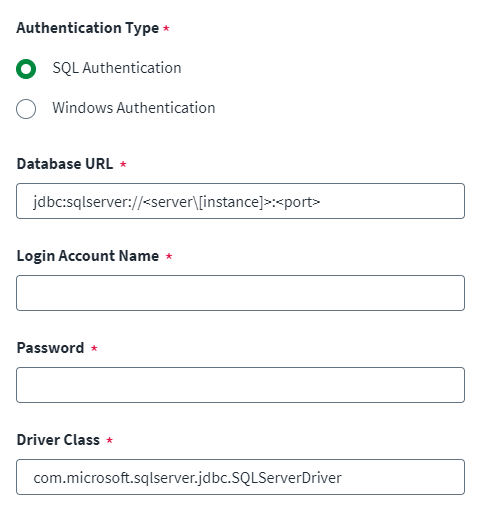
To configure a secured, direct connection:
-
Select an Authentication Type.
-
Based on your selected Authentication Type, enter a Database URL.
-
For SQL Authentication:
<jdbc:sqlserver://><[serverName][\instanceName][:portNumber]]
Consider the following for this URL:
-
jdbc:sqlserver– (Required) This is known as the sub-protocol and is constant. -
serverName– The address of the server or listener for clustered environments to which Identity Security Cloud should connect.This could be a DNS, IP address, localhost, or
127.0.0.1for the local computer. -
instanceName– The instance used to connect toserverName -
portNumber– The port used to connect toserverName
-
-
For Windows Authentication:
To properly support Windows authentication, the Virtual Appliance must be able to resolve the SQL server host, the key distribution center (KDC), and the default Kerberos realm. For more information about configuring Windows authentication, refer to Windows Authentication and Kerberos.
Important
To use Windows authentication, you must upload SQLJDBCDriver.config and krb5.config files. For more information, refer to Base Configuration or Upload Configuration Files.
Connections using Windows authentication are supported for JDBC drivers only.
jdbc:sqlserver://><[serverName[\instanceName][:portNumber]];integratedSecurity=true;authenticationScheme=JavaKerberos;trustServerCertificate=true;
Consider the following for this URL:
-
jdbc:sqlserver– (Required) This is known as the sub-protocol and is constant. -
serverName– The fully qualified domain name of the SQL server host machine.This is typically in the following format:
<hostname>.<domain_name>
For example, if the SQL server host is
MYSQLSERVERand the domain isEXAMPLE.COM, your entry would be as follows:MYSQLSERVER.EXAMPLE.COM
-
instanceName– The instance used to connect toserverName -
portNumber– The port used to connect toserverName
-
-
-
Enter the service account username into the Login Account Name field. The service account is the account that makes the connection to the Microsoft SQL server database.
If you are using Windows authentication, the service account should be in the following format, with
<name>as the username and<realm>as the domain name:<name>@<realm>
For example, if
useris the service account username, andEXAMPLE.COMis its domain, then the entry is as follows:user@EXAMPLE.COM
-
Enter the Password used to authenticate the service account.
If you are using Windows authentication, the password you enter is the password that authenticates the Active Directory user.
-
Enter the fully qualified name of the Driver Class supported by JDBC. For example, you can use the following:
com.microsoft.sqlserver.jdbc.SQLServerDriver
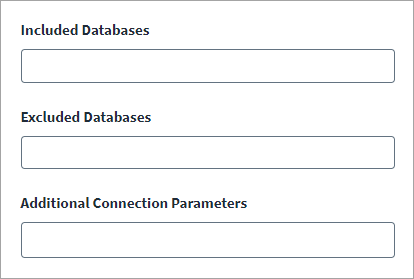
Database Connection Settings
Note
If you leave both the Included Databases and Excluded Databases fields blank, SailPoint aggregates all server accounts and users from all available databases, except orphan database users (databases users who are not linked with any server account) and databases users with only public roles.
-
In the Included Databases field, enter a comma-separated list of database names to be included in the aggregation operation. The Microsoft SWL server source supports database names with special characters during account aggregation.
-
In the Excluded Databases field, enter a comma-separated list of database names to be excluded in the aggregation operation. The Microsoft SWL server source supports database names with special characters during account aggregation.
Important
If the Include Databases field is configured, SailPoint ignores the Excluded Databases parameter. -
In the Additional Connection Parameters field, you can set up the additional parameters as per your requirements, in the form of a key-value pair. Press Enter to add each multiple key-value pair to a list that displays below the field.
-
Select Save.