Upgrade Considerations
Note
Any customizations done on SAP GRC before upgrading to IdentityIQ version 8.2, 8.1 Patch 3, or 8.0 Patch 5 are not reflected in SAP GRC after upgrading.
SAILPOINT Add-On to replace the use of RFC_READ_TABLE
Note
Go to the SAP GRC Workflows topic and in the Importing Integration Workflows task, complete step 2.
To support proactive check and SAP CUA integration in SAP GRC, import the Workflow_SAPGRC_Integration.xml file when upgrading to IdentityIQ version 8.2, 8.1 Patch 3, or 8.0 Patch 5.
If you are upgrading to IdentityIQ version 8.2, 8.1 Patch 3, or 8.0 Patch 5, perform the following changes:
-
SAP GRC Data Generator workflow to pass value of modified provisioning project.
For Invoke SAP GRC Request Executor add the following changes in the application debug page:
<Arg name="project" value="ref:project"/>
Add the following after all the
<arg>tags:<Return name="project" to="project"/>
-
For the SAP GRC Request Executor workflow, add a process variable project as follows:
Copy<Variable input="true" name="project">
<Description>
ProvisioningProject which is a compiled version of the ProvisioningPlan.
</Description>
</Variable>For updateGRCResponse, add the following changes in the application debug page:
<Arg name="project" value="ref:project"/>
Add the following after all the
<arg>tags:<Return name="project" to="project"/>
-
Go to the Process Designer and perform the following:
-
Right-click on the transition after the Start Step and edit the transition.
-
Remove both the transition statements present.
-
Right-click Start Step and perform the following:
-
Start the transition and end that transition on the Set Dates for SAP Roles step.
-
Save the changes.
-
-
-
Open the SAP GRC Data Generator workflow from the application debug page and perform the following:
-
Search for
<Step action="call:compileProvisioningProject" -
Under the <Step> tag, a list of <Arg> tags are found.
-
Search for
<Arg name="plan" value="ref:plan"/>and modify it as follows:<Arg name="plan" value="script:return project.getMasterPlan();"/>
-
Save the workflow.
-
Note
Before performing the upgrade procedure mentioned in this section, ensure that the steps mentioned in Creating Provisioning Workflows are performed.
Change the SAP GRC Data Generator as follows:
-
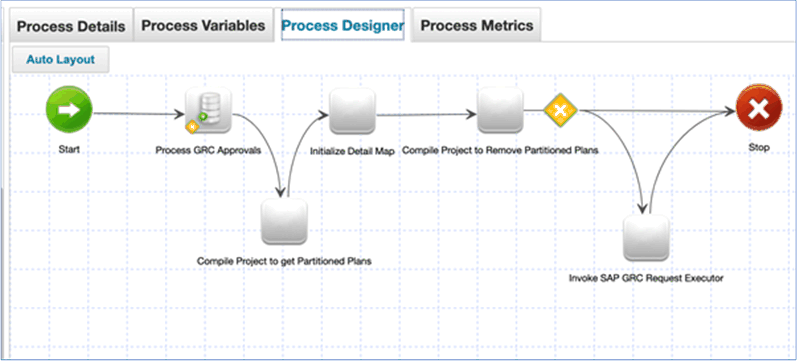
Go to Setup > Business Process > select SAP GRC Data Generator from Edit An Existing Process > Process Designer and select Add A Step and then select Generic.
-
Drag and drop the generic step (in Auto Layout) after the Process GRC Approvals step.
-
Select Save.
-
Right-click on generic and select Edit Step.
-
Provide the following values in the Details section:
-
Name: Compile Project to get Partitioned Plans
-
call method: compileProvisioningProject
-
result variable: project
Add the following new arguments under the Add A New Argument button:
-
identityName
-
plan
-
requester
-
ignoreStartDate
-
Enter the values as identityName, plan, requester respectively for Reference fields and save the changes.
Note
Ensure that you set the value forignoreStartDateas string true. -
-
Right-click Process GRC Approvals and perform the following:
-
Start the transition and end that transition on the Compile Project to get Partitioned Plans step.
-
Save the changes.
Right-click Compile Project to get to the Partitioned Plans step and perform the following:
-
Start the transition and end that transition on Initialize Detail Map step.
-
Save the changes.
-
-
-
Go to Process Designer > Add A Step > Generic.
-
Drag and drop the generic step (in Auto Layout) after the Initialize Detail Map step.
-
Select Save.
-
Right-click on generic and select Edit Step.
-
Provide the following values in the Details section:
-
Name: Compile Project to Remove Partitioned Plans
-
call method: compileProvisioningProject
-
result variable: project
Add the following new arguments under Add A New Argument button:
-
identityName
-
plan
-
requester
-
accountRequestSAPGRC
-
ignoreStartDate
Enter the values as identityName, plan, requester, accountRequestSAPGRC respectively for Reference fields and save the changes.
Note
Ensure that you set the value forignoreStartDateas string false. -
-
Right-click the Initialize Detail Map step and perform the following:
-
Delete the following transitions:
-
Between Process GRC Approvals and Initialize Detail Map.
-
Between Initialize Detail Map and Invoke SAP GRC Request Executor.
-
-
Start the transition and end that transition on Compile Project to Remove Partitioned Plans step.
-
Save the changes.
-
-
Go to the application debug page and select the workflow in object browser from the dropdown list and open the SAP GRC Data Generator workflow and perform following steps:
-
Search for the following Initialize Detail Map step:
<Step icon="Default" name="Initialize Detail Map" posX="317" posY="11" resultVariable="completeDetailMap">
Note
In the above step, posX="317" posY="11" is a variable.For the above step after all the
<Arg>tags add the following:<Arg name="roleDates" value="call:getBusinessRoleDates"/>
<Arg name="entitlementExpand" value="call:getBusinessRoleChckngCommonEntl"/>
<Return name="accountRequestSAPGRC" to="accountRequestSAPGRC"/>
Remove the following transition conditions for that particular step:
<Transition to="Stop">
.........
</Transition>
<Transition to="Invoke SAP GRC Request Executor"/>
Ensure that after the above deletion, only the following transition statement is present:
<Transition to="Compile Project to Remove Partitioned Plans"/>
-
Search for the following Compile Project to Remove Partitioned Plans step:
<Step action="compileProvisioningProject" icon="Default" name="Compile Project to Remove Partitioned Plans" posX="332" posY="240" resultVariable="project">
Note
In the above step, posX="332" posY="240" is a variable.For the above step after all the
<Arg>tags, add the following:<Return name="completeDetailMap" to="completeDetailMap"/>
Add the following transition statements:
Copy<Transition to="Stop">
<Script>
<Source>
<![CDATA[
import sailpoint.tools.Util;
List lineItemList = new ArrayList();
boolean flag = false;
lineItemList = completeDetailMap.get("requestLineItemMap");
if (Util.isEmpty(lineItemList)) {
flag = true;
}
else if (Util.isEmpty(accountRequestSAPGRC)) {
flag = true;
}
return flag;
]]>
</Source>
</Script>
</Transition>
<Transition to="Invoke SAP GRC Request Executor"/>
-
-
Perform the following changes in SAP GRC Data Generator workflow XML:
Code changes in SAP GRC Data Generator workflow
-
Go to Setup > Business Process > SAP GRC Data Generator > Process Designer.
-
Right-click Initialize Detail Map.
-
Select Edit Step.
-
Under the Details tab for Result Variable, the Java code is found in Source field under the Action section.
-
Perform the following changes in the Java code:
-
Search for "private static final String PROVISIONING_ITEM_TYPE_PRF = "PRF";" and add the following constants:
private static final String SUNRISE_DATE = "addDate";
private static final String SUNSET_DATE = "removeDate";
-
Go to the populateRequestItemMap() method and search for the following code snippet under the if(attrReq.getName().equals("Roles")) condition:
Copyif(roleNameObject instanceof String){
requestLineDataMap = new HashMap();
String roleName = (String)roleNameObjectAt the end of the above code snippet add the following code to support sunrise and sunset:
Copy…………
}
if (null != sapRoleDates.get(roleName + SUNRISE_DATE) || null != sapRoleDates.get(roleName + SUNSET_DATE)){
startDate = sapRoleDates.get(roleName + SUNRISE_DATE);endDate = sapRoleDates.get(roleName + SUNSET_DATE);
} -
Go to the populateRequestItemMap() method and search for the following code snippet under the if(attrReq.getName().equals("Roles")) condition:
Copyelse if(roleNameObject instanceof List) {
List roleList = (List)roleNameObject;
for(String role:roleList){At the end of the above code snippet add the following code to support sunrise and sunset:
Copy………………..
}
if (null != sapRoleDates.get(role + SUNRISE_DATE) || null != sapRoleDates.get(role + SUNSET_DATE)){
endDate = sapRoleDates.get(role + SUNSET_DATE);startDate = sapRoleDates.get(role + SUNRISE_DATE);
}
-
Perform changes in the SAP GRC Data Generator workflow XML through the application debug page:
-
Go to the application debug page and select Object as workflow from object browser dropdown list and open the SAP GRC Data Generator workflow.
-
Search for <Step icon="Default" name="Initialize Detail Map" …. and add the following argument:
<Arg name="sapRoleDates" value="call:getEffectiveStartDateEndDates"/>
The SAP GRC Data Generator Workflow is as follows:
-
-
Import the Rule Set Date SAP GRC Role Assignment rule from
examplerules.xmlfile.Note
Existing customization in the Rule Set Date SAP GRC Role Assignment rule is overwritten once the rule is imported. -
After all the above upgrade procedures are performed, ensure that the configurations mentioned are performed.
Perform the following steps to support partial provisioning:
-
Go to Application > SAP GRC (Application Type) > Enable Partial Provisioning.
-
Go to the application debug page and select object as Workflow, name as SAP GRC Request Executor, add the following variable and save it:
Copy<Variable input="true" name="project">
<Description>A ProvisioningProject object describing the modifications to the identity. This may include a list of Question objects which will cause the generation of a Form and a WorkItem to solicit additional information necessary for provisioning.</Description>
</Variable>Copy<Variable input="true" name="sapBusinessRoleMap">
<Description>The map containing an association of business role and entitlement and vice versa.</Description>
</Variable> -
In the same screen, select object as Workflow and name as SAP GRC Data Generator, add the following variable and save it:
Copy<Variable name="sapBusinessRoleMap" output="true">
<Description>A list of SAP Direct AccountRequest which are qualified for SAP GRC violation check.</Description>
</Variable> -
Go to Setup > Business Process and then select SAP GRC Data Generator from Edit An Existing Process > Process Designer and then edit the Initialize Detail Map step.
-
In the Initialize Detail Map step, go to Argument.
-
Add the new argument sapBusinessRoleMap, select the Call Method and add the value as getSAPBusinessRoles and then save the changes.
-
-
Go to Setup > Business Process and then select SAP GRC Data Generator from Edit An Existing Process > Process Designer and edit the Invoke SAP GRC Request Executor step.
-
In Invoke SAP GRC Request Executor step, go to Argument.
-
Add the value of project argument as project for Reference fields and save the changes.
-
Add the value of sapBusinessRoleMap argument as sapBusinessRoleMap for Reference fields and save the changes.
-
Go to the application debug page and select Workflow object as and perform the following steps:
-
Open Identity Request Provision workflow and add the following:
-
Workflow variables:
Copy<Variable name="endDate" output="true">
<Description>End date of the role assignment.</Description>
</Variable>
<Variable name="startDate" output="true">
<Description>Start date of the role assignment.</Description>
</Variable> -
Search for Provision with retries entry and add the following arguments to the existing list of arguments in <Step> with name Provision:
<Arg name="endDate" value="ref:endDate"/>
<Arg name="startDate" value="ref:startDate"/>
-
-
Open Provision with retries workflow and search for step name start, that is name="Start" and perform the following:
-
Modify the
<Transition to="Set Dates for SAP Roles" when="script:(endDate != null || startDate != null )"/>transition to<Transition to="Set Dates for SAP Roles"/>. -
Delete the following:
<Transition to="Initialize Retries"/>
-