Enrichment Connector Setup
- On the File Access Manager Administrative Client navigate to Applications > Configuration > Activity Monitoring > Data Enrichment Connectors.
- Click New.
-
Select Type: IdentityIQ.
-
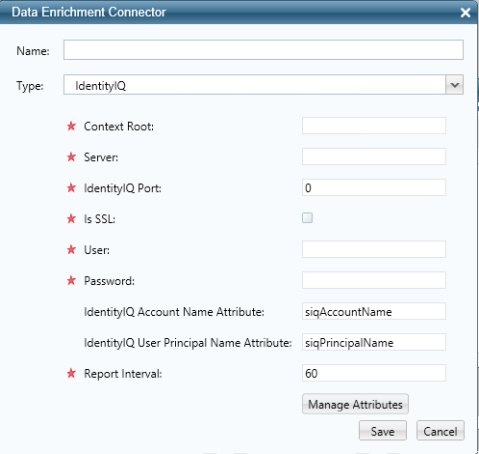
Complete the following IdentityIQ Enrichment connector fields as follows:
Name
The connector’s logical name.
Context Root
The IdentityIQ context root is part of the IdentityIQ address. The default context root when installing IdentityIQ is "IdentityIQ", as in the URL: http://localhost:8080/IdentityIQ
The context root can be changed from the default value during the IdentityIQ installation stage. If so, type in the updated value.
Server
The IdentityIQ server name.
Port
The IdentityIQ port.
Is SSL
Select if IdentityIQ uses SSL.
User/Password
The IdentityIQ credentials (from the account in Section IdentityIQ User for File Access Manager).
IdentityIQ Account Name Attribute: The Account Mapping attribute name (from the File Access Manager Account Name mapping created in section Setting Account Mappings ).
If the names are the same as those in this guide, the attribute will be siqAccountName.
IdentityIQ User Principal Name Attribute
Type the Principal Name Mapping attribute name, as defined in File Access Manager Principal Name mapping created in section Setting Account Mappings.
If the names are the same as those in this guide, the attribute will be siqPrincipalName.
Report Interval
Set the connector Health reporting interval (in seconds).
-
Click Manage Attributes.
This screen displays the attributes that can be fetched from the IdentityIQ Enrichmentconnector. Some are predefined attributes, while others are custom attributes (defined in IdentityIQ Identity Mappings).
The predefined attributes displayed the first time this screen is displayed are:
- userName
- capabilities
- displayName
- isManager
- active
Other attributes will be displayed after the predefined attributes, with the same Name and Display Name, and will be unmarked by default.
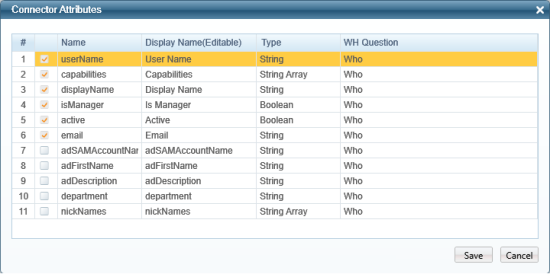
- Each marked attribute will be fetched from IdentityIQ and stored in each File Access Manager activity.
-
Mark an attribute to add it, or unmark an attribute to remove it.
Predefined attributes cannot be unmarked.
-
You can edit the display name of any attribute by clicking on it and typing a new Display Name.
- Click Save after editing the attributes.
- Click Save (again) to save the connector.