Assigning Source Accounts to Identities
Correlation is the process IdentityNow uses to match and assign source accounts to identities. IdentityNow's correlation configuration compares the values of specific account attributes with the values of related identity attributes. When IdentityNow finds matching values in an account attribute and an identity attribute, it assigns the account to the identity that has the matching value.
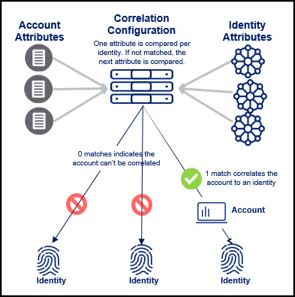
If IdentityNow is unable to match any account attributes to any identity attributes, the account is considered uncorrelated and is not assigned to any identities.
Configuring Account Correlation
Configure account correlation before you load, or aggregate, source accounts for the first time. Before you change the account correlation for a source that has already been aggregated, disable optimization on the source so that unchanged accounts can be reexamined for correlation.
Prerequisite: At least one identity profile already exists.
Use the Correlation Configuration panel on the Import Data tab to map, or pair, an identity attribute with an account attribute. A correlation configuration comprises a group of one or more attribute pairings.
To update a correlation configuration:
- Go to Admin > Connections > Sources and select the source to update.
-
Select the Import Data tab and then select Correlation from the left panel. If no correlation configurations exist for this source, the identity and account attribute fields will be empty.
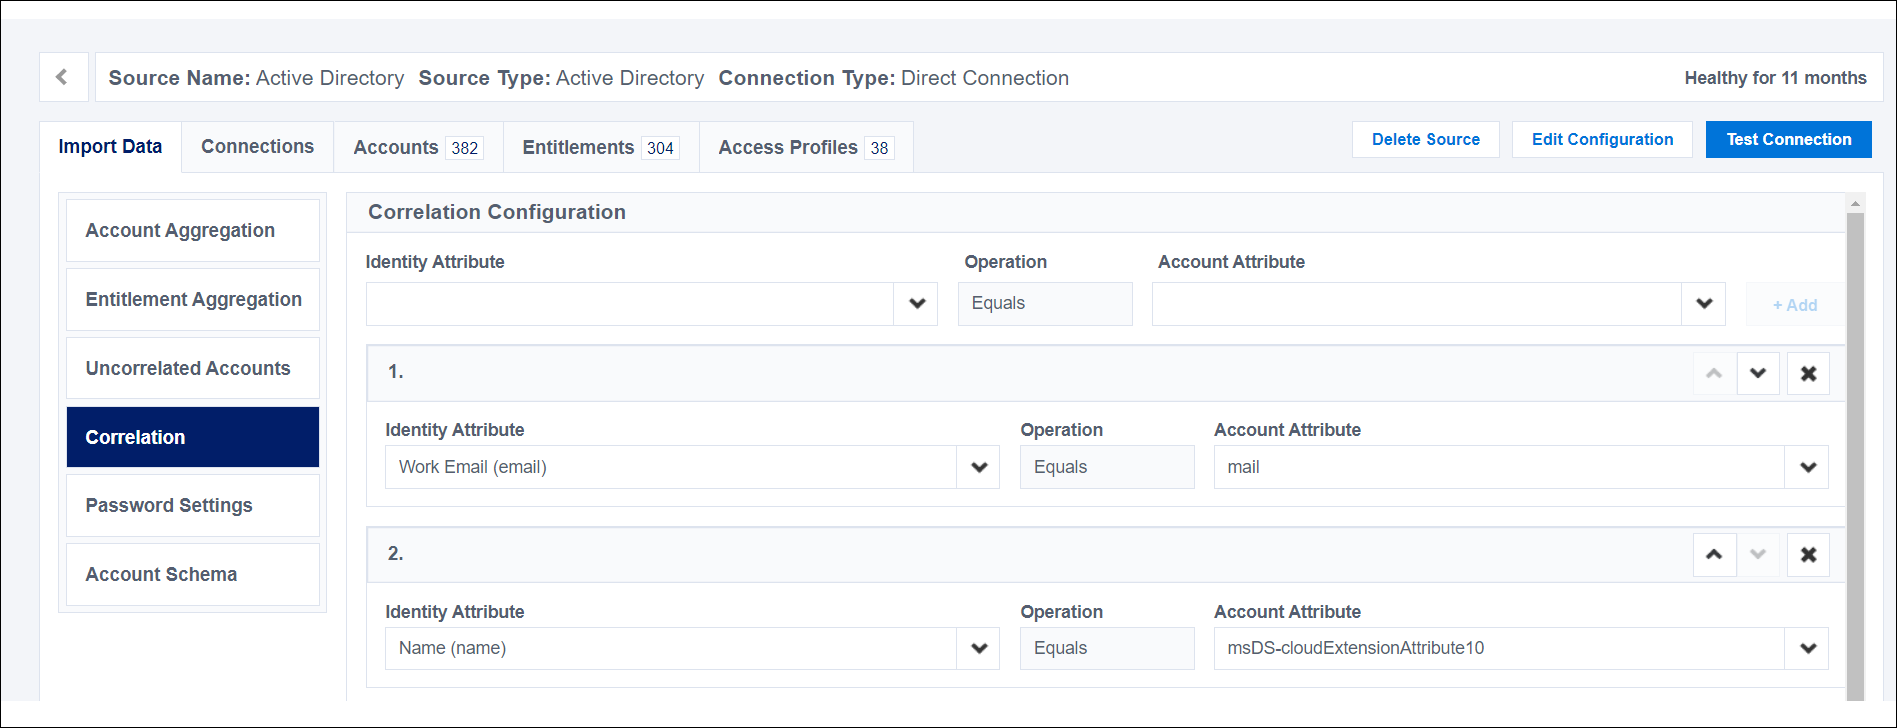
In the Correlation Configuration panel, review the existing attributes for configuring this source:
- The Identity Attribute field lists the attribute from the identity profile used to match the accounts.
- The Account Attribute field lists the attribute on the source that IdentityNow tests against the identity attribute.
- The Operation field is always set to Equals. This field is not editable.
-
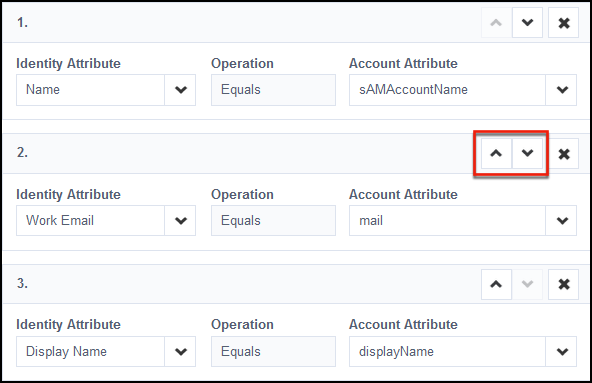
If you are working in an existing correlation configuration, remove unnecessary attribute pairings by selecting the X icon beside the pairing.
- Use the Identity Attribute dropdown menu to select a unique identity attribute such as
email,displayName, oruid. - Use the Account Attribute dropdown menu to choose the account attribute that corresponds to the identity attribute you just selected.
-
If your organization has a preferred attribute for identifying unique accounts, use the up or down arrow icons beside each attribute pairing to move the pairing up or down in the list. IdentityNow attempts to correlate accounts by checking the attributes in the order they are listed.
-
Select Save to apply and save your updates.
Using Custom Identity Attributes in Correlation
Identity attributes must be configured as searchable to be included in the Correlation Configuration's Identity Attribute list. By default, a subset of the predefined identity attributes are set as searchable. You can use the Create Identity Attribute or Update Identity Attribute endpoint to add up to 6 additional searchable attributes. These are typically chosen from the custom identity attributes you have defined for your site.
Note
This configuration is not related to enabling searches in IdentityNow Search based on your custom attributes. Any built-in or custom identity attribute can automatically be used as a search query filter there.
Resolving Uncorrelated Accounts
When you load accounts onto a source using a direct connector or flat file, you may have some source accounts that are not linked to identities in the source system. These unlinked source accounts are called uncorrelated accounts.
Accounts may be uncorrelated for a number of reasons. Some accounts simply need to be removed from a source, while others require updates to a source or to information in IdentityNow. The following table presents some possible reasons for uncorrelated accounts and how to resolve them.
| Reason for Uncorrelated Account | Resolution |
|---|---|
| Accounts belong to former employees. | Remove the old accounts from the source and aggregate the updated source accounts to IdentityNow. |
| Unusual, incomplete, or incorrectly entered account data does not match any identities. | Correct the account names on the source and aggregate those accounts to IdentityNow. |
| The identity the accounts are supposed to be linked to have not been created in IdentityNow. | Create an identity profile in IdentityNow that includes identities your uncorrelated accounts can link to. |
Uncorrelated accounts must be resolved before the identities associated with those accounts can be granted access to systems and apps. Account resolution is required for access, regardless of how access is granted.
After aggregating a source, run and download an Uncorrelated Accounts report to verify whether all newly loaded source accounts have been correlated. This report lists uncorrelated accounts in IdentityNow by source, so you can easily find and then resolve any uncorrelated accounts.
Resolving Mismatched Attribute Values
The Uncorrelated Accounts report can be a global report listing all the uncorrelated accounts and their sources or a source-specific report of uncorrelated accounts. Use the global report to display uncorrelated accounts and their sources. The global report can also be used for resolving uncorrelated accounts from one source.
For detailed instructions on updating information in your source, refer to your third-party source documentation or reach out to Support for additional help.
Resolving Uncorrelated Accounts on Sources
To resolve mismatched attribute values across multiple sources, you can use the global Uncorrelated Accounts report:
- Go to Admin > Global > Reports.
- Select PDF or CSV in the Uncorrelated Accounts row to generate a list of all uncorrelated accounts.
- Download the report and review the list of uncorrelated accounts and their sources.
- On each source listed in the report, edit at least one attribute on each uncorrelated account, including the value of an identity attribute used for correlation.
For example, if you’re editing an account in Active Directory, you can update the
sAMAccountNameto match theuidof an identity in your system, if those attributes are paired in the correlation configuration. - Save your changes and aggregate the source's accounts again. The number of uncorrelated accounts updates to reflect your changes.
You can resolve mismatched attribute values within a single source as well:
- Go to Admin > Connections > Sources.
- Choose your source and select the Import Data tab.
- Select Uncorrelated Accounts and choose Export in the Uncorrelated Accounts panel to download the Uncorrelated Accounts report for that source.
- Edit at least one attribute on each uncorrelated account, including the value of an identity attribute used for correlation.
- Save your changes and aggregate the source’s accounts again. The number of uncorrelated accounts updates to reflect your changes.
Manually Resolving Uncorrelated Accounts in IdentityNow
Resolving uncorrelated accounts in IdentityNow can involve manual correlation. Manual correlation creates a permanent link from the account to the identity. Even if the source data for the account changes, the account will still be linked to the identity. To move the account, you must manually re-correlate the account to the identity by importing a new CSV containing account's details and a new userName for the identity owning the account.
Note
You can manually correlate up to 100 accounts to a single identity.
To manually resolve uncorrelated accounts on IdentityNow:
-
Go to Admin > Connections > Sources.
-
Select and open the source you want to review.
-
Go to Import Data > Uncorrelated Accounts. When uncorrelated accounts exist, they are to the right of the Export panel.
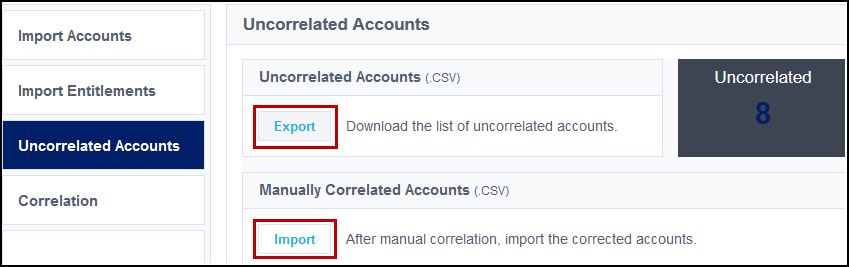
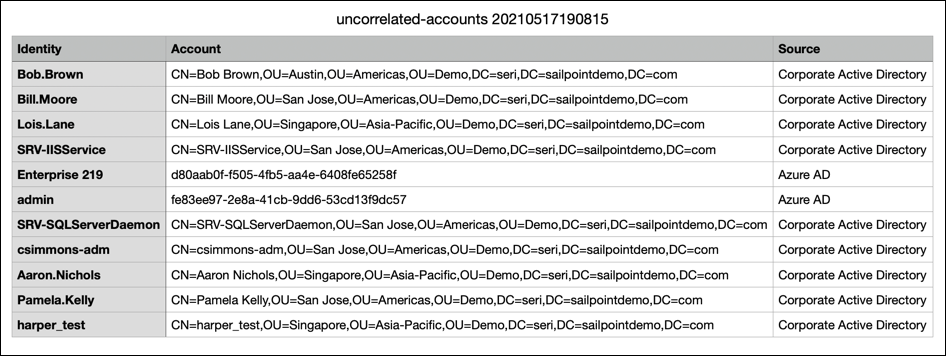
-
Select Export to download a CSV file of the uncorrelated accounts. The following example shows uncorrelated accounts with no userNames in IdentityNow for the Active Directory source.
-
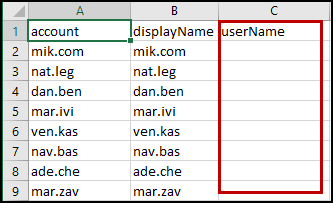
Add the Account IDs of the associated identities to the userName row of the CSV file. To find the Account IDs:
- Go to Admin > Identity Management > Identities.
- Select the name of the identity you want to correlate with one account.
-
In the Details tab, review the Attributes list to find the value of the Account Name for the identity.

This value is the Account Name attribute in the authoritative source's schema.
-
Add the Account Name attribute to the userName column of the appropriate account.
-
Save the file to apply and save your changes.
-
Return to your source's page and select Uncorrelated Accounts.
-
In the Manually Correlated Accounts panel, select Import to load the file with the corrected accounts into IdentityNow. In the Uncorrelated Accounts panel, the listed number of uncorrelated accounts adjusts to reflect your changes.
When you import a set of correlated accounts, you can view the summary information about your activity along with a badge that indicates whether there were issues with the file you imported. In the Manually Correlated Accounts panel, select the Information icon ![]() next to the uploaded file to view these details.
next to the uploaded file to view these details.
Note
Accounts that have been created by IdentityNow have the account attribute manuallyCorrelated=true. If you need to uncorrelate the account, you must remove the account or change the attribute to false. Unoptomized aggregation does not remove correlation.
Example of Manual Correlation
In this example, Source XYZ normally links accounts to identities by matching the account attribute email to the identity attribute work email. However, Source XYZ's Account 123 is missing an email. You manually correlate Source XYZ's Account 123 to the user Joe, who has the work email attribute joe@example.com.
Later in the day, Source XYZ's data is updated. Now Account 123 has matched the email attribute to a different work email attribute in the system, lisa@example.com.
When you aggregate Source XYZ, even though correlation logic says it should match to Lisa's identity, the account is permanently linked to Joe, because of the manual correlation. If you want to correlate the account to Lisa instead of Joe, you can do one of the following to remove the permanent link to Joe:
-
Reset all aggregated source accounts and entitlements. This option removes all Source XYZ accounts and entitlements from IdentityNow. When you aggregate again, the source accounts and entitlements load into IdentityNow and this time the correlation logic matches Account 123 to Lisa's identity.
-
Manually move Source XYZ's account 123 by importing a new CSV file that has the Account 123 linked to Lisa's identity instead of Joe's.
-
Remove Account 123 from IdentityNow.
- Go to Admin > Identity Management > Identities > Joe's identity > Accounts and find Joe's account on Source XYZ.
- From the Actions menu for Joe's account, select Remove Account. Removing Joe's account deletes the permanent link between Account 123 and Joe's identity.
- Aggregate source XYZ. Correlation logic matches Account 123 to Lisa's identity.
Preset and Default Configurations
Most supported source types have a preset correlation configuration, which is a set of two to four mapped attributes from the predefined account schema.
If you edit or delete a source’s preset correlation configuration, you can manually restore those settings.
-
Create a new source of the same type to identify the preset correlation attributes.
-
Use that information to enter and save the same attributes in the existing source.
Note
You may need to work with Support to reset your source, so you can apply the preset settings to existing identity data.
IdentityNow also contains default correlation logic which is applied any time an account fails to correlate based on the source’s correlation configuration. This default logic associates accounts to identities if the account’s displayName (the attribute marked as the Account Name in the account schema) matches the name attribute of the identity. This is not configurable.