System Settings to Support SSO - Okta
The task checklist below is followed by a detailed description of each step:
-
Website: Log in using the wbxadmin credentials, and create a data source for SSO users.
-
Admin client: Create an identity collector based on this data source.
-
Admin client: Select this identity store as the authentication store.
-
Website: Run the Identity collector task which was recently selected as authentication store.
This step will load the Okta users into the database.
-
Website: Click on the SAML login button and sign in to the relevant SSO Provider.
-
You should now be logged into File Access Manager the SSO provider user.
Detailed Settings
-
Website: Create a data source for SSO users.
(First time login to File Access Manager using wbxadmin credentials)
-
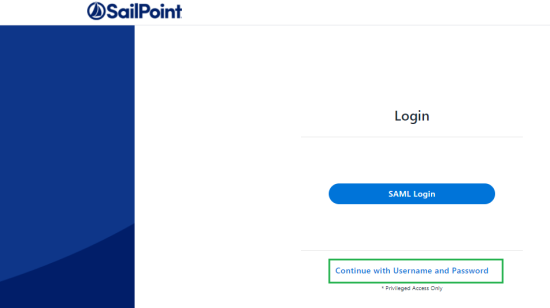
Open the website and click on Continue with username and password
Warning: Make sure to use the correct URL. The URL used to log in should match the Redirect URL entered in the OKTA application when creating the application. E.g., If you use HTTPS connection, the Login link and redirect URL in Okta should both be HTTPS.
Warning: If you use an IP address instead of server name, the login link and Redirect URL in Okta should be written with an IP address as well.
-
Log in to the system with the wbxadmin user and use the password entered during the installation of the system.
Select Login.

-
Within the website navigate to Admin > Data Sources > Add New Data Source.
-
Create a new data source that contains a list of Okta Users you want to access File Access Manager.
-
This could be any type of data source on your system such as a query on a table in your database, a local Excel file, or a static table stored in the File Access Manager system.
See the chapter on data sources in the File Access Manager Admin Guide for further details.
-
The data source should contain a single column of the user login.
-
This data source will be read by the File Access Manager identity collector process when it is scheduled to run, or it could be triggered manually.
-
These users also have to be assigned to the File Access Manager application in Okta.
For this example, we'll call the data source "OktaUsers" and the column of users "User Principal Name."
-
-
-
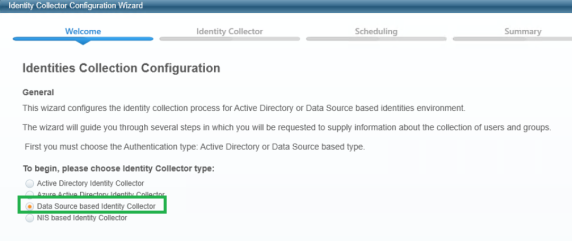
Admin client: Create an identity collector based on this data source.
-
Navigate to Configuration > Permissions Management > Identity Collectors.
-
Click new and select the Data Source based Identity Collector.
-
Enter any name and uncheck This application uses Groups.
Select Next.
-
Make the following selections:
-
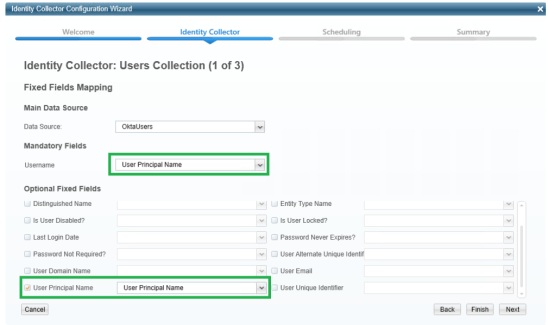
Select the Data Source created in the website
-
Map the only existing field (User Principal Name) to the following fields:
User Principal Name
Username
-
-
In the Identity Collector Users Collections (3 of 3) uncheck all the checkboxes (Users Tree, Unique User Accounts Mapping).
Click Next.
-
Create a scheduler. This will determine the update frequency in which new users read from the Okta data source will be read.
Click Finish.
-
Wait until the task is finished, and close the Identity Collector Configuration window.
Select Next.
-
-
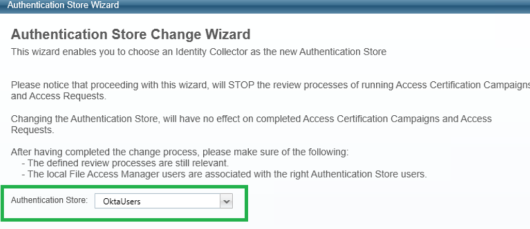
Admin client: Select this identity store as the authentication store.
-
Navigate to Configuration > General Configuration > Authentication Store.
-
Select the identity collector created above as the current authentication store.
-
Click Finish.
-
-
Website: Run the Identity collector task which was recently selected as authentication store.
-
Navigate to Settings > Tasks Management > Scheduled Tasks.
-
Run the Identies Synchronization task which was recently selected as authentication store.
-
-
Website: Click on the SAML login button and sign in to the relevant SSO Provider.
Click on Send anyway if needed, sign in for the first time if needed.
-
You should now be logged into File Access Manager the SSO provider user.