Creating an ADFS Application
In order to connect ADFS as an identity provider for File Access Manager, you must first create a dedicated application in ADFS.
-
Log into ADFS and navigate to Trust Relationships > Relying Party Trusts.
-
Click on Add Relying Party Trust….
-
In the opened wizard enter the following values in the following steps:
Welcome step
Start
Select Data Source
Enter data about the relying party manually (The last option)
Select Next. -
Specify Display Name: Enter any name, this name will later be used during the installation of File Access Manager with SAML 2.0 option.
Select Next.
-
Choose Profile: Select the first option ADFS profile.
Select Next.
-
Configure Certificate
Select Next.
-
Configure URL
Select Next.
-
Relying party trust identifier.
Enter the name entered in the step Specify Display Name above.
Select Add.
Select Next.
-
Configure multi-factor authentication settings…:
Select I do not want to configure multi-factor authentication… option.
Select Next.
-
Choose Issuance…:
Select the first option Permit all users to access the relying party.
SelectNext.
-
Ready to Add Trust
Select Next.
-
Finish.
“Open the Edit Claim Rules dialogue…” is checked.
SelectClose.
-
In the opened Edit Claim Rules for [app name] window.
Select Add Rule.
-
In the opened wizard select and enter the following data:
-
Select Rule Template
Claim Rule Template
Select Send LDAP Attributes as Claims
Select Next.
-
Configure Claim Rule
Claim rule name
UserInfo
Attribute store
Active Directory
Mapping of LDAP attributes to outgoing claim types
LDAP Attribute (Select or type to add mote) Outgoing Claim Type (Select or type to add more) User-Principal-Name Username User-Principal-Name Name
-
-
Select Finish.
-
Select the Add Rule button.
-
In the opened wizard select and enter the following data:
-
Choose Rule Type: input the fields as specified below
Claim rule name
Free text
Claim rule template
Transform an Incoming Claim
Incoming claim type
Username
Outgoing claim type
Name ID
Outgoing name ID format
Unspecified
Pass through all claim values
Select this option
-
SelectFinish.
-
-
Select OK.
-
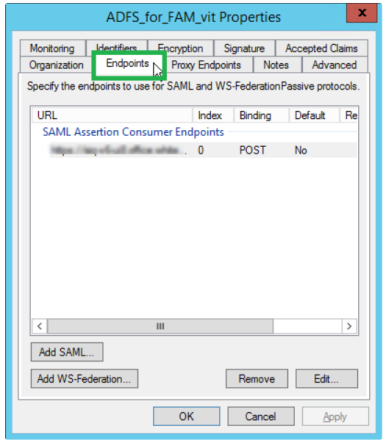
Right click on the recently created Relying Party Trust > Properties.
-
Select the EndPoints tab.
-
Select Add SAML.
-
Fill the following values in all fields:
Endpoint type
SAML Assertion Consumer
Binding
POST
Index
0
Trusted URL
Enter the following link. This the ADFS where to redirect the user logging in (A link to the File Access Manager system) https://[SERVER_NAME]/siqapi/login/AssertionConsumerService
SERVER_NAME is the server in which the website is installed
-
Select OK, and then OK on the next screen.
The ADFS application is now set and the following data will be needed during the installation of the FAM with the SAML 2.0 version.
-
The name of the created Relying Party Trusts, in this example: “ADFS_for_FAM_vit“
-
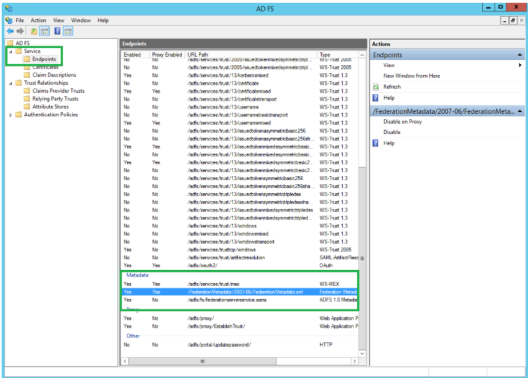
The URL to the Metadata which is constant per a VM where the ADFS is set
The URL can be found in the ADFS Configuration: Service > Endpoints> Metadata section
When installing File Access Manager, make sure to follow the sections pertaining to SAML login installation.