Creating or Editing an Azure Identity Collector
Azure AD Connector Full OAuth 2.0 Support
File Access Manager now offers full support of standard OAuth 2.0 Authentication for the Azure AD connector.
The new authorization sequence will direct the user through a standard Microsoft O365 consent flow, to grant the File Access Manager Azure AD Connector app the privilege to acquire and refresh access tokens.
The new authentication method replaces the previous Basic Authentication flow, that required admins to provide user and password credentials.
This enhancement brings full OAuth support to the Azure AD Identity Collector, instead of the legacy user and password approach.
This means the configuration will resemble other connectors for cloud applications such as OneDrive.
-
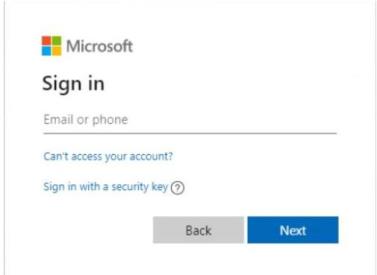
Configuring the Identity Collector, instead of providing a username and a password, you will click on a link that sends you to a Microsoft login page.
-
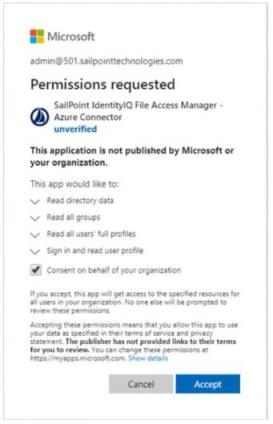
Enter the relevant user credentials and give your consent for the File Access Manager Azure AD O365 Application to access your directory data.
-
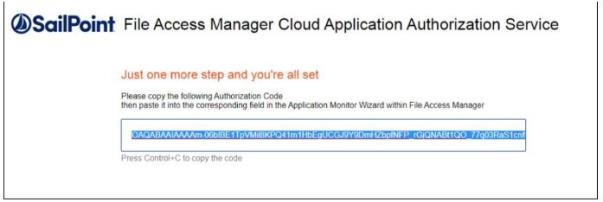
You will then copy the resulting Authorization Code to the appropriate field, which will then be used to generate the first access token.
-
The access token will be used in all requests to the tenant's Azure AD and will be automatically refreshed when needed.
Complete the following steps:
-
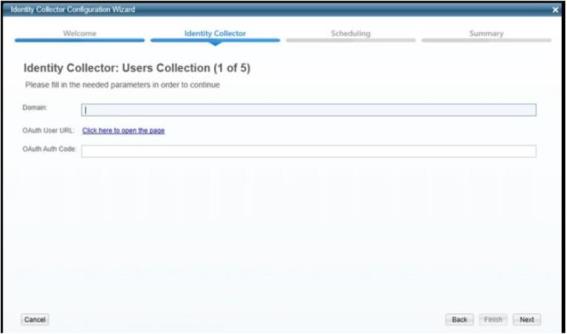
In the Identity Collector Configuration Wizard enter your O365 Domain name, then click on the OAuth User URL link to generate an Authorization Code.
-
You will then be redirected to the Microsoft O365 Login Screen Login with the user that should be used by the Identity Collector.
-
You will then be prompted to consent to granting access to the File Access Manager Azure Connector Accept to receive an Authorization Code and continue with generating the Access Token.
-
A final redirect will lead you to the File Access Manager Cloud Application Authorization Service, and will present the received Authorization Code.
-
Copy that code and past it in the Auth Code field in the Identity Collector Configuration Wizard screen.
-
Click Next and complete the Identity Collector configuration flow.
The File Access Manager Azure AD Connector requires the following permissions:
-
Directory.Read.All – this Permission grants read only access to AAD contents (by default, all domain users can read all AAD data).
File Access Manager uses the Microsoft Graph REST API – which works exclusively in HTTPS.
The API base path is : https://graph.microsoft.com/v1.0/ where the tenant domain name is the customer assigned domain name on Microsoft cloud. It is usually in the format of domain_name.onmicrosoft.com, but might be changed in your configuration.
A list of resources that are accessed by File Access Manager using the REST graph API include:
https://graph.windows.net/{tenant_domain_name}/tenantDetails
https://graph.windows.net/{tenant_domain_name}/users
https://graph.windows.net/{tenant_domain_name}/users/{user_id}
https://graph.windows.net/{tenant_domain_name}/groups/{group_id}
https://graph.windows.net/{tenant_domain_name}/directoryRoles
https://graph.windows.net/{tenant_domain_name}/directoryRoles/{role_id}
To grant a third-party application (ISV) with the Directory.Read.All permission requires an administrator consent, which can be given by users with one of the following roles:
-
Global Administrator (Company Administrator)
-
Cloud Application Administrator
-
Application Administrator
Hence, during the initial configuration phase (while generating the token for the first time), the service account dedicated to the File Access Manager Azure AD Connector must have one of the above-mentioned roles. Once consent is given, the role can be removed from the user.
The Consent flow will appear different for users with different roles.
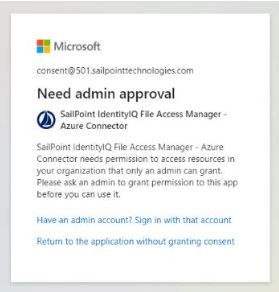
Non-admin user trying to access the consent screen will be presented with the following screen:
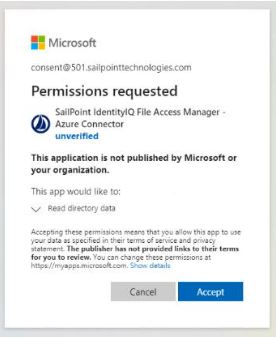
Application Administrators trying to access the consent screen, will be presented with a request to consent and grant the File Access Manager Application the Read Directory Data permissions:
Users with the Global Administrator role trying to give consent to an application will be presented with a screen containing an additional checkbox (consent on behalf of your organization):
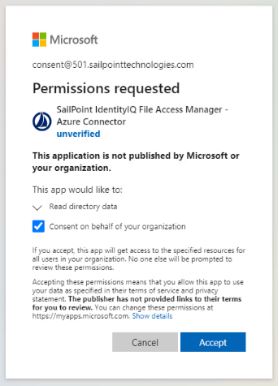
This extra checkbox consents to give permissions to the applicationon behalf of all other users in the organization, thereby ensuring no other user would have to explicitly give consent to the app to run on its behalf. File Access Manager does not require this checkbox to be checked, as our application only needs to run on behalf of the consenting user.
Checking this option is optional, and not mandatory.
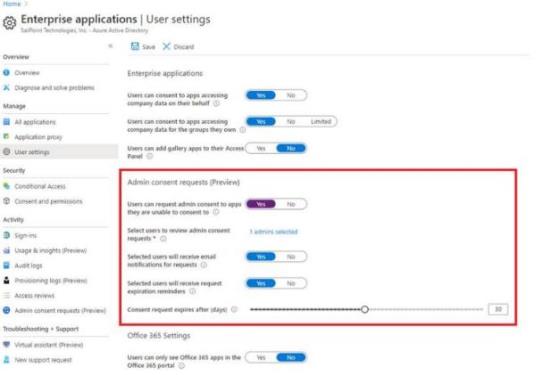
To avoid granting an administrative role the service account, even if only for the duration of the consent sequence, you may use Azure’s AdminConsentRequests.
This relatively new feature lets non-admin users indirectly give consent to applications that require admin consent by requesting an admin’s authorization.
This feature can be enabled on the tenant’s level, and allows setting one of the three above-mentioned administrator roles as are viewer:
When users without one of these administrative roles go through the normal consent flow, they will be presented with the screen:
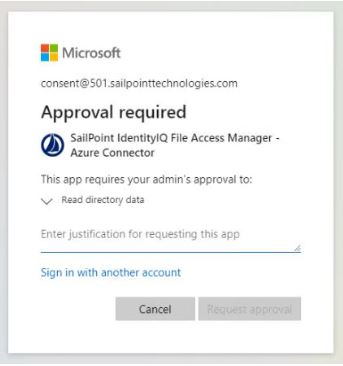
The requested is required to provide a justification for granting consent to the application and a request is sent to the administrator listed in the configuration as reviewers.
When clicking on Request approval to continue, the following screen appears:
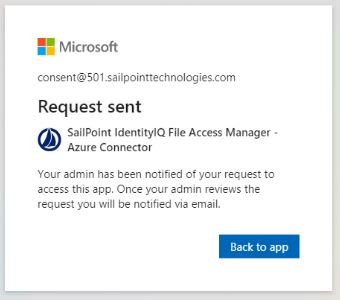
Clicking on Back to app would just return an access denied error as access was not yet granted. This screen can be safely closed while waiting for admin consent.
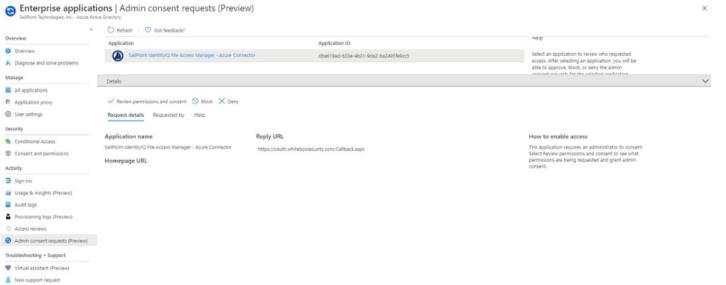
The reviewing administrator will either receive an email notifying them of the request, or have to go to the Admin Consent Requests screen and check for new requests:
To approve a request, the administrator will go through the Review permissions and consent flow, where they will be presented with the familiar consent screen:
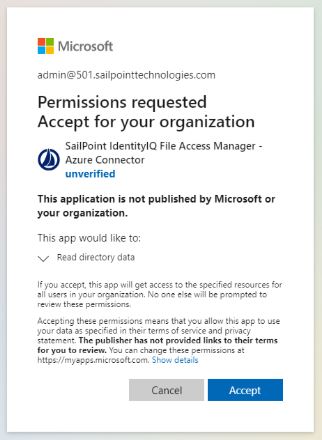
After an administrator Accepts, non-administrator users will have to go the through token generation sequence again.
However, this time the consent screen will be skipped entirely, and the flow will lead directly to the Authorization code.
Note: This method gives consent to the app on behalf of the entire organization, similar to when a Global Administrator ticks the checkbox to enables the Consent on behalf of your organization, as described above.