Creating a Database Using the Installer
To create the database, perform the following steps:
-
Start the installer by opening the SailPoint\Server Installer shortcut.
Note: Run in Administrator mode.
-
Click Next.
The End User License Agreement (EULA) window displays. -
When you have read and accepted the End User License Agreement, select the I have read and accepted the agreement option and click Next.
The Database Details window displays.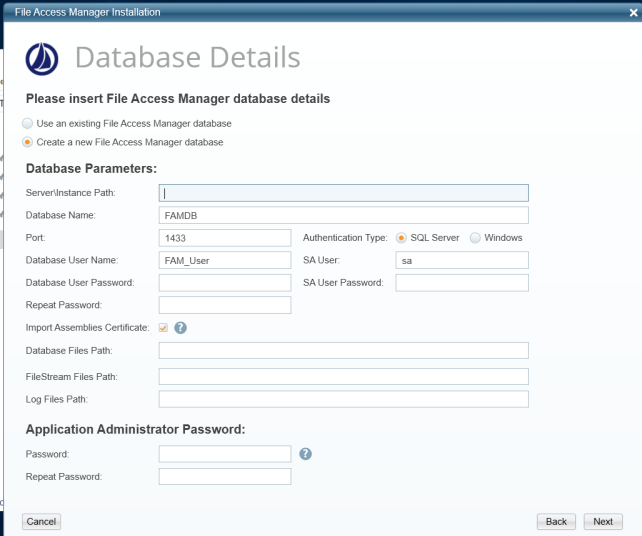
-
If you are installing File Access Manager for the first time:
-
Select Create a New File Access Manager Database.
-
Enter the following information:
-
Server\Instance Path – typically a server
-
Database Name – default is FAMBD
-
Port Number – default is 1433. When using a dynamic port, input 0
-
Database User Name – default is FAM_User
-
-
Enter the Database User Password twice in the appropriate fields.
-
Import Assemblies Certificate checkbox: Check this option if the CLR Strict Security Mode is enabled in the database. Using this option will import a certificate into the Master database. This option is relevant only for SQL Server 2017 and above.
-
Enter the database files path. This folder must exist on the database server.
-
Enter the file stream files path.
-
Enter the log files path. This folder must already exist on the database server.
-
Select the Authentication Type from the SQL Server or Windows options. This is the authentication used to log in to the database for the creation of the File Access Manager database.
-
For SQL, type in the SA User Field and password for the system administrator.
-
For Windows, the Server Installer will use the logged-in user to connect to the database.
-
-
Enter a password (only for the WBXadmin user) for the administrative client user and repeat the password. The password needs to meet the following parameters:
-
-
Minimum Length: 12 characters
-
At least one uppercase and lowercase letter
-
At least 1 special character
- If you are installing additional services to an existing File Access Manager installation, select Use an existing File Access Manager Database.
- Enter the Server\Instance Path.
- The Database Name, Port, and Database User Name fields are automatically populated.
- Enter the Database User Password.
-
Click Next.
The Action Select window displays. -
Select Create / Edit Installation Configuration and click Next.