Identity Collector Main Page
The Identity Collector page displays all previously created Identity Collectors. This screen also allows the user to add, edit, remove, sync and manage Identity Collectors. You can also set the Authentication Store.
Note: Cloud application Identity Collectors are created in the application setup process. They will be displayed on this screen and can also be edited here.
Access the Identity Collector page by navigating to Admin > Identity Collectors.
To create a new Identity Collector, click Create New.
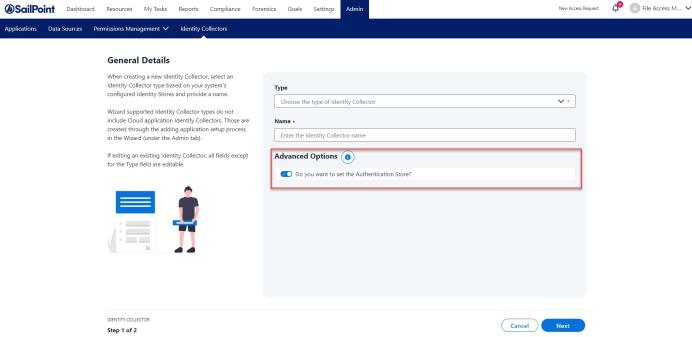
Name
This is the name of an Identity Collector
Type
This is the type (Active Directory, Azure, NIS, Data Source) of Identity Collector
Actions
This column provides the user three possible options:
-
Edit
-
Delete
-
More
-
Run Synchronization
-
Set Authentication Store
-
Note: If an Identity Collector is set an Authentication Store, that Identity Collector will display on the first row.
Filters
To filter the results on the grid, click the filter icon on the heading bar. Select the requested criteria.
A user can filter various Identity Collectors by providing a full or partial name or by selecting the known type.
Click Apply to apply the filter or click Clear All to clear the filters and repopulate the grid.
Editing an Identity Collector
-
Select the edit icon on the row of the Identity Collector you wish to edit.
Note: The Type field will be disabled.
With the exception of the Type field, every step in the wizard will be editable.
Deleting an Identity Collector
Note: If an Identity Collector is set as an Authentication Store, that Identity Collector cannot be deleted. If an Identity Collector is used within another part File Access Manager, it cannot be deleted.
Note: Only one Identity Collector can be deleted at a time.
-
Select the delete icon on the row of the Identity Collector you wish to delete.
-
A dialog will display confirming the deletion of the selected Identity Collector.
Running the Synchronization Task
A user is able to sync to an Identity Collector so that it has the most updated identities. If anything about the Identity Collector is changed, run the synchronization task to update the changes.
To run a synchronization, navigate to the Actions column on the Identity Collector row and click More Options > Run Synchronization.
Note: It is recommended that the Synchronization task is ran before selecting an Authentication Store.
Note: Cloud applications cannot run the Synchronization task.
Setting an Authentication Store
Authentication Stores are used by File Access Manager to authenticate users across its various interfaces.
Changing the Authentication Store from one Identity Collectors to another will affect the following:
-
The users associated with File Access Manager and their access to it.
-
It will stop the review processes of all running Access Certification Campaigns and Access Requests.
-
It might affect predefined review processes.
Before you change your Authentication Store, we recommend running synchronization on the Identity Collector. This is to ensure you receive the most updated results and avoid losing the user’s permissions.
-
Select the More Options button on the row of the Identity Collector you wish to set as the Authentication Sore.
-
Select Set Authentication Store.
Note: The newly set Identity Collector will move to the top of the grid.
Caution: Cloud application Identity Collectors cannot be set as Authentication Stores.
Caution: You can connect the Authentication Store Identity Collector to other Identity Collectors by setting the Same User Field between two or more Identity Collectors in order to extend the Access Request's Usage list.
-
When creating a new Identity Collector, a toggle will display on the General Details steps to set the Identity Collector as the Authentication Store.
Note: When setting the Authentication Store through creating a new Identity Collector, the toggle will only display if there are no Authentication Stores currently enabled.