Editing Reports
The following fields are available to edit a customized report:
-
Custom fields to display (where supported)
-
Recipients list
-
Name
-
Description
-
Scheduling
Note: It is not possible to change the query filter of a saved customized report.
To edit report parameters in the Administrative Client, navigate to Reports.
-
Select a scheduled report from the list to edit.
-
Select Edit.
The Welcome to the Schedule Report Wizard Screen displays.
-
Select Next on the Schedule Report Wizard welcome page.
-
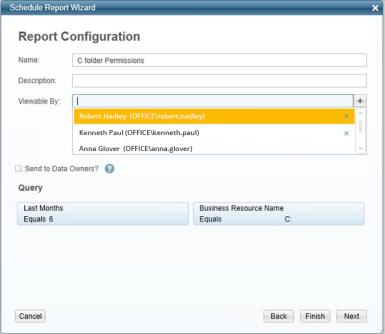
The Report Configuration screen of the Schedule Report Wizard already displays the name in the Name field.
-
Enter a description in the Description field.
-
Double-click in the Viewable By field to view a list of users who can view the report.
-
Select a user’s name and the + sign.
The user’s name appears in the box under the Viewable By field.
-
Select the Send to Data Owners checkbox to send the report to data owners.
-
Relevant queries appear in the Query section of the Report Configuration screen.
-
Select Finish to send the configuration to the system without configuring a report schedule.
-
If you select Finish, the following confirmation message displays: “You are creating a report without a scheduler. Do you wish to continue?”
-
Select Yes to save the report without configuring a report schedule, or No to return to the Report Configuration screen.
-
If you select Yes and the following warning message displays: “This action can only run by a File Access Manager user that is associated with a user from the authentication store. The action will not be executed,” this means that you logged into the client with a local File Access Manager user, rather than with an Active Directory user from the Authentication Store.
Only Active Directory users can create reports, since File Access Manager needs the email address of the user and the user’s identity to generate the report.
Otherwise:
-
If you select No in step 12, there is no additional message. Select Next.
The Report Configuration screen displays.
-
Select the Create a Schedule checkbox to create a schedule, or Finish to send the report configuration to the system without a schedule.
-
If you select Finish, the following confirmation message displays: “You are creating a report without a scheduler. Do you wish to continue?”
-
Select Yes to send the configuration to the system without configuring a report schedule, or No to return to the Report Configuration screen.
-
If you select Yes, the following warning message displays: “This action can only run by a File Access Manager user that is associated with a user from the authentication store. The action will not be executed.”