Custom Authentication
When you select Custom Authentication as the Authentication Type, Web Services aggregates the authentication details for all other endpoints.
In custom authentication, the Web Services source doesn't authenticate requests and doesn't add any authorization to the HTTP header. To accomplish this, the REST application requires a new token to authenticate the request from the Authentication Server.
-
From the Authentication Type drop-down list, select Custom Authentication.
Important
If an endpoint does not require authentication at all, you only need to select Custom Authentication. Continue to the following steps to set up custom authentication. -
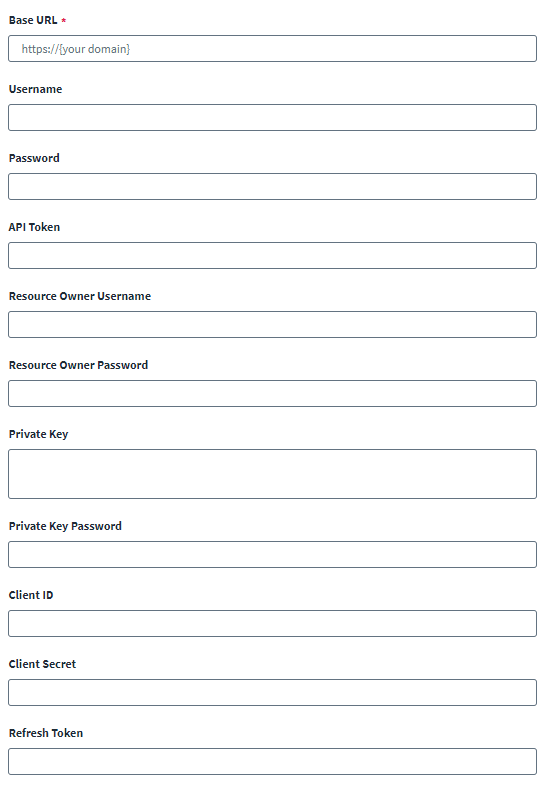
In the Base URL field, enter the base URL to connect to the target managed system.
For example:https://api.testurl.com
-
(Optional) Several optional fields display which you can configure as your authentication configuration requires.
-
Username
-
Password
-
API Token
-
Resource Owner Username
-
Resource Owner Password
-
Private Key
-
Private Key Password
-
Client ID
-
Client Secret
-
Refresh Token
-
-
Select Save.
-
Go to the HTTP Operations tab, and select Add Operation. Set the Operation Type to Custom Authentication.
For more information on using the HTTP Operations fields, refer to HTTP Operations.
-
Configure the following for endpoints:
-
Authentication URL – From the endpoint details page, enter the full URL in the Authentication URL field.
Note
Ensure that you enter the full URL in this field unlike the other endpoints where this field takes in the context URL. -
Header and Body:
-
Configure the Header and Body with the required fields for the token generation.
-
Keys for sensitive attributes updated in the Header and Body must be appended in the encrypted list in the application.
Caution
Don't configure sensitive attributes for the Header and Body through the configuration UI. They should be added using IdentityNow Update Source Partial REST API.
For more information on using IdentityNow Update Source Partial REST API, refer to IdentityNow REST API - Update Source (Partial).
When you add sensitive attributes to the header, ensure that the attributes are added with the suffix,
_CA. For example, to use a password in the request, addpassword_CA.Note
If the attributes are not suffixed with_CA, the Web Services source might display unusual behavior.For example, if the attribute updated is a password then it must be added to the header as follows:
Before updating the encrypted list:
{"encrypted":"accesstoken,password,refresh_token,oauth_token_info,client_secret,private_key,private_key_password,clientCertificate,clientKeySpec,resourceOwnerPassword,custom_auth_token_info"}
After updating the encrypted list:
{"encrypted":"accesstoken,password,refresh_token,oauth_token_info,client_secret,private_key,private_key_password,clientCertificate,clientKeySpec,resourceOwnerPassword,custom_auth_token_info,password_CA"}
After the attributes are added, their values can be used as placeholders in the Header and Body.
For example:
$application.password_CA$
-
Use the
password_CAattribute key with value asxyz123(for example). -
Add the
password_CAkey to the existing encrypted attribute (comma-separated) using IdentityNow REST API. -
Use the
encryptedattribute key and append,password_CAto the existing value.
-
-
-
Response Mapping – Configure Response Attribute Mapping to obtain access details from the response. Response mapping is the same as in other endpoints where the key is added under the Response Attribute value. Its respective path must be added under Attribute Path.
Note
-
The Response Attribute value must not be present in the application configuration attributes. After response parsing the value is stored in key value format as follows:
<entry key="customaccesstoken" value="access_token"/>
-
Be sure to use a custom name for the Response Attribute Key other than the default name. For example, instead of using
accesstokenyou can define it ascustomaccesstoken. -
The
accesstokenentry can't be used in response mapping for custom authentication. You must use a different, unique entry to save the response.
-
-
-
The token value generated after executing Custom Authentication endpoint can be utilized in all other endpoints using placeholders as follows:
"$application.<your key>$"
For example:
"$application.customaccesstoken$".
If the token type is for Bearer instance, then it can be used as the following:
"<your token type> $application.<your key>$"
For example:
"Bearer $application.customaccesstoken$"