Troubleshooting
If you encounter any of the following issues or errors, SailPoint recommends that you follow the guidance provided below to resolve the error before contacting SailPoint Support.
Tip
Community nickname must be unique.
Message:
javax.net.ssl.SSLHandshakeException: Remote host terminated the handshake
The test connection might be working, but when you run an aggregation or any other flow, you may still get the error.
Resolution:
Check the following:
-
The certificate may need to be communicated to the managed system.
-
Try running the Salesforce request and print in the logs via postman.
-
If dynamic IP is configured in environment, try opening the firewall for *.salesforce.com
The email ID of that user may be utilized in the Salesforce system already.
Resolution – Create a new account with a different email ID. The Email ID is the mandatory username for the user.
Resolution – Increase the account limit in Salesforce or disable existing active accounts in Salesforce before initiating a Create request.
INVALID_SESSION_ID Session error during any Salesforce connector operation
Message:
INVALID_SESSION_ID
Resolution:
-
Remove the
serverUrlandsessionIDattributes from the application configuration using the source update API. -
Perform a test connection.
-
If the test is successful retry the failed operation.
Before connecting to Salesforce using OAuth 2.0 JWT Flow, you need to create your own connected app required by JWT Flow on the Salesforce platform.
-
In Salesforce, go to Security Controls > Certificate and Key Management. Select Create Self-Signed Certificate to create a self-signed certificate. Then download the certificate to your local machine.
In this example, the certificate,
jwtapril.crt, was created and downloaded toC:\jwtapril.crtfor demonstration purposes. -
Select Export to Keystore to export your certificate to a keystore file in JKS (Java Keystore) format.
In this example, the certificate is exported to
D:\jwtapril.jks. Use this same location to export the certificate in JKS format. -
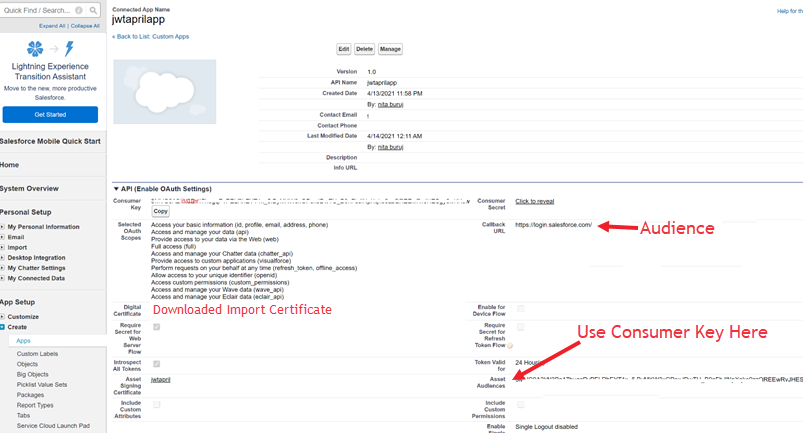
Go to Create > Apps, and select New in the connected apps area. Create a connected app that enables OAuth settings and which uses the digital certificate
C:\jwtapril.crtyou downloaded earlier and save it.Now, go to Create > Apps and open the newly created connected app. You can find the following attributes in the connect app view:
-
subject– The username with which certificate is registered -
audience– The callback URL (provide:https://login.salesforce.com) -
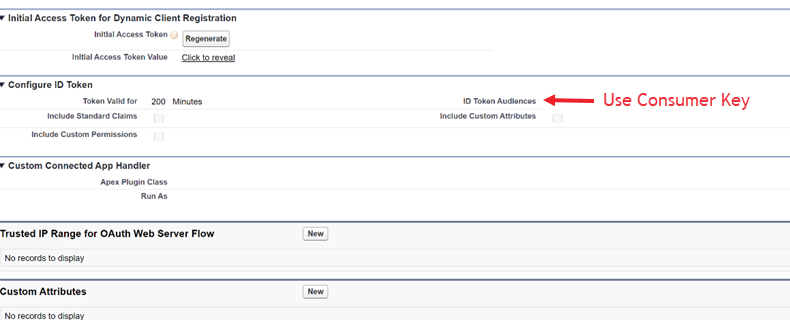
issuer– The connected app's consumer key
-
-
Execute a keytool command to extract the private key from the Certificate:
-
List the contents of the keystore file from earlier. Check the certificate details with the alias name:
Raw query:
keytool -list -v -keystore keystoreName.jksQuery for this case:
keytool -list -v -keystore <jwtapril>.jksNote
In this case,<jwtapril>is the alias name of the certificate from earlier. -
Convert the .jks file to a .p12 file by providing the certificate alias name from the keystore. In this example, it's
jwtapril.Raw query :
keytool -importkeystore -srckeystore <source keystore>.jks -srcstorepass <source keystore password> -srckeypass <source key password> -srcalias <source alias> -destalias <destination alias> -destkeystore <destination keystore>.p12 -deststoretype PKCS12 -deststorepass <destination keystore password> -destkeypass <destination key password>
Query for this case :
keytool -importkeystore -srckeystore jwtapril.jks -srcstorepass jwtapril -srckeypass jwtapril -srcalias jwtapril -destalias jwtapril -destkeystore destination_keystore.p12 -deststoretype PKCS12 -deststorepass jwtapril -destkeypass jwtapril
-srckeystore: location of source keystore file(.jks file)
-srcstorepass: password of the keystore file
-srckeypass : password of the keystore file
-srcalias: alias of the keystore file
-destalias: alias of the destination(.p12) file
-destkeystore: location where you want to generate the .p12 file
-deststorepass: password of the destination file
destkeypass:password of the destination keypass
Tip
Be sure to keep track of the passwords used in this query. Incorrect passwords may cause errors during private key generation.Another example :
-> keytool -importkeystore -srckeystore C:\Certificates\Salesforce\00D3k000000usr9.jks -srcstorepass changeit -srckeypass changeit -srcalias jwt8mar -destalias jwt8mar -destkeystore C:\Certificates\Salesforce\pem8Mar.p12 -deststoretype PKCS12 -deststorepass changeit -destkeypass changeit
-
Change the .p12 file into .pem format:
openssl pkcs12 -in destination_keystore.p12 -nodes -nocerts -out examplePem.pem
Note
You may get an error message such as:
0C2F0000:error:0308010C:digital envelope routines:inner_evp_generic_fetch:unsupported:crypto\evp\evp_fetch.c:373:Global default library context, Algorithm (RC2-40-CBC : 0), Properties ()
To work around this, do one of the following:
-
Download the openssl version for your system from https://indy.fulgan.com/SSL/
-
Try to change the node version.
-
-
Change the extension of the .pem file from ".pem" to ".key".
openssl rsa -in examplePem.pem -outform PEM -out privatekey.key
For example:
openssl rsa -in C:\Certificates\Salesforce1\examplePem.key -outform PEM -out C:\Certificates\Salesforce1\privatekey.key
The generated private key (
privatekey.keyin the example) should be in RSA format.If the key is not in RSA format, run the following command to change it to RSA key format:
openssl rsa -in C:\Certificates\Salesforce1\examplePem.key -outform PEM -out C:\Certificates\Salesforce1\privatekey.key -traditional
-
Open to validate the privatekey:
https://8gwifi.org/certsverify.jsp
Input x509, CSR, or PrivateKey:
put jwtapril.crt content
Validate against x509, CSR, or PrivateKey:
put privatekey.key content
privatekey.keycontains the privatekey.Note
PrivateKeyPasswordcan be empty as it is not mandatory.
-
Note
During the test connection, you may get the following error message:
Unable to Authorize User: user is not admin approved to access this app
To work around this error, do the following:
-
Go to Create > App and open the your newly created connected app.
-
Select Manage.
-
Select Edit Policies.
-
In the OAuth Policies section:
-
Select Admin approved users are pre-authorized for Permitted Users, and select OK.
-
Select Save.
-
Select Manage Profiles and then Manage Permission Sets. Do one of the following:
-
Select the profiles and permission sets that are pre-authorized to use this connected app. You can create permission sets if necessary.
Now, the connected app provides access to users assigned with the selected profiles and permission sets. Assign the selected profiles or permission sets to the subject (username is used as the subject).
OR
-
Select All users may self-authorize. This authorizes all users.
-
-
Note
You may need to authorize a Salesforce user. Use the following Postman query for to do so:
-
Import the following cURL request in Postman:
Copycurl --location --request POST 'https://login.salesforce.com/services/oauth2/authorize' \
--header 'Content-Type: application/x-www-form-urlencoded' \
--header 'Cookie: BrowserId=ytV1qb2fEe2h2SmHOqTcbQ; CookieConsentPolicy=0:0; LSKey-c$CookieConsentPolicy=0:0' \
--data-urlencode 'client_id=3MVG9_XwsqeYoueJcfSbGhDFD45vg89rWLCiZ_yhv8WAQ3KFojhtBDz7qSDH37Kp7tbzEv8lRhg6LYk3ZtPu2b' \
--data-urlencode 'client_secret=FF2148B26AC19A1EC8800AA9EC63C8100XDF74C75F86AACF4173D6C355EA2A3A' \
--data-urlencode 'redirect_uri=https://login.salesforce.com/' \
--data-urlencode 'response_type=code -
Save the response of this query with a ".html" extension.
-
Open the file and select it in order to validate. The file asks for you to provide for a username and password. Provide the same username and password you used to create the certificate.
The connector terminates an aggregation task with a timeout error.
Error message:
QUERY_TIMEOUT: Your query request was running for too long
Resolution: Increase the Connection Timeout setting, then reattempt the aggregation task. For more information, refer to Connection Settings.

