Data Access Aggregation Settings
The Data Access Aggregation feature supports aggregation of all security context and security context values (data access) from the Oracle ERP Cloud managed System. This feature should only be used if required. Enabling the feature may seriously impact system performance. If the feature is not required, please skip this step. If the feature is required, refer to the following information:
Warning
Enabling the Data Access Aggregation feature may seriously impact the system performance. It is advised to use this feature only if required.
Enable enableOldRestFrameworkForDataSecurities for handling special characters in the Data Access. By default, the value is set as false.
-
Key:
enableOldRestFrameworkForDataSecurities -
Value:
true
Note
For more information on SailPoint's REST APIs, refer to Best Practices: REST API Authentication and REST API - Update Source (Partial) in the SailPoint Developer Community.
|
Context Name |
Module |
|---|---|
|
Financials |
|
|
Financials, Procurement |
|
|
Financials |
|
|
Financials |
|
|
Financials |
|
|
Financials |
|
|
Project Management |
|
|
Financials |
|
|
Financials |
The following Function Security Policies, Role Hierarchy, and existing aggregation permissions are required to use this feature.
Function Security Policy - to access Security Context LOVs REST APIs
|
User Friendly Name of Role |
Role Code |
Data Security Policy- Data Resource |
|---|---|---|
|
Manage Application Reference Data Set |
|
|
|
Manage Application Reference Data Set Assignment |
|
|
|
Get Enterprise Structures Using REST Service |
|
|
|
Get General Ledger Setups Using REST Service |
|
|
|
Get Intercompany Setups Using REST Service |
|
|
|
Manage Control Budgets |
|
|
|
View Fixed Asset Transaction Accounting |
|
|
|
Manage Project Labor Schedules |
|
|
|
View Purchase Order Work Area |
|
|
Role Hierarchy - to schedule and access Oracle Business Intelligence Reports
|
Role Name |
Role Code |
Security for Analysis and Reports |
Usage |
|---|---|---|---|
|
BI Consumer Role |
BIConsumer |
View-Only |
View Report |
|
BI Author Role |
BIAuthor |
Create and Edit |
Reschedule Report |
|
BI System Role |
BISystem |
Access SOAP and Related services |
Backend SOAP calls |
|
BI Application Administrator Duty Role |
BIA_ADMINISTRATOR_DUTY |
Manage Permissions |
Manage report permissions and Download Report |
By default, the user with BI Administrator privileges must unarchive the following archive (i.e. SailpointDAv1.catalog) located in ‘Shared Folders' under Catalog of Reports and Analytics platform. Once unarchived, the new folder with 'SailpointDAv1’ name should start appearing in the Shared Folders path.
Caution
Once unarchived, any further modification of the content in 'SailpointDAv1’ folder is strictly prohibited.
Download the SailpointDAv1.zip from Compass.
Important
If the path of the BI report is set to anything other than 'SailpointDAv1', it is mandatory to overwrite all the reports in the unarchived folder by recreating them with the correct data model path. Additionally, make sure in report settings that the Output Format and Default Format are set to Data (CSV) and saved.
Warning
Enabling the Data Access Aggregation feature may seriously impact the system performance. It is advised to use this feature only if required.
-
Ensure the Minimum Permissions Required have been met.
-
Ensure the Prerequisites have been met.
-
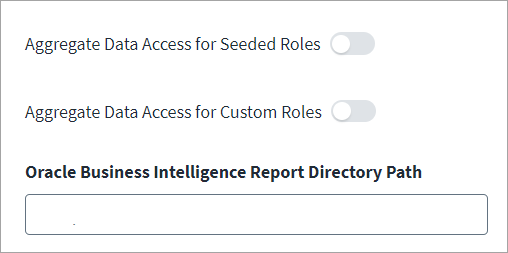
Enable the Aggregate Data Access for Seeded Roles and Aggregate Data Access for Custom Roles features based on your aggregation needs.
-
In the Oracle Business Intelligence Report Directory Path field, enter SailpointDAv1.
-
Select Save.
Note
Once the aggregation with the features enabled is complete, SailPoint advises that you disable the features to avoid system performance impacts for each consecutive aggregation attempt when data access aggregation is not required.
-
Download the SailpointDAv1.zip from Compass, and unzip the download to get the SailpointDAv1.catalog file.
-
Sign in to Oracle ERP Cloud with valid BI admin's credentials.
-
Go to Tools > Reports and Analytics. Ensure your browser allows pop-ups for the Reports and Analytics page, and then select the Browse Catalog button. The catalog window will open in a separate tab. .
-
On the Catalog tab, select Folders > Shared Folders > Tasks, and then select Unarchive. Keep the settings as is (Replace = None, ACL = Inherit) and select OK.
The SailpointDAv1 folder should now be visible under Shared Folders.
The OracleERPCloud folder delivers the SailpointDAv1.catalog file containing the data model and report files. The catalog file is an archived version of the folder from Oracle Business Intelligence with necessary permissions.
Note
Once unarchived, the SailpointDAv1 folder contains two data models, SeededRolesMapping and NonSeededRolesMapping and two reports, SeededRolesReport and NonSeededRolesReports. These files are required to schedule reports needed to generate the CSV extract of Roles and Security context relationships for aggregation of data access in the connector.
-
Download the SailpointDAv1.zip from Compass, and unzip the download to get the SailpointDAv1.catalog file.
-
Sign in to Oracle ERP Cloud with valid BI admin's credentials.
-
Go to Tools > Reports and Analytics. Ensure your browser allows pop-ups for the Reports and Analytics page, and then select the Browse Catalog button. The catalog window will open in a separate tab.
-
On the Catalog tab, select Folders, and then select the desired folder where you want to unarchive the file. Select Tasks, and then select Unarchive. Keep the settings as is (Replace = None, ACL = Inherit) and select OK.
-
Confirm that a folder named SailpointDAv1 appears under the selected folder. (Optional) delete SeededRolesReport and NonSeededRolesReport files to recreate them from scratch.
-
Create Reports
-
Open SeededRolesMapping, and select Edit to access the data model.
-
Select Create Report to begin generating a new report.
-
In the Create Report window, locate the SeededRolesMapping.xdm file within the unarchived folder. Choose Select Layout, and select Portrait and Table Layout.
-
-
Design the Table
Drag and drop the fields in the following order:
-
ROLE_NAME
-
SECURITY_CONTEXT
-
-
Save and View the Report
-
Save the report as SeededRolesReport, and select OK to save (or replace) and view it.
-
-
Set the Report Properties
-
Select Edit Report from the gear icon.
-
Ensure the output and default format is Data (CSV).
-
-
Set Permissions
-
Go to the folder where you unarchived the catalog, and confirm the presence of the SeededRolesReport.
-
Select More, and then Permissions. Add your service user account with Full Control permissions to ensure proper access to schedule and read the report.
-
-
Repeat for Non-Seeded Roles.
Follow steps 6-10 for the NonSeededRolesMapping data model to create the NonSeededRolesReport.
Note
The reports must be named SeededRolesReport and NonSeededRolesReport. These reports are essential for SailPoint connector operations, ensuring proper aggregation of roles and security context data.To find the BI report directory path select More, and then Schedule.Copy the report directory path from the report name. For example, if the report name is
/~ServiceUser/DesiredFolder/SailpointDAv1/report.xdo, the correct BIDirectoryPath will be/~ServiceUser/DesiredFolder/SailpointDAv1