Configuring SailPoint for Integration
To integrate with the ServiceNow Portal, you will need to configure access to the following:
-
The SailPoint APIs, so the ServiceNow client can communicate with the platform
-
Your source of ServiceNow accounts, so SailPoint can access and govern them
To grant the ServiceNow client access to the IdentityNow APIs:
-
Log in to IdentityIQ as an Administrator.
-
From the IdentityIQ Admin Dashboard, click the gear icon and select Global Settings.
-
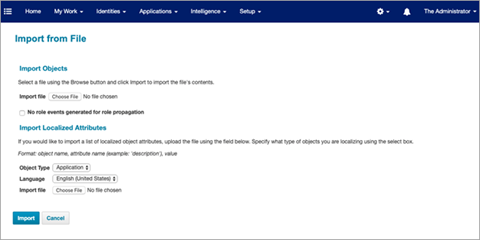
Click the Import from File option near the bottom of the list on the right to open the Import from File page.
-
Under Import Objects, click Choose File and import the following files from the directory you downloaded them into previously:
-
SP_SPNT_SNOW_INT_ServiceNow_Task_Rule.xml
-
SP_SPNT_SNOW_INT_ServiceNow_Update_RITM_Status.xml
-
SP_SPNT_SNOW_INT_ServiceNowCredentialConfig.xml
-
SP_SPNT_SNOW_INT_IIQServiceNowStatusMapping.xml
-
•SP_SPNT_SNOW_INT_SystemConfig_ShowExternalTicketId.xml
-
• SP_SPNT_SNOW_INT_AutoApproveServiceNowRequest.xml
-
-
Copy the
SP_SPNT_SNOW_INT_CustomRest.jarfile that you previously downloaded from Compass Community into the /WEB_INF/lib folder for your IdentityIQ installation. (e.g.,<C:/Prog/Tomcat 8.5_Tomcat8-IdentityIQ/webapps/identityiq/WEB-INF/lib/>). -
Open the web.xml file in the
/WEB_INFfolder and change value of thejavax.ws.rs.Applicationparameter fromsailpoint.rest.SailPointRestApplicationtosailpoint.rest.ServiceNowIIQCustomRest.
Before:

After:

7. Navigate to tomcat_home/bin and run the ./shutdown.sh command to stop Tomcat services, followed by the ./startup.sh command to restart Tomcat.
IdentityIQ is now ready to receive and process access requests initiated using the ServiceNow Portal integration.
Connect to the source of ServiceNow accounts:
If you haven't already connected to the source of ServiceNow accounts, be sure to do so before proceeding.