Authenticating with OAuth2
OAuth2 is available for IdentityIQ version 8.1 and above.
-
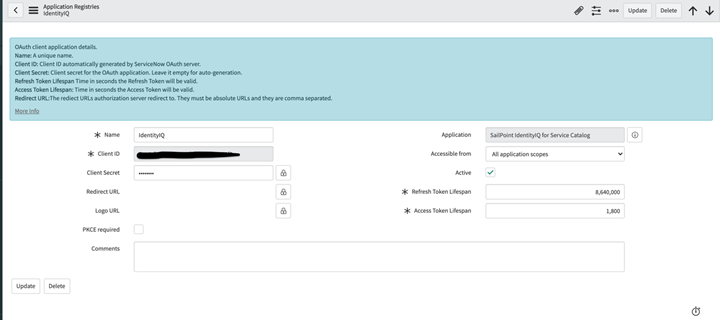
In IdentityIIQ, create an OAuth client. For more information, see OAuth 2.0 (Client Credentials) as a Token-Based Protocol for API Authentication.
-
In Service Now:
-
Setup OAuth. For more information, see Set up OAuth in the ServiceNow documentation.
-
Create an endpoint for the client to access the instance. For more information, see Create an endpoint for clients to access the instance in the ServiceNow documentation.
-
-
Replace
SP_SPNT_SNOW_INT_ServiceNow_Task_Rule. -
In
SP_SPNT_SNOW_INT_ServiceNowCredentialConfiguse the following key/values:Key Value enableOauth2
True
ClientId
clientId created in step 2b.
clientSecret
encrypted value from step 2b
tokenURL
https://<your instance name> /oauth_token.do
password
Same value as for Basic Authentication
url
Same value Basic Authentication
username
Same value as Basic Authentication
After you’ve successfully integrated the ServiceNow Service Portal with IdentityIQ, you can access it from the Service Portal link (e.g., https://<instance>.service-now.com/sp).
You can now do the following from within ServiceNow:
-
View and manage the roles and entitlements associated with each user.
-
View and make access requests and add comments to help approvers decide how to handle each request.
-
Set sunrise and sunset dates for the access that’s been granted.
-
Resolve any SoD errors that arise from the request.
As an Administrator, you’ll need to add a Manage Access link to the Service Portal menu that users will click to request access – this is not done automatically via the app installation. Change the application scope to Global, then follow the process described below.