Configuring and Scheduling the Permissions Collection
Permissions can be analyzed to determine the application permissions of an out-of-the-box application, provided you have defined an identity store for File Access Manager to use in its analysis, and you have run a crawl for the application.
The permission collector is a software component responsible for analyzing the permissions in an application.
The Central Permission Collector Service is responsible for running the Permission Collector and Crawler tasks.
If the “File Access Manager Central Permission Collector” wasn’t installed during the installation of the server, this configuration setting will be disabled.
-
Open the edit screen of the required application.
-
Navigate to Admin > Applications.
-
Scroll through the list, or use the filter to find the application.
-
Click the edit icon
 on the line of the application.
-
-
Press Next till you reach the Crawler & Permissions Collection settings page.
The actual entry fields vary according to the application type.
When entering this page in edit mode, you can navigate between the various configuration windows using the Next and Back buttons.
Central Permissions Collection Service
Select a central permission collection service from the dropdown list. You can create permissions collection services as part of the service installation process. See section "Services Configuration" in the File Access Manager Administrator Guide for further details.
Calculate Effective Permissions
Calculate effective permissions during the permissions collection run.
Skip Identities Sync during Permission Collection
Skip identity synchronization before running permission collection tasks when the identity collector is common to different connector.
This option is checked by default.
Permissions Comments on Isilon for the CIFS server
The permissions are managed on the NTFS level, or on the Share Level (as when the shares are configured with Full Control to everyone, and all the permissions are defined in the folders, in which case you should select NTFS, which is the default.
Create a Schedule
Click on this option to view the schedule setting parameters.
Schedule Task Name
A name for this scheduling task
When creating a new schedule, the system generates a default name in the following format:
{appName} - {type} Scheduler
You can override or keep this name suggestion.
Schedule
Select a scheduling frequency from the dropdown menu.
-
Schedule Types and Intervals
Once
Single execution task runs.
Run After
Create dependency of tasks. The task starts running only upon successful completion of the first task.
Hourly
Set the start time.
Daily
Set the start date and time.
Weekly
Set the day(s) of the week on which to run.
Monthly
The start date defines the day of the month on which to run a task.
Quarterly
A monthly schedule with an interval of 3 months.
Half Yearly
A monthly schedule with an interval of 6 months.
Yearly
A monthly schedule with an interval of 12 months.
Date and time fields
Fill in the scheduling times. These fields differ, depending upon the scheduling frequency selected.
Active check box
Check this to activate the schedule.
Click Next.
To set or edit the Crawler configuration and scheduling
-
Open the edit screen of the required application.
-
Navigate to Admin > Applications.
-
Scroll through the list, or use the filter to find the application.
-
Click the edit icon
on the line of the application.
-
-
Press Next till you reach the Crawler & Permissions Collection settings page.
The actual entry fields vary according to the application type.
Calculate Resource Size
Determine when, or at what frequency, File Access Manager calculates the resources' size.
Select one of the following:
- Never
- Always
- Second crawl and on (This is the default)
Create a Schedule
Click to open the schedule panel. See Scheduling a Task
There are several options to set the crawl scope:
-
Setting explicit list of resources to include and / or exclude from the scan.
-
Creating a regex to define resources to exclude.
To set the paths to include or exclude in the crawl process for an application
-
Open the edit screen of the required application.
-
Navigate to Admin > Applications.
-
Scroll through the list, or use the filter to find the application.
-
Click the edit icon
on the line of the application.
-
-
Press Next till you reach the Crawler & Permissions Collection settings page.
The actual entry fields vary according to the application type.
- Scroll down to the Crawl configuration settings.
- Click Advanced Crawl Scope Configuration to open the scope configuration panel.
- Click Include / Exclude Resources to open the input fields.
- To add a resource to a list, type in the full path to include / exclude in the top field and click + to add it to the list.
- To remove a resource from a list, find the resource from the list, and click the x icon on the resource row.
When creating exclusion lists, excludes take precedence over includes.
To set filters of paths to exclude in the crawl process for an application using regex.
-
Open the edit screen of the required application.
-
Navigate to Admin > Applications.
-
Scroll through the list, or use the filter to find the application.
-
Click the edit icon
on the line of the application.
-
-
Press Next till you reach the Crawler & Permissions Collection settings page.
The actual entry fields vary according to the application type.
- Click Exclude Paths by Regex to open the configuration panel.
- Type in the paths to exclude by Regex, See regex examples in the section below. Since the system does not collect BRs that match this Regex, it also does not analyze them for permissions.
The following are examples of crawler Regex exclusions:
Exclude all shares which start with one or more shares names:
|
Starting with \\server_name\shareName Regex: |
|
Starting with \\server_name\shareName or \\server_name\OtherShareName Regex |
Include ONLY shares which start with one or more shares names:
|
Starting with \\server_name\shareName Regex
|
|
Starting with \\server_name\shareName or \\server_name\OtherShareName Regex |
Narrow down the selection:
|
Include ONLY the C$ drive shares: \\server_name\C$ Regex
|
|
Include ONLY one folder under a share: \\server\share\folderA Regex |
|
|
|
Include ONLY all administrative shares Regex: ^(?!\\\\server_name\\[a-zA-Z]\$($|)).* |
To write a backslash or a Dollar sign, add a backslash before it as an escape character.
To add a condition in a single command, use a pipe character “|” .
Use the top level exclusion screen to select top level roots to exclude from the crawl. This setting is done per application.
To exclude top level resources from the crawl process
-
Open the application screen
Admin > Applications
-
Find the application to configure and click the drop down menu on the application line. Select Exclude Top Level Resources to open the configuration panel.
-
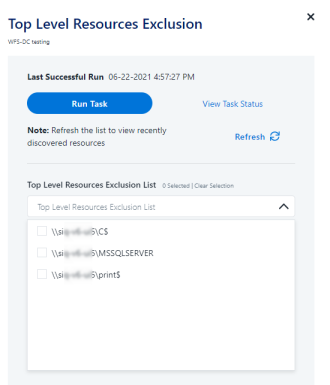
Run Task
The Run Task button triggers a task that runs a short detection scan to detect the current top level resources.
Before running the task for the first time, the message above this button is:
"Note: Run task to detect the top-level resources"
If the top level resource list has changed in the application while yo u are on this screen, press this button to retrieve the updated structure.
Once triggered, you can see the task status in
Settings > Task Management > Tasks
This will only work if the user has access to the task page
When the task has completed, press Refresh to update the page with the list of top level resources.
-
Click the top level resource list, and select top level resources to exclude.
- Click Save to save the change.
- To refresh the list of top level resources, run the task again. Running the task will not clear the list of top level resources to exclude.
If you need to support long file paths above 4,000 characters for the crawl, set the flag
excludeVeryLongResourcePaths
in the Permission Collection Engine App.config file to true.
By default this value will be commented out and set to false.
This key ensures, when enabled, that paths longer than 4000 characters are excluded from the applications’ resource discovery (Crawl), to avoid issues while storing them in the SQLServer database.
When enabled, business resources with full paths longer than 4000 characters, and everything included in the hierarchical structure below them, will be excluded from the crawl, and will not be collected by File Access Manager. This scenario is extremely rare.
You should not enable exclusion of long paths, unless you experience an issue.
Background
File Access Manager uses a hashing mechanism to create a unique identifier for each business resource stored in the File Access Manager database. The hashing mechanism in SQLServer versions 2014 and earlier, is unable to process (hash) values with 4,000 or more characters.
Though resources with paths of 4000 characters or longer are extremely rare, File Access Manager is designed to handle that limitation.
Identifying the Problem
When using an SQL Server database version 2014 and ealier
The following error message in the Permission Collection Engine log file:
System.Data.SqlClient.SqlException (0x80131904): String or binary data would be truncated.
In all other cases, this feature should not be enabled.
Setting the Long Resource Path Key
The Permission Collection Engine App.config file is RoleAnalyticsServiceHost.exe.config, and can be found in the folder
%SailPoint_Home%\FileAccessManager\[Permission Collection instance]\
Search for the key excludeVeryLongResourcePaths and correct it as described above.