JWT
Configure JWT authentication to complete the connection setup.
Note
The linked documents on this page are not maintained by SailPoint and are subject to change without notice.
Userpass
-
Do the following in the HashiCorp Vault (Cloud) server to configure JWT authentication:
-
Enable JWT authentication using the HashiCorp API. For more information, refer to JWT/OIDC auth method (API) in the HashiCorp documentation.
Provide the following while enabling JWT:
-
jwt_validation_pubkeys– Public key required for JWT -
bound_issuer– Required issuer value -
jwt_supported_algs–RS256Note
RS256 is the only supported algorithm.
-
-
Create a Role for JWT authentication using the HashiCorp API. For more information, refer to the Create/Update role in the HashiCorp documentation.
Provide the following values while configuring the Role:
-
bound_subject– Required subject value for authentication -
user_claim– Requireduserclaim -
bound_audiences– Required value for theaudclaim -
role_type–JWT -
policies– Provide required policies to fetch the secrets
-
-
-
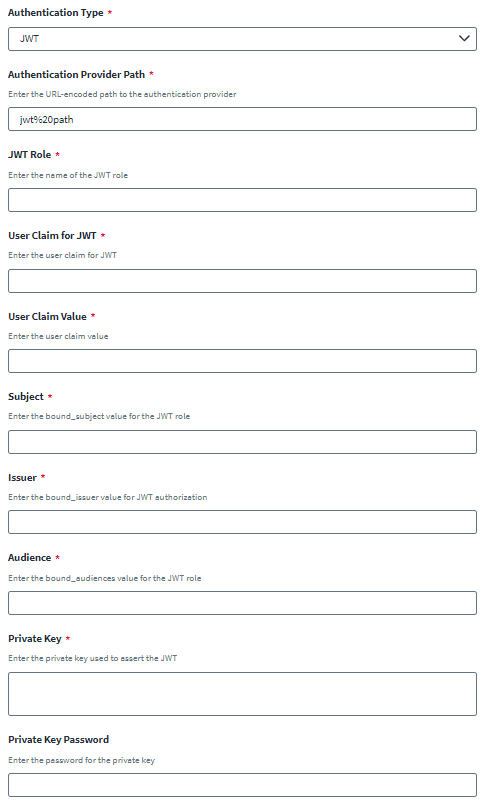
In SailPoint, enter the configuration parameters to use HashiCorp JWT authentication.
-
Enter the URL-encoded Authentication Provider Path used to authenticate with the HashiCorp Vault (Cloud) secret server.
Important
Don't encode the last slash (/) in your Authentication Provider path. For example, if your Authentication Provider path isxyz/pqr abcd/, then encode onlyxyz/pqr abcd.Tip
Use urlencoder.org to encode your URL attributes. -
Enter the name of the JWT Role.
-
Enter the User Claim for JWT.
-
Enter the User Claim Value.
-
In the Subject field, enter
bound_subjectvalue for the JWT Role. -
In the Issuer field, enter the
bound_issuervalue for JWT authorization. -
In the Audience field, enter the
bound_audiencesvalue for the JWT Role. -
Enter the Private Key used to assert the JWT.
Note
The private key should be in standard PKCS #1 format. Currently, SailPoint doesn't support private keys in PKCS #8 format. -
Enter the Private Key Password.
Note
This is only required if the private key is encrypted with a passphrase.
-
-
Select Save.